Find the very best layout to display your photography with our guide on the themes and colour schemes available with Picfair Stores
What are the layout options for Picfair Stores?
As part of the Picfair Stores feature package, you have various layout options to display images in your store, along with a light, dark, or bespoke colour scheme. All of which has been designed so you can craft the look of your store to your liking, and your images will look their very best.
.png)
Why should I carefully consider the layout of your Picfair Store?
Choosing a layout for your Picfair Store that suits your photography is crucial because it directly impacts how your images are presented and experienced by visitors.
A good layout and colour scheme can enhance the visual impact of your photos, provide a logical navigation flow, and create a harmonious composition that showcases your work effectively. A well-thought-out layout can elevate the overall user experience, draw attention to your best shots, and convey your unique style and artistic vision.
.png)
How to configure the layout and colour scheme of your Picfair Store
There are several options available to you for how you can layout your store, and it's easy to try different settings and find what works best for you!
You can customise the layout of your Picfair Store all in one place. Go to “STORE SETTINGS” > “THEME AND LAYOUT”. Here you can do all of the configurations.
.png)
First, let’s look at the Theme, where you’ve got three options—Light, Dark and Custom.
The Light and Dark themes are pretty self-explanatory; your images will either be displayed on a white background with black text or a black background with white text. See these examples below:
Light theme
.png)
%20(1).png)
Dark theme
.png)

Custom theme (choose your own colours)
If selecting Custom, you’ve got more options available you, where you can choose a bespoke text colour for your store, as well as a bespoke background colour. You can use the use the colour dropper to select the colours of both the text and background, or enter a hex code.
%20(1).png)
%20(1).png)
Custom theme (pre-set colours)
You’ll also see some preset combinations of colours–we've made these available as we know they work well for displaying photography.
.png)
%20(1).png)
Remember to "Save Changes" once you've finished with your theme settings.

We strongly recommend you experiment with the colour scheme for your store, and it may take a few attempts to get the best colour combination that works for your photography.
Ten top tips for choosing a colour theme that works for your photography store:
1 Consider the mood and style: Choose colours that align with your desired look and feel.
2 Let the photos guide you: Draw inspiration from the colours in your photographs.
3 Start with a neutral base: Use neutral colours as a background to highlight your photos.
4 Use color psychology: Select colours that evoke the desired emotions and associations.
5 Limit the number of colors: Keep your colour scheme simple and cohesive.
6 Ensure readability: Make sure the text is easy to read by choosing appropriate colour contrasts.
7 Test for accessibility: Check if your colours meet accessibility standards.
8 Look for inspiration: Explore other photography websites and portfolios.
9 Use colour harmonies: Experiment with different colour combinations.
10 Get feedback: Seek input from others to refine your colour scheme.
Remember, the ultimate goal is to create a colour scheme that enhances your photography, engages visitors, and reflects your artistic vision.
Once again configuring the layout is all done in “STORE SETTINGS” > “THEME AND LAYOUT”.
For the Layout, which is how your images are displayed on your store, you have four options; Rows, Full screen, Square, Custom which you can select from.
Rows
Your images will be displayed un-cropped and set in rows.
.png)
%20(1).png)
Full screen
Your images will be displayed un-cropped and full screen width.
.png)
.png)
Square
Your images will be displayed as a square crop and set in a predefined grid.
.png)
.png)
Custom
This is where you can select a square or un-cropped display, and adjust the vertical and horizontal spacing between images.
This option is ideal for photographs who want more control over how their images are displayed, and you can see below how much difference the spacing can make:
.png)
%20(1).png)
.png)
%20(1).png)
If you're using a custom layout we strongly recommend trying out different types of spacing for your images to see what works for you.
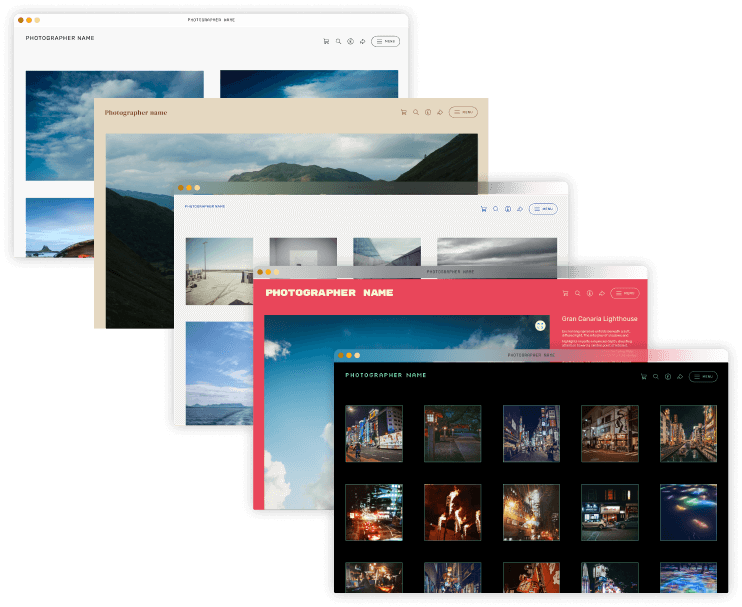
Some beautiful examples of different store layouts
.png)
.png)
.png)
.png)
.png)
.png)
.png)