


I tried out Picfair’s Retro Preset package on images from a recent trip to Lanzarote. These are the results, and some top tips and inspiration for enhancing your own images using presets too…

Contents:
- How I used Picfair's presets to get a retro look
- What are presets, and why use them?
- How to start using presets if you’re new to them
- How to choose the best preset for your photos
- Finding the best preset for my Lanzarote series
- Adapting the preset look with the slider
- Completing the series with the 35mm Compact Preset
- Final thoughts and next steps
Picfair’s Free presets:
Get 30+ new looks for your images effortlessly with Picfair's FREE Adobe presets Retro, Film Stock & Classic.
Download Picfair’s presets.
How I used Picfair's Presets to get a retro look for my photos

I wanted to do something special with images I had taken on a recent trip to Lanzarote, Canary Islands. That being, I wanted to give them a nostalgic, vintage holiday aesthetic - which is really quite trendy right now - and I thought Picfair’s free Retro presets for Lightroom and Photoshop could be perfect for the job. So, I decided to try them out to see if I could achieve the look I was going for with the series...
You can see the results below, which I must say I'm really pleased with. Read on, and you can learn how I got the aesthetic for my Lanzarote image series in this guide using the presets in Lightroom, from testing the different looks to tweaking the preset effect to get the optimal look, which I hope inspires you to try presets, too!
First of all, what are presets and why use them?
If you’re entirely new to presets and unsure what they are, a preset is a pre-made selection of edits for your images that you can apply to your photos in editing software like Lightroom and Photoshop. For the purpose of this guide I worked in Lightroom desktop, but presets work perfectly well in Lightroom for Mobile too, if you prefer editing images on your smartphone.
A significant advantage of presets is that you can use them to give your photos a stunning, stylised look, and generally you don’t need any editing experience to use them.
Presets are also super handy for creating a consistent style across your work. So if you’re putting together a photo series, you can use a preset to edit all the images in the series; they’ll have the same look throughout, and as photographers, we know that creating a coherent style is beneficial for many reasons.
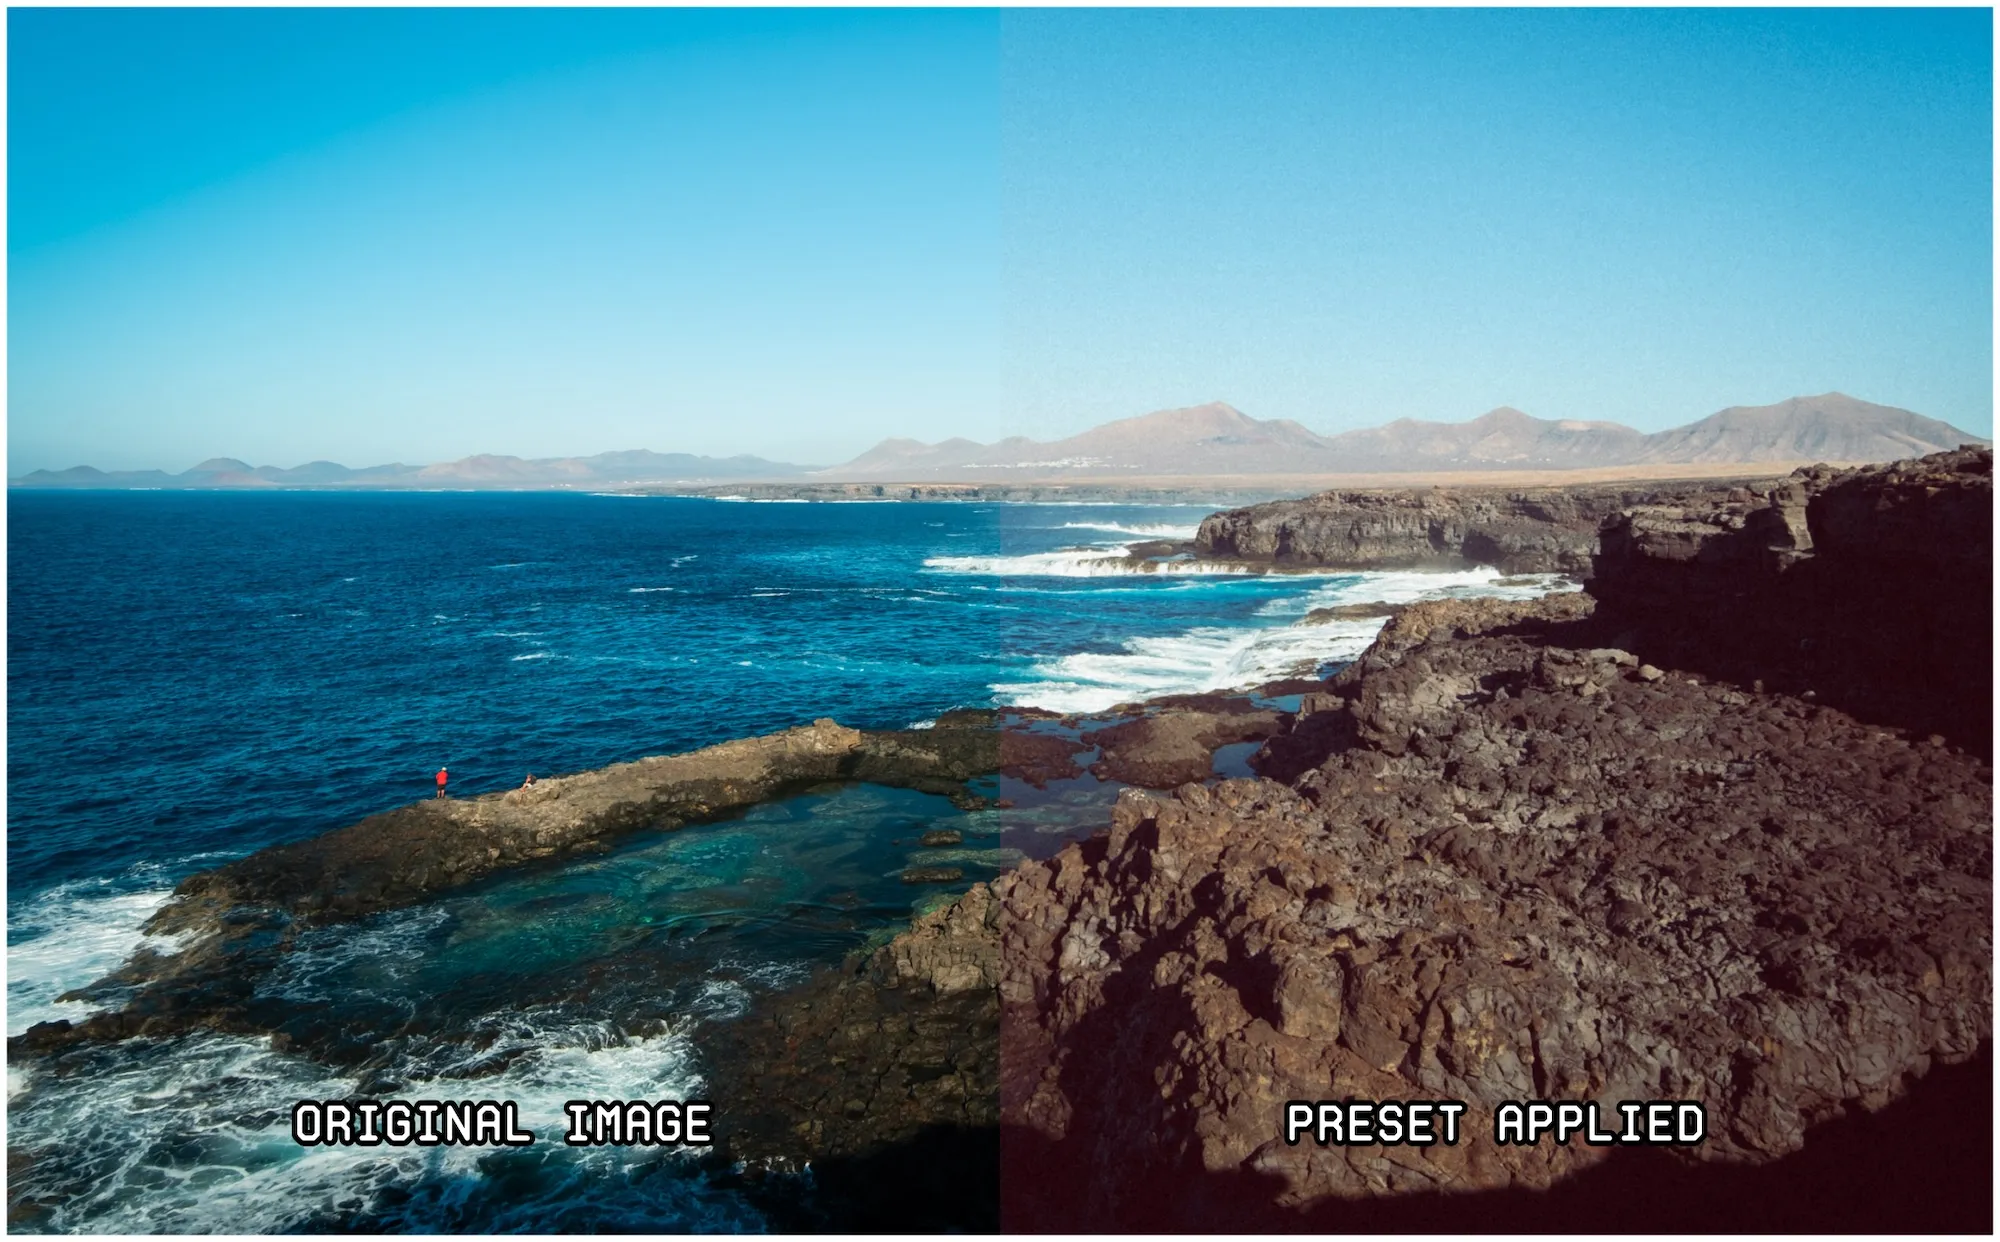
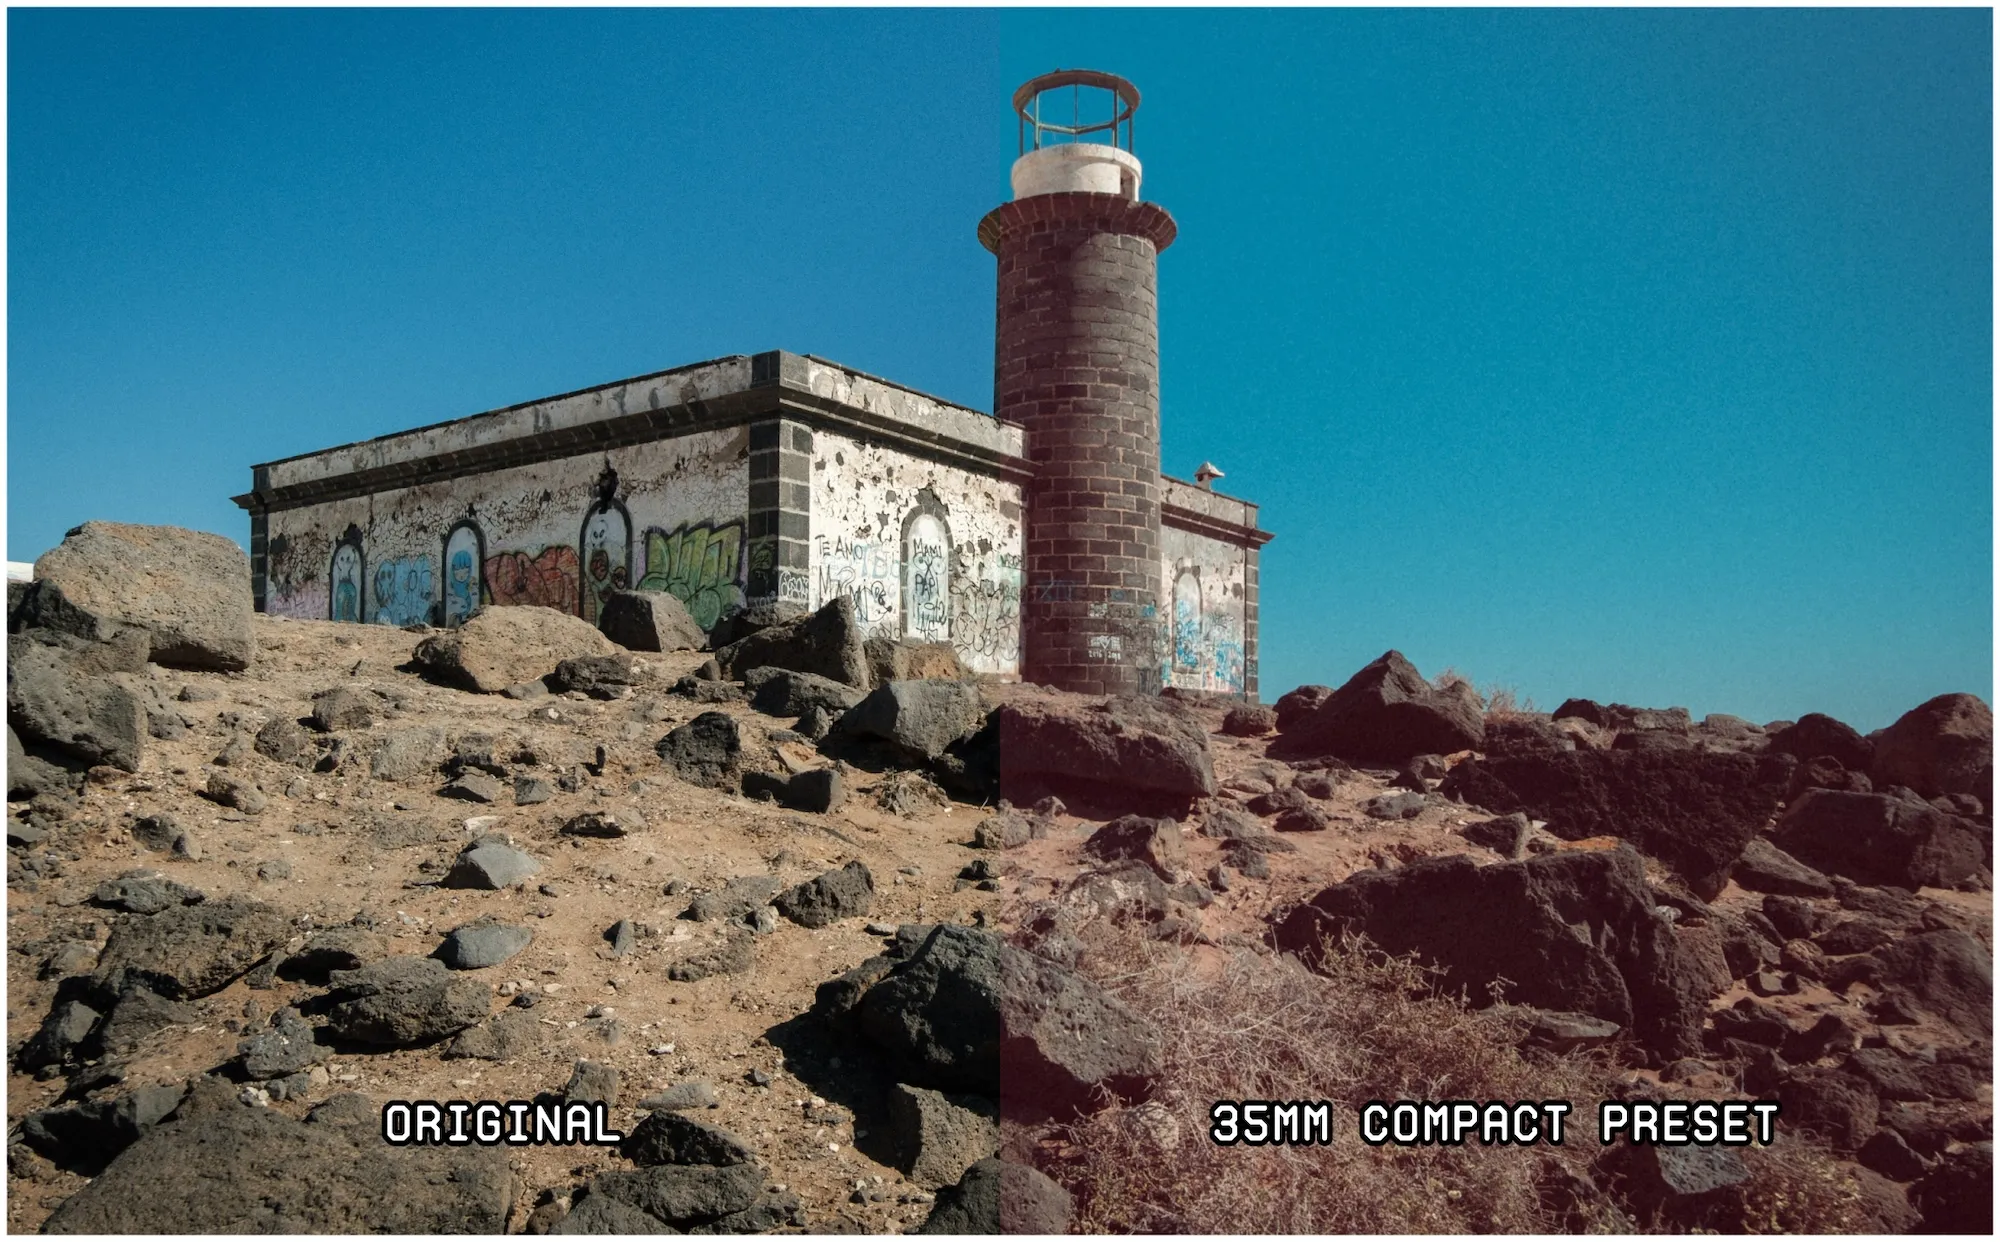
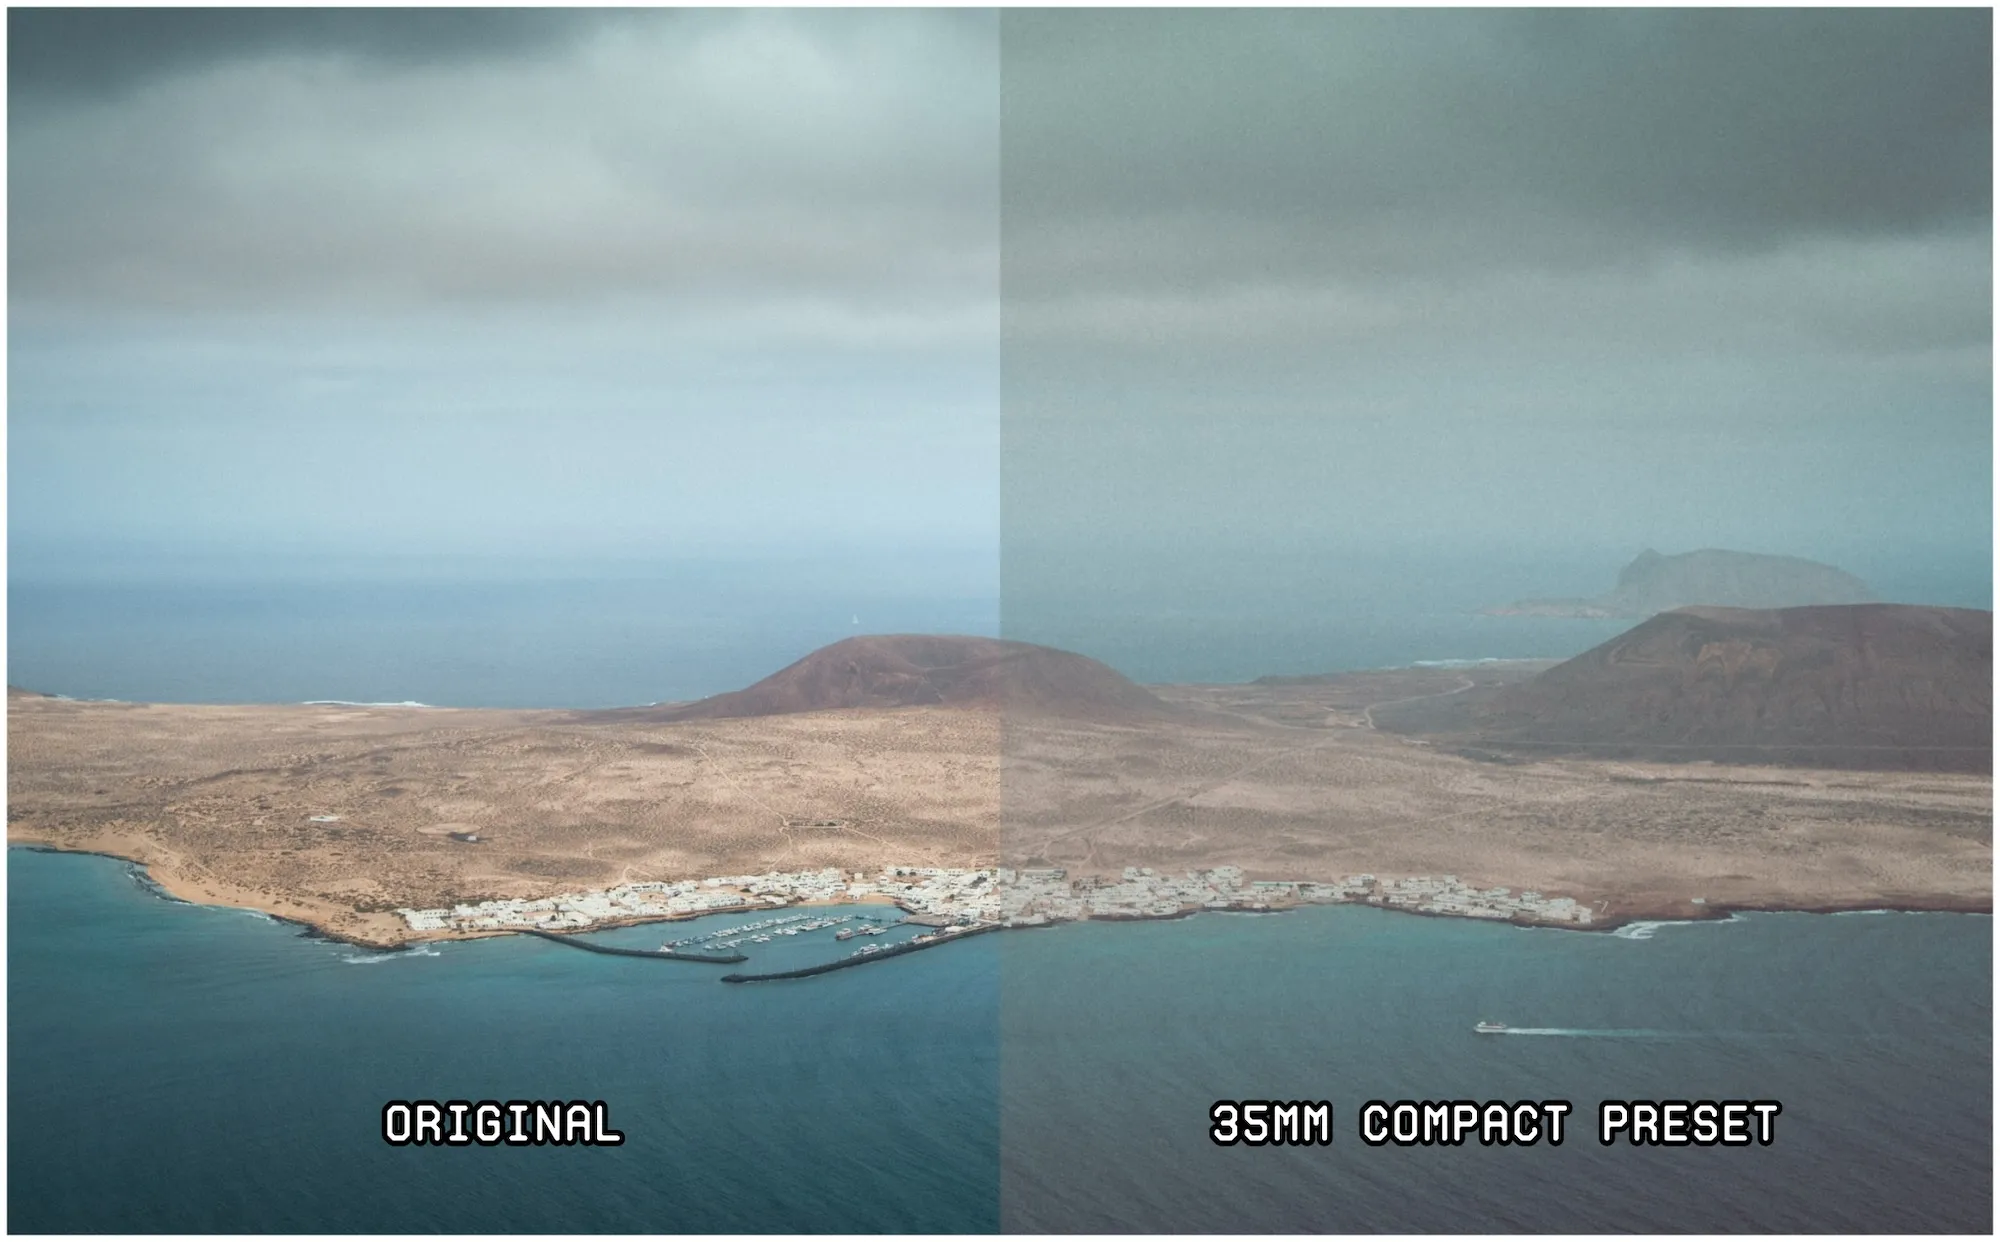
Here's a before/ after example of an image from my Lanzarote series with a preset applied, in this case it's Picfair's 35mm Compact Preset (which you can read more about later in this guide):
I only really discovered presets a few years ago, even though I've been doing photography for over ten years, and it changed everything about how I process and edit my images in Lightroom.
From experience, you'll find it exciting when you first start using presets because you see your pictures transformed immediately. And, as mentioned, if you're not a photo editing expert (which I certainly am not, and I know many photographers aren't either), they're the perfect way to give your images a striking aesthetic without spending hours in post-production.
The beauty of presets, too, is that they allow you to experiment with different looks and styles for your pictures with a single click in Lightroom. Testing different styles and looks on your images is a fantastic way to get creative with your work, and will help you build your signature style over time.
Top tip:
Lightroom Presets typically come in the form of packages that you can download, so, for example, on Picfair, we have three sets containing ten presets each, all based on a different theme. You can download them on our presets page.
Often, as well as selling images, photographers will create their own presets and then sell them too, as an additional part of their business offering. Another excellent way of creating additional revenue from your photography business.
"I only really discovered presets a few years ago... and it changed everything about how I process and edit my images in Lightroom."
How to use presets if you’re new to them
Choose some images
If you're looking for somewhere to start using presets, the best thing to do (before you load your presets), is group some images together that you want to work with. You may have gone on a recent trip or are working on a particular photo series, or you may have a group of images or a few pictures you like and want to try a new look with them… all of these are ideal situations for trying out presets.
I spent a reasonable amount of time looking through all of my images from Lanzarote in Lightroom, and selected the pictures I wanted in my series first. Then, I put each image into a Collection (a great way to organise your pictures in Lightroom) that I named for ease - ‘Lanzarote Final Edit’ - grouping them all together in one place.
To create a Collection in Lightroom, go to the Library Module and navigate to the Collections Panel on the left. Here, click the + icon to create a new Collection, screenshot below:

Importing presets
Once you've got your images grouped together in a Collection, this is where you can start having some fun with presets. Load in your presets to Lightroom if you haven't already; for Lightroom (desktop), head to the Presets Panel, click the flyout menu and choose ‘Import Presets’. For how to import presets in Lightroom for Mobile, see instructions here.
Top tip:
Don’t just use presets for your latest images.
Try out presets with older pictures or those you might have overlooked; they can transform otherwise forgotten-about photos, and could become some of your new favourite shots!
You can get a lot of satisfaction from returning to your image archive and working on old photos, giving them a new look. Take a look at my guide about revisiting your photo archive for more inspiration.
How to choose the best preset for your photos
In a word, experiment!
Finding the best preset for your photos is all about trying many different preset styles and working out which ones you like the best. And a lot of what you like will come down to personal preference and precisely what you're trying to achieve with the look of your images. For me, I'm pretty into vintage and retro aesthetics right now (hence why I'm using the retro presets), but whatever type of look you're after, you'll no doubt find presets that fit.
Remember to make any initial edits before applying the presets. If your images need light or any contrast adjustments, etc, you should make those edits before applying the preset so you're getting the optimum output for your photo. However, you might also need to make some smaller individual adjustments to your images after you've applied a preset too, in order to fine tune your images so they look their very best.
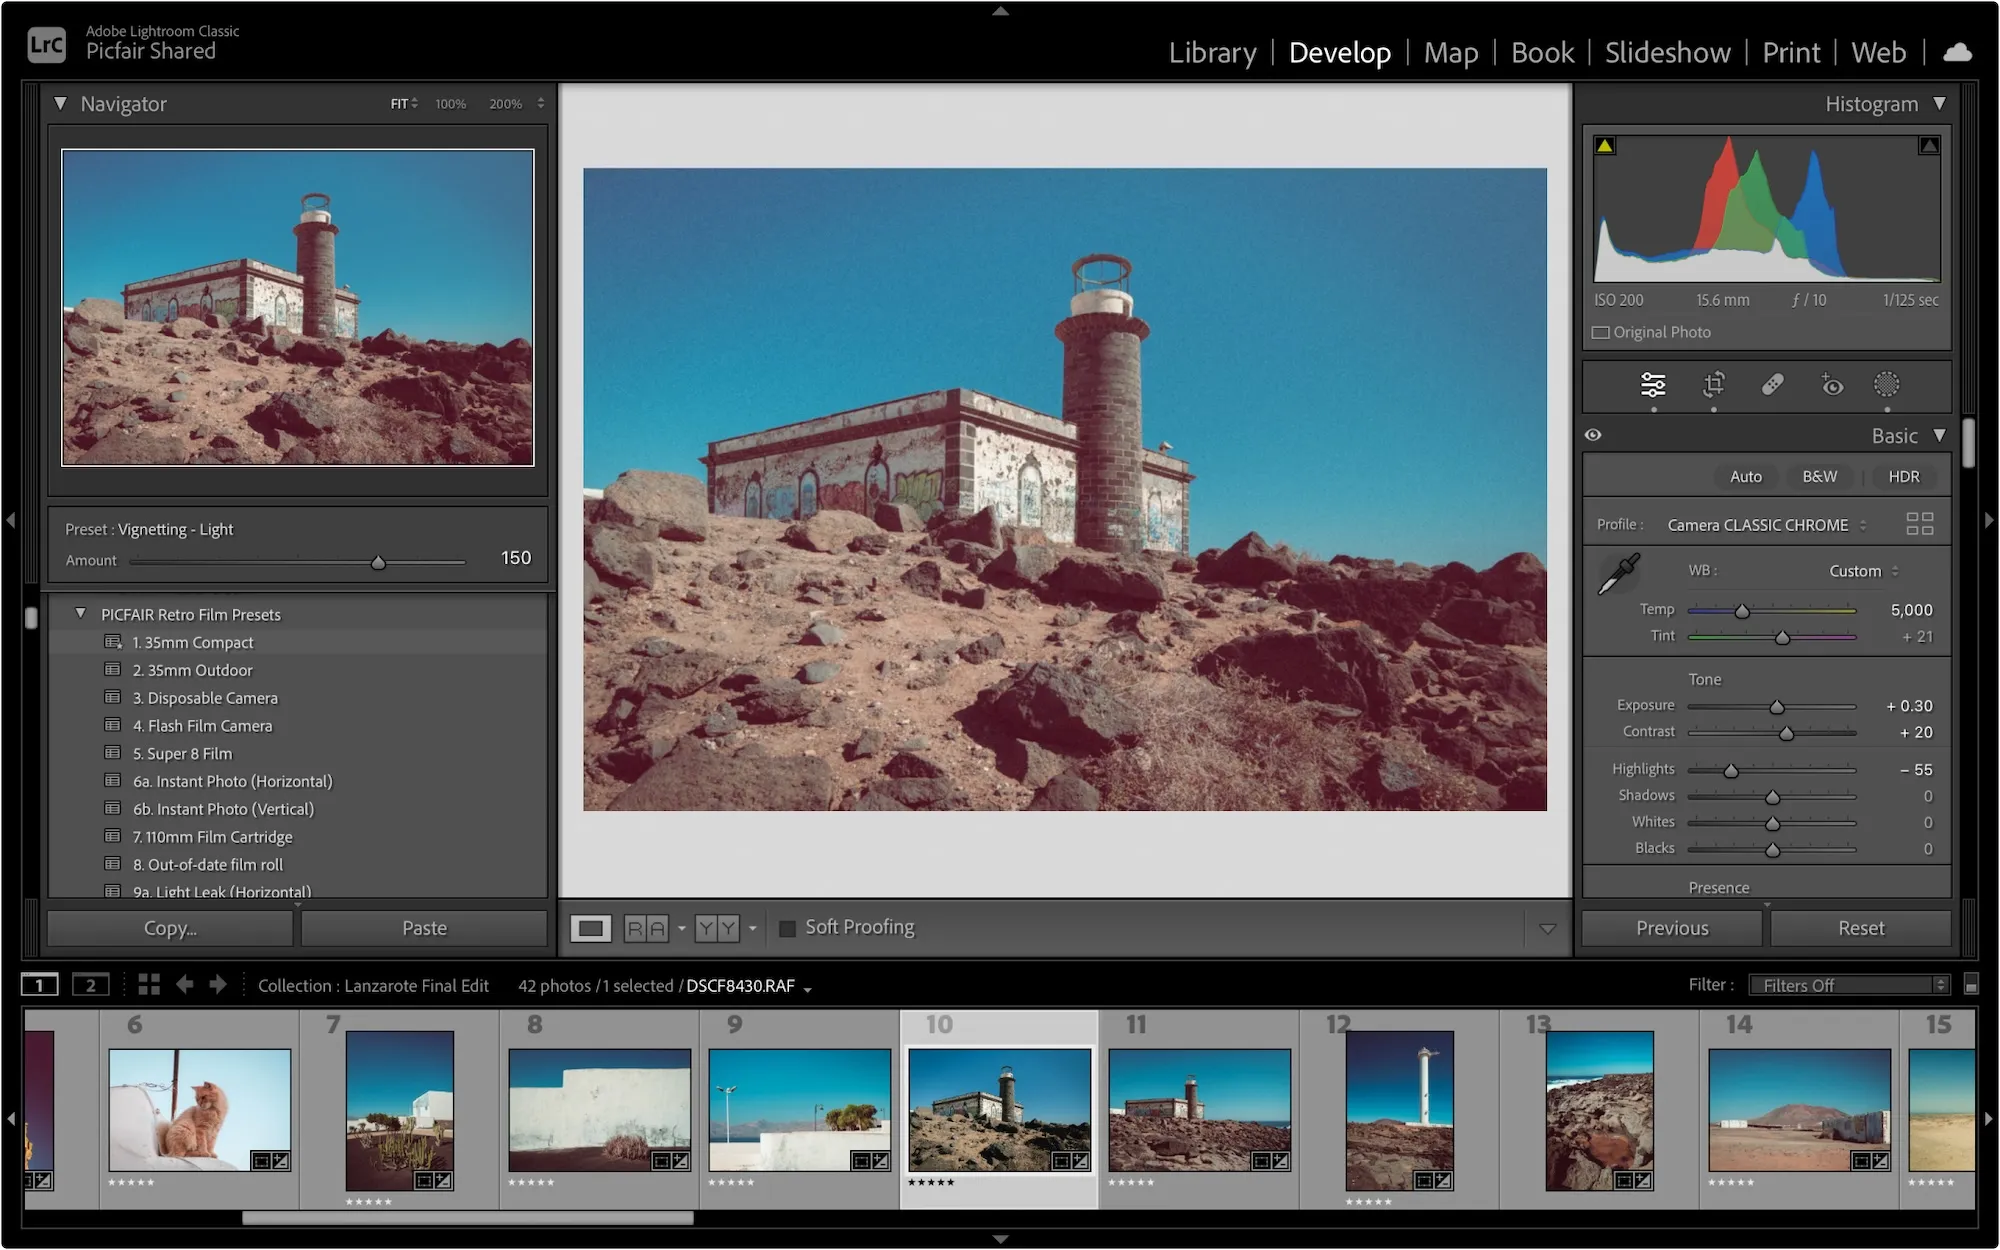
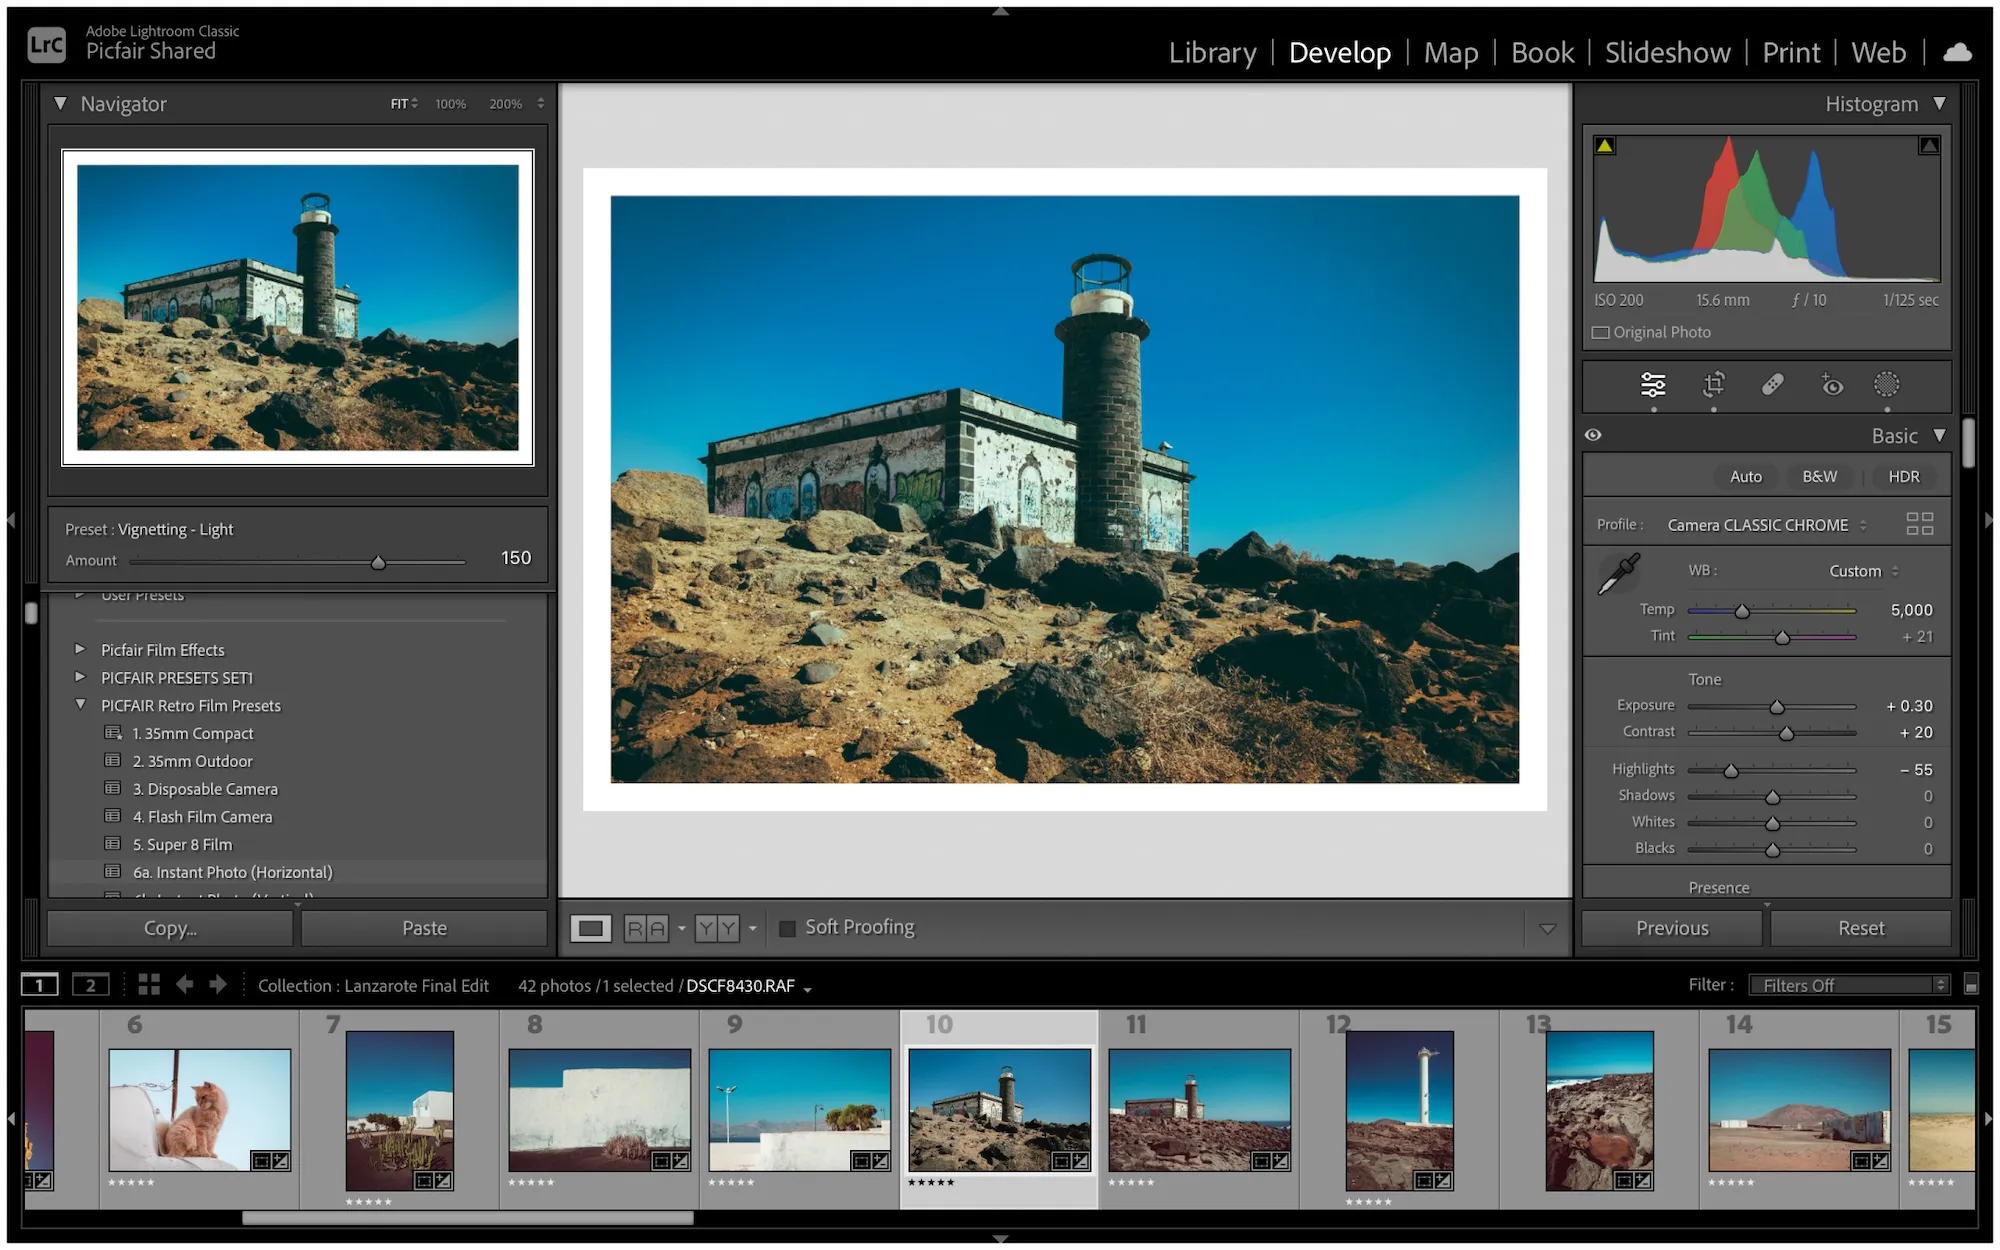
To experiment with the different presets once you load them into Lightroom. You can hover over the presets in the Preset Panel, which I did with my Lanzarote pics (see below), to preview them and see how they look with the image, and then click on the preset that you want to apply. You can also try out small sets of images with different presets to see what looks best and decide which one you want to use for your final edit.
Finding the best preset for my Lanzarote series
Using the method discussed above, I tried out all the different looks available with the Picfair Retro Preset package for my Lanzarote images. To try find the style that resonated with my images, and the look that I was going for the most. Here are some of my tests with the different presets and some reasons why some of the looks weren't suitable:
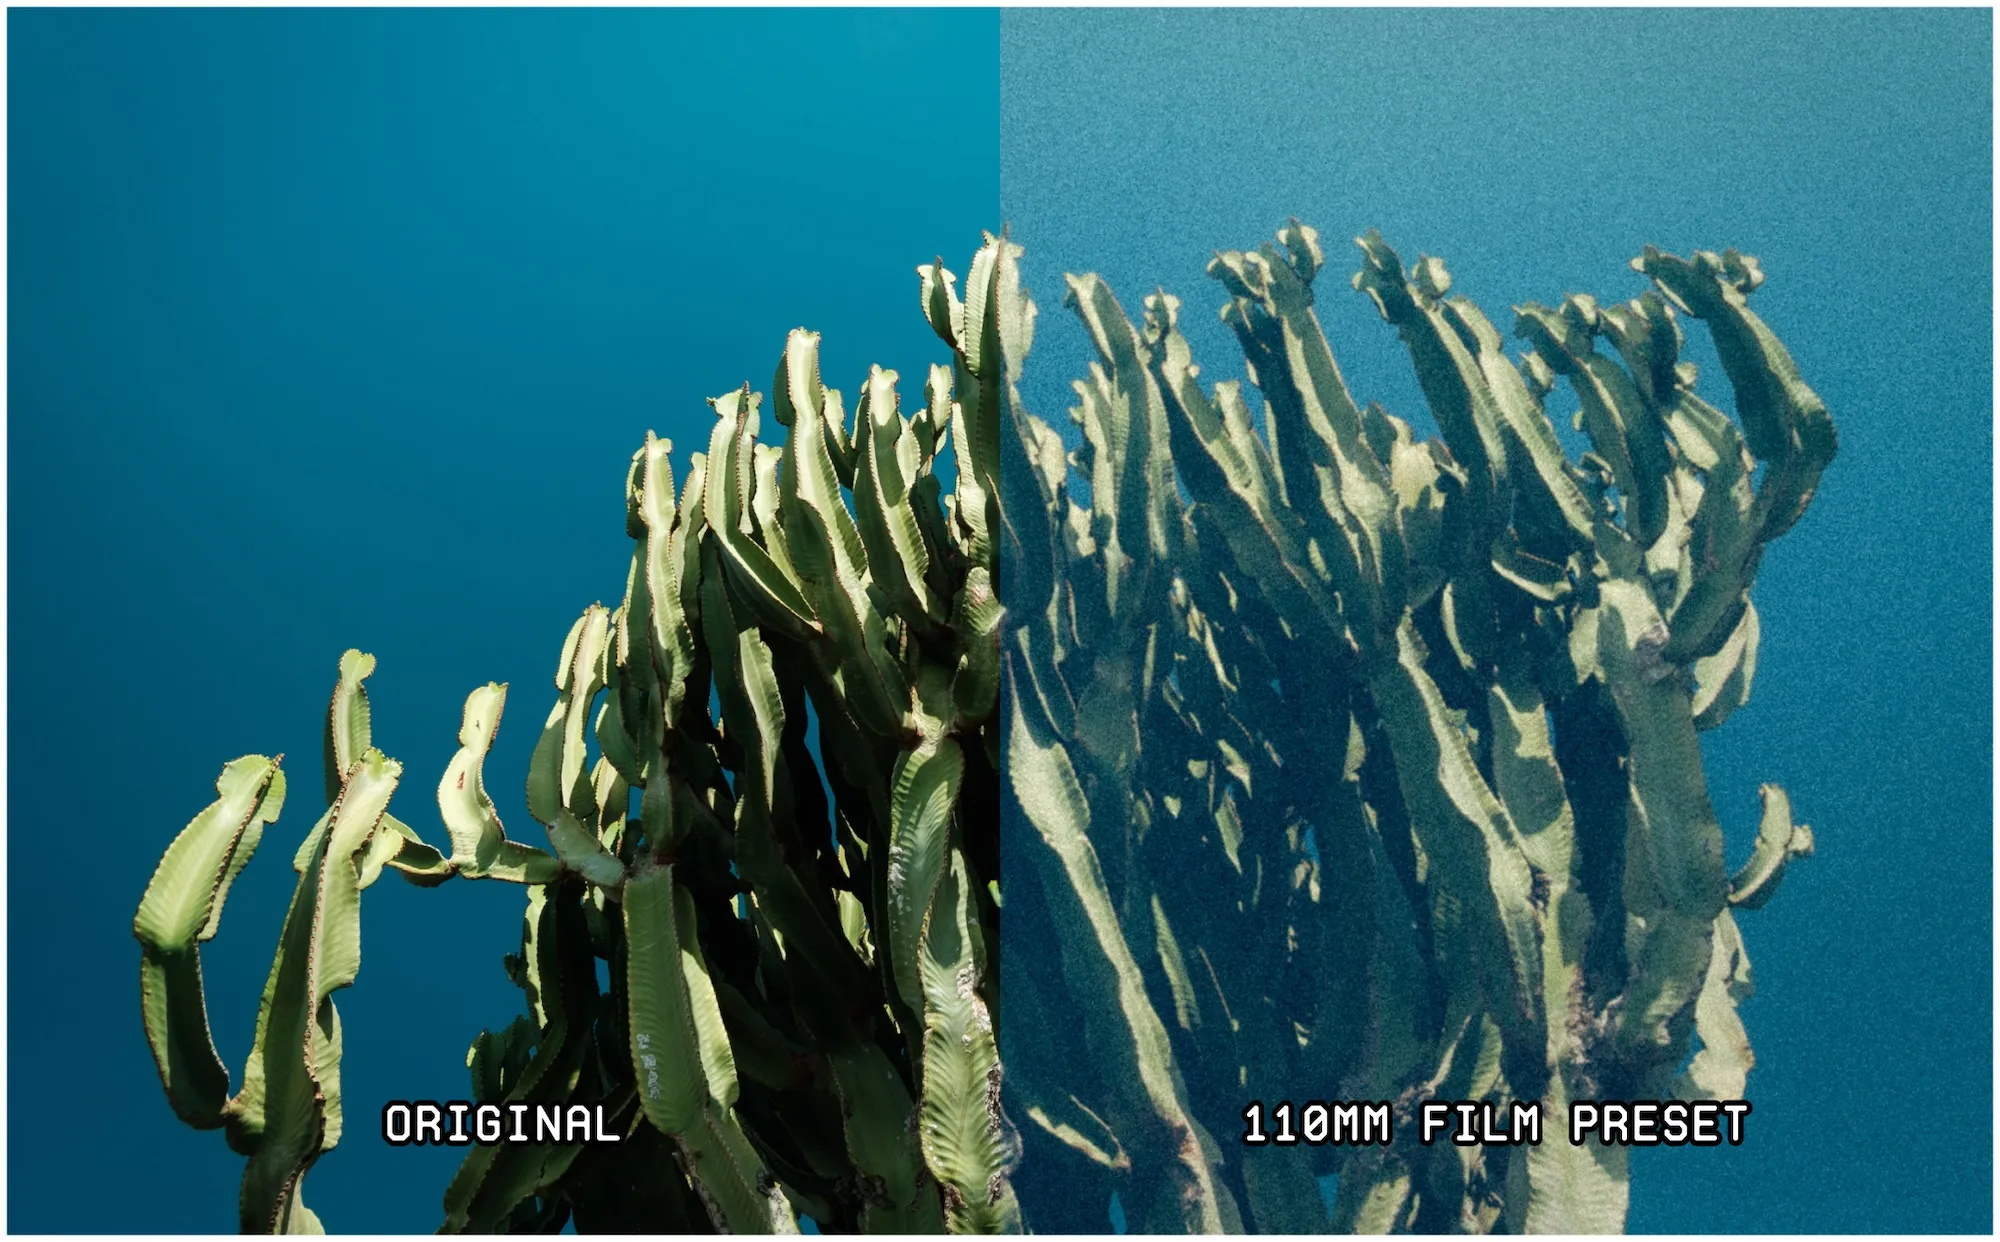
110 Film Cartridge:
I love the faded colours with this preset, but I want the blues in my images to stand out a bit more.
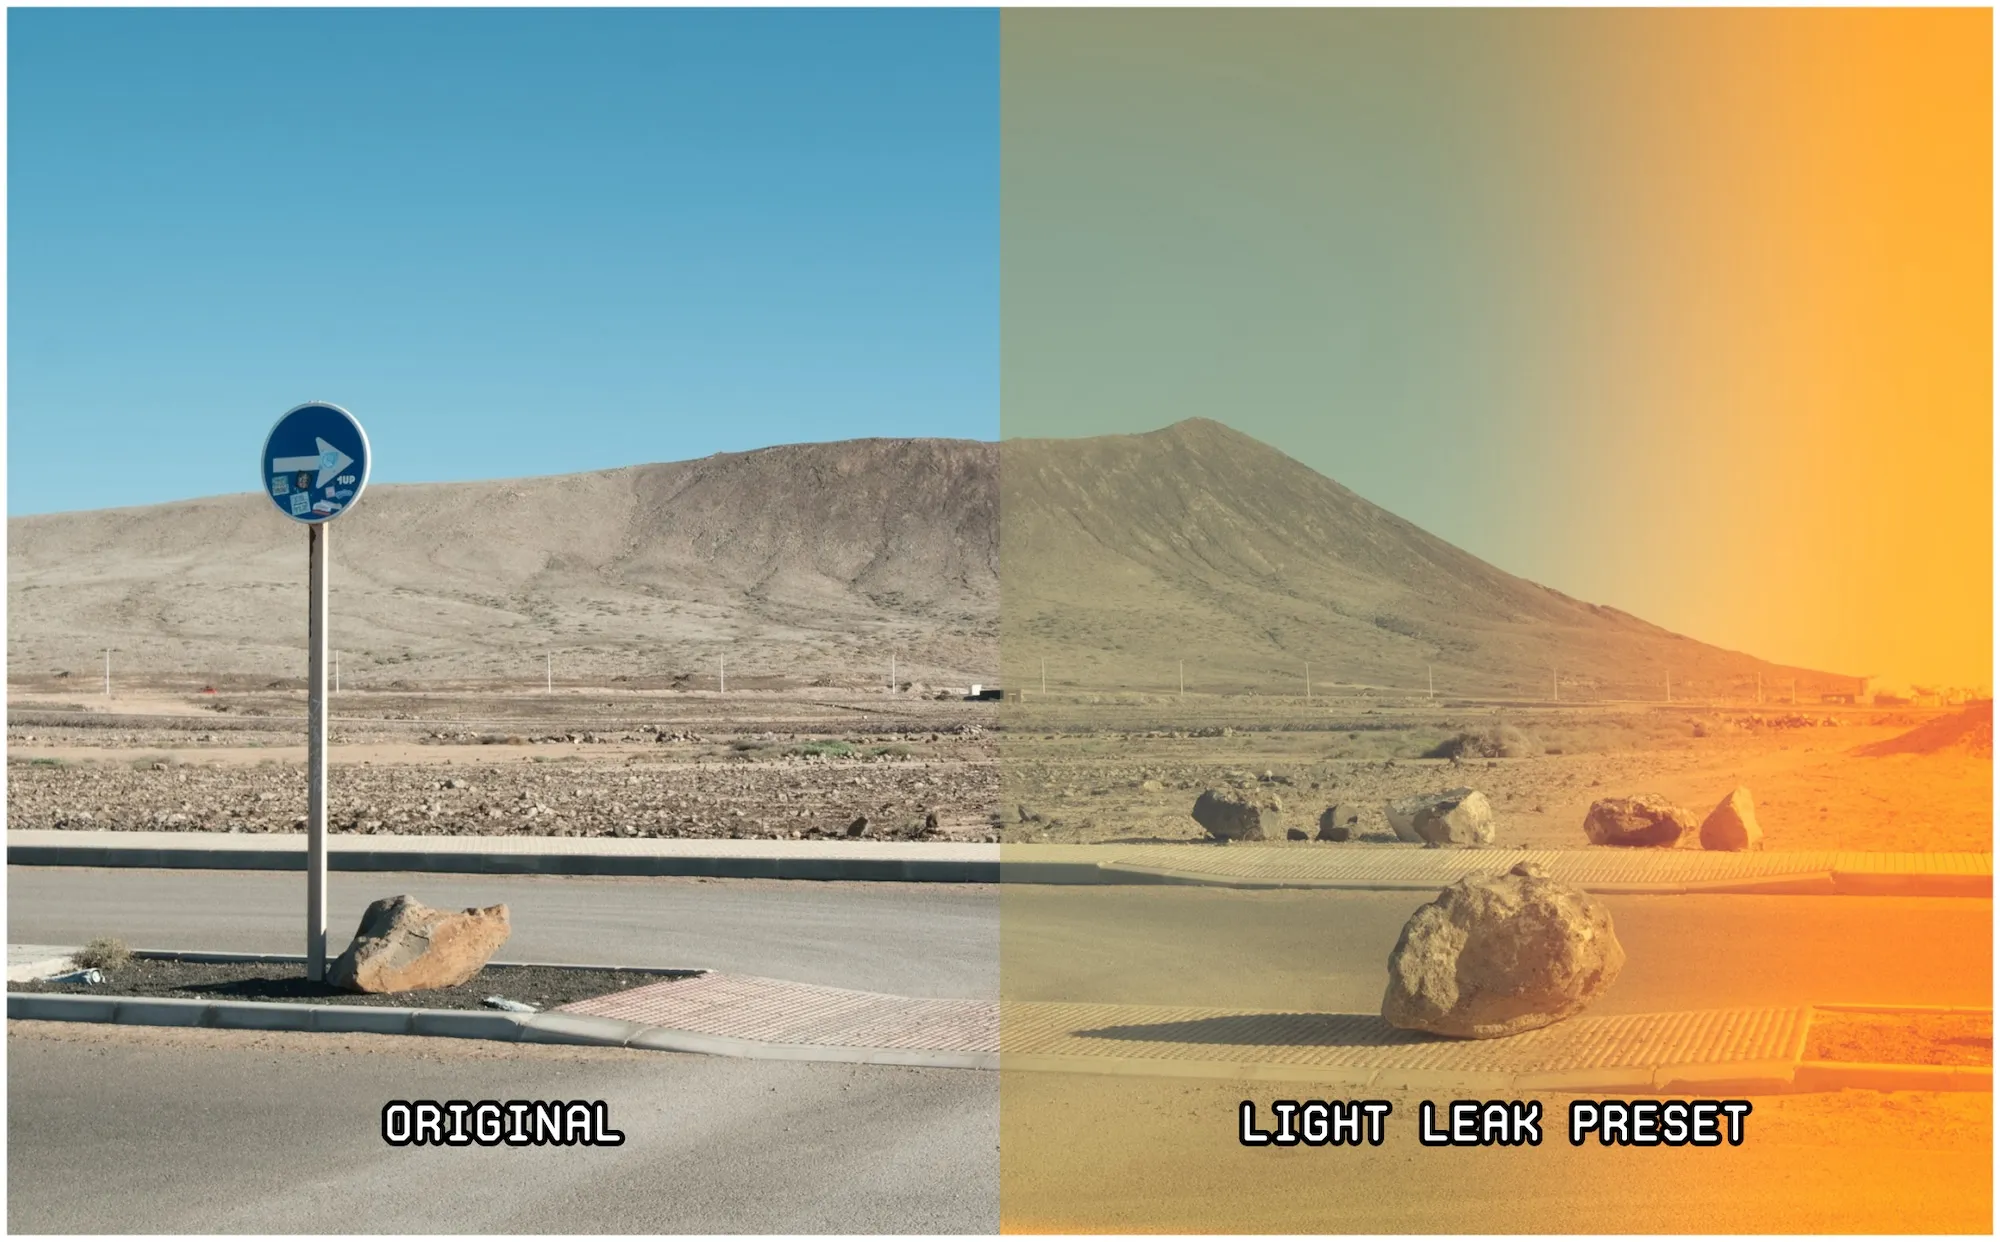
Light Leaks:
While I love this preset for the dramatic effect it gives, it wouldn't be suitable to apply to all images in the series - too distracting.
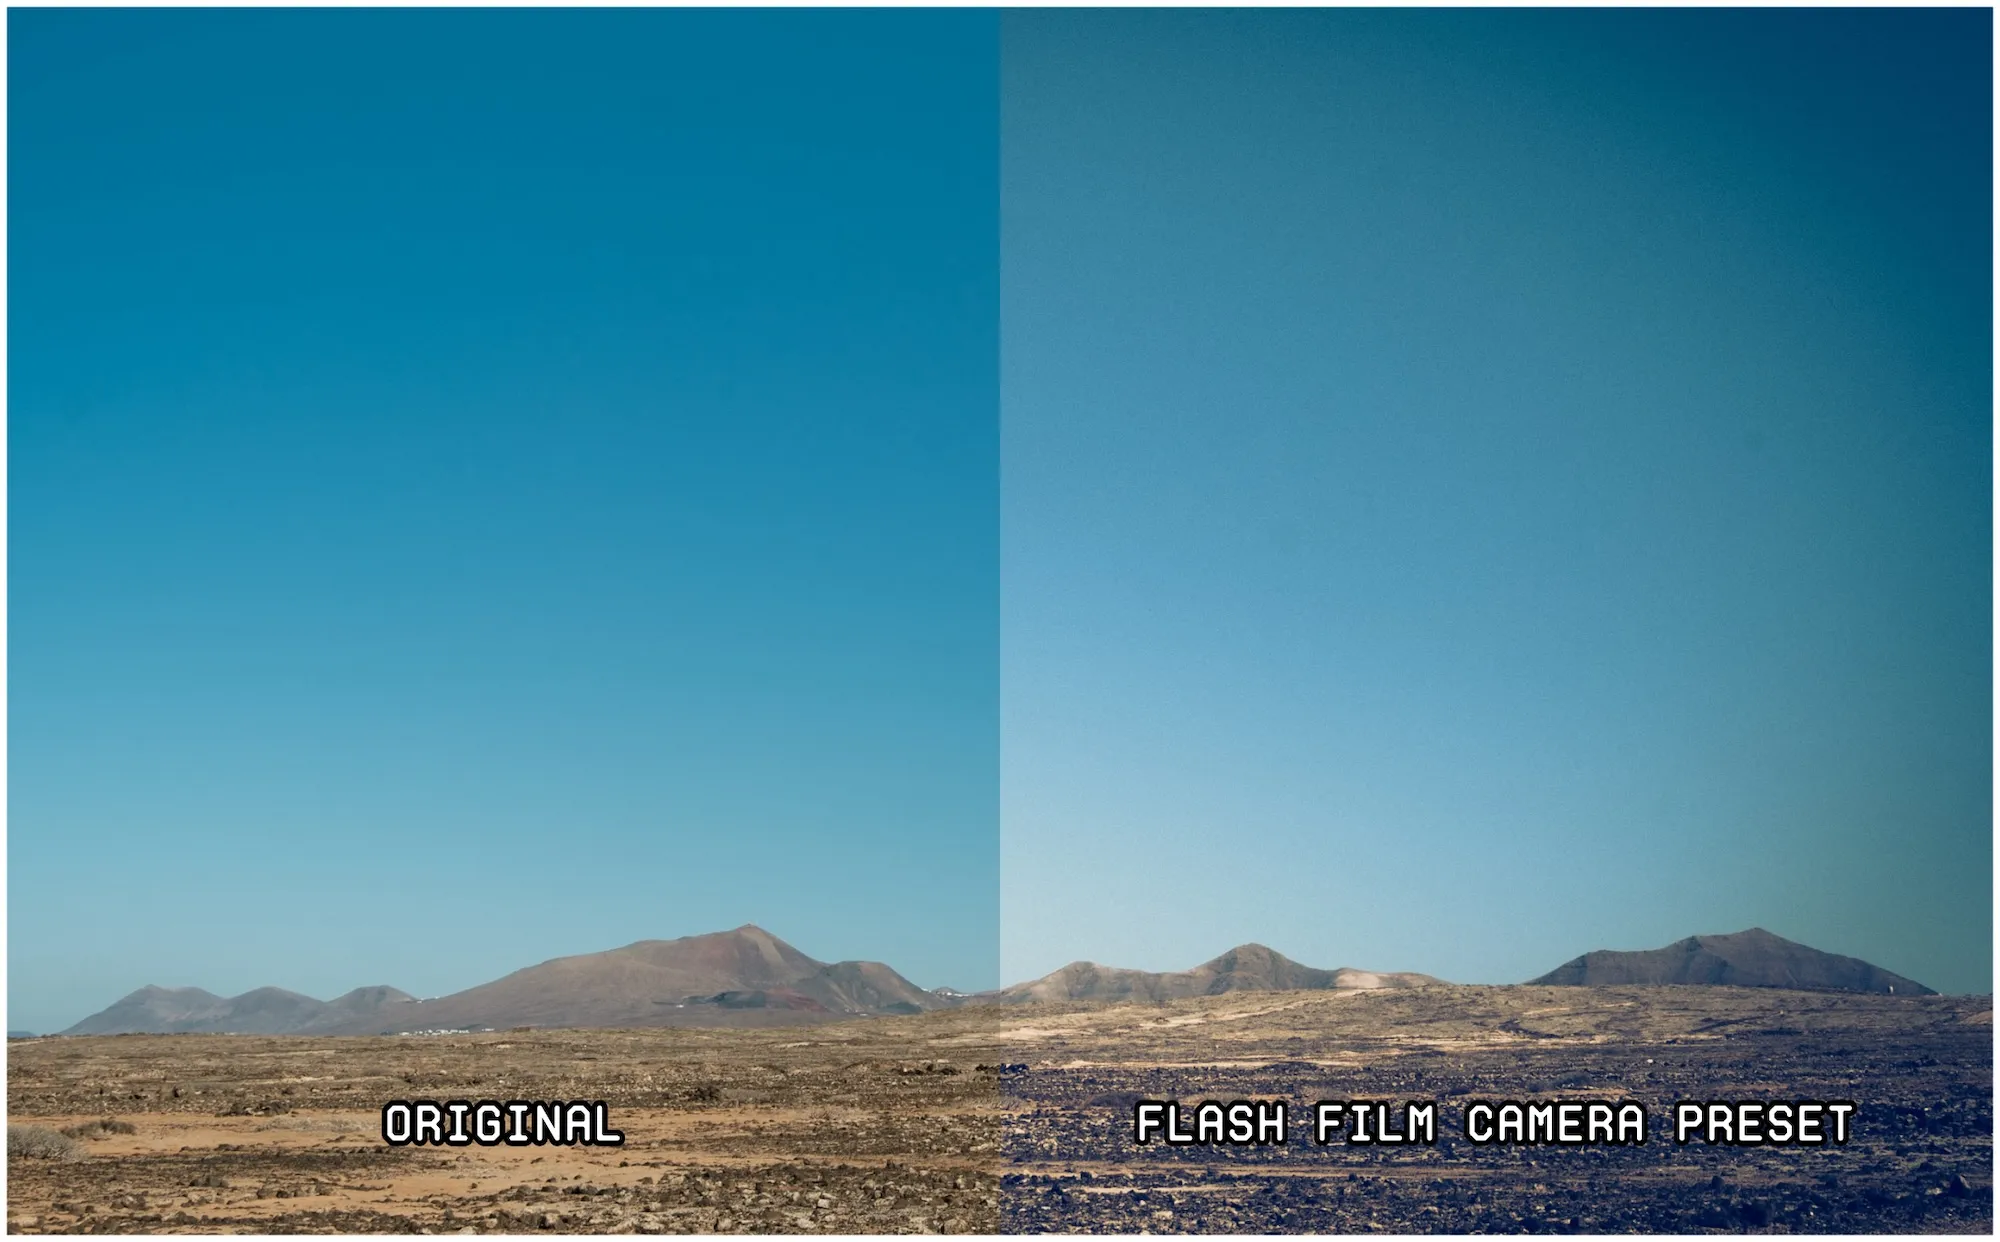
Flash Film Camera:
I think for outdoor images, while it gives some dramatic effect, it isn't suitable for images with deep blue skies.
Disposable Camera:
This one was a strong contender, but I didn't want to add too strong a colour cast to my images.

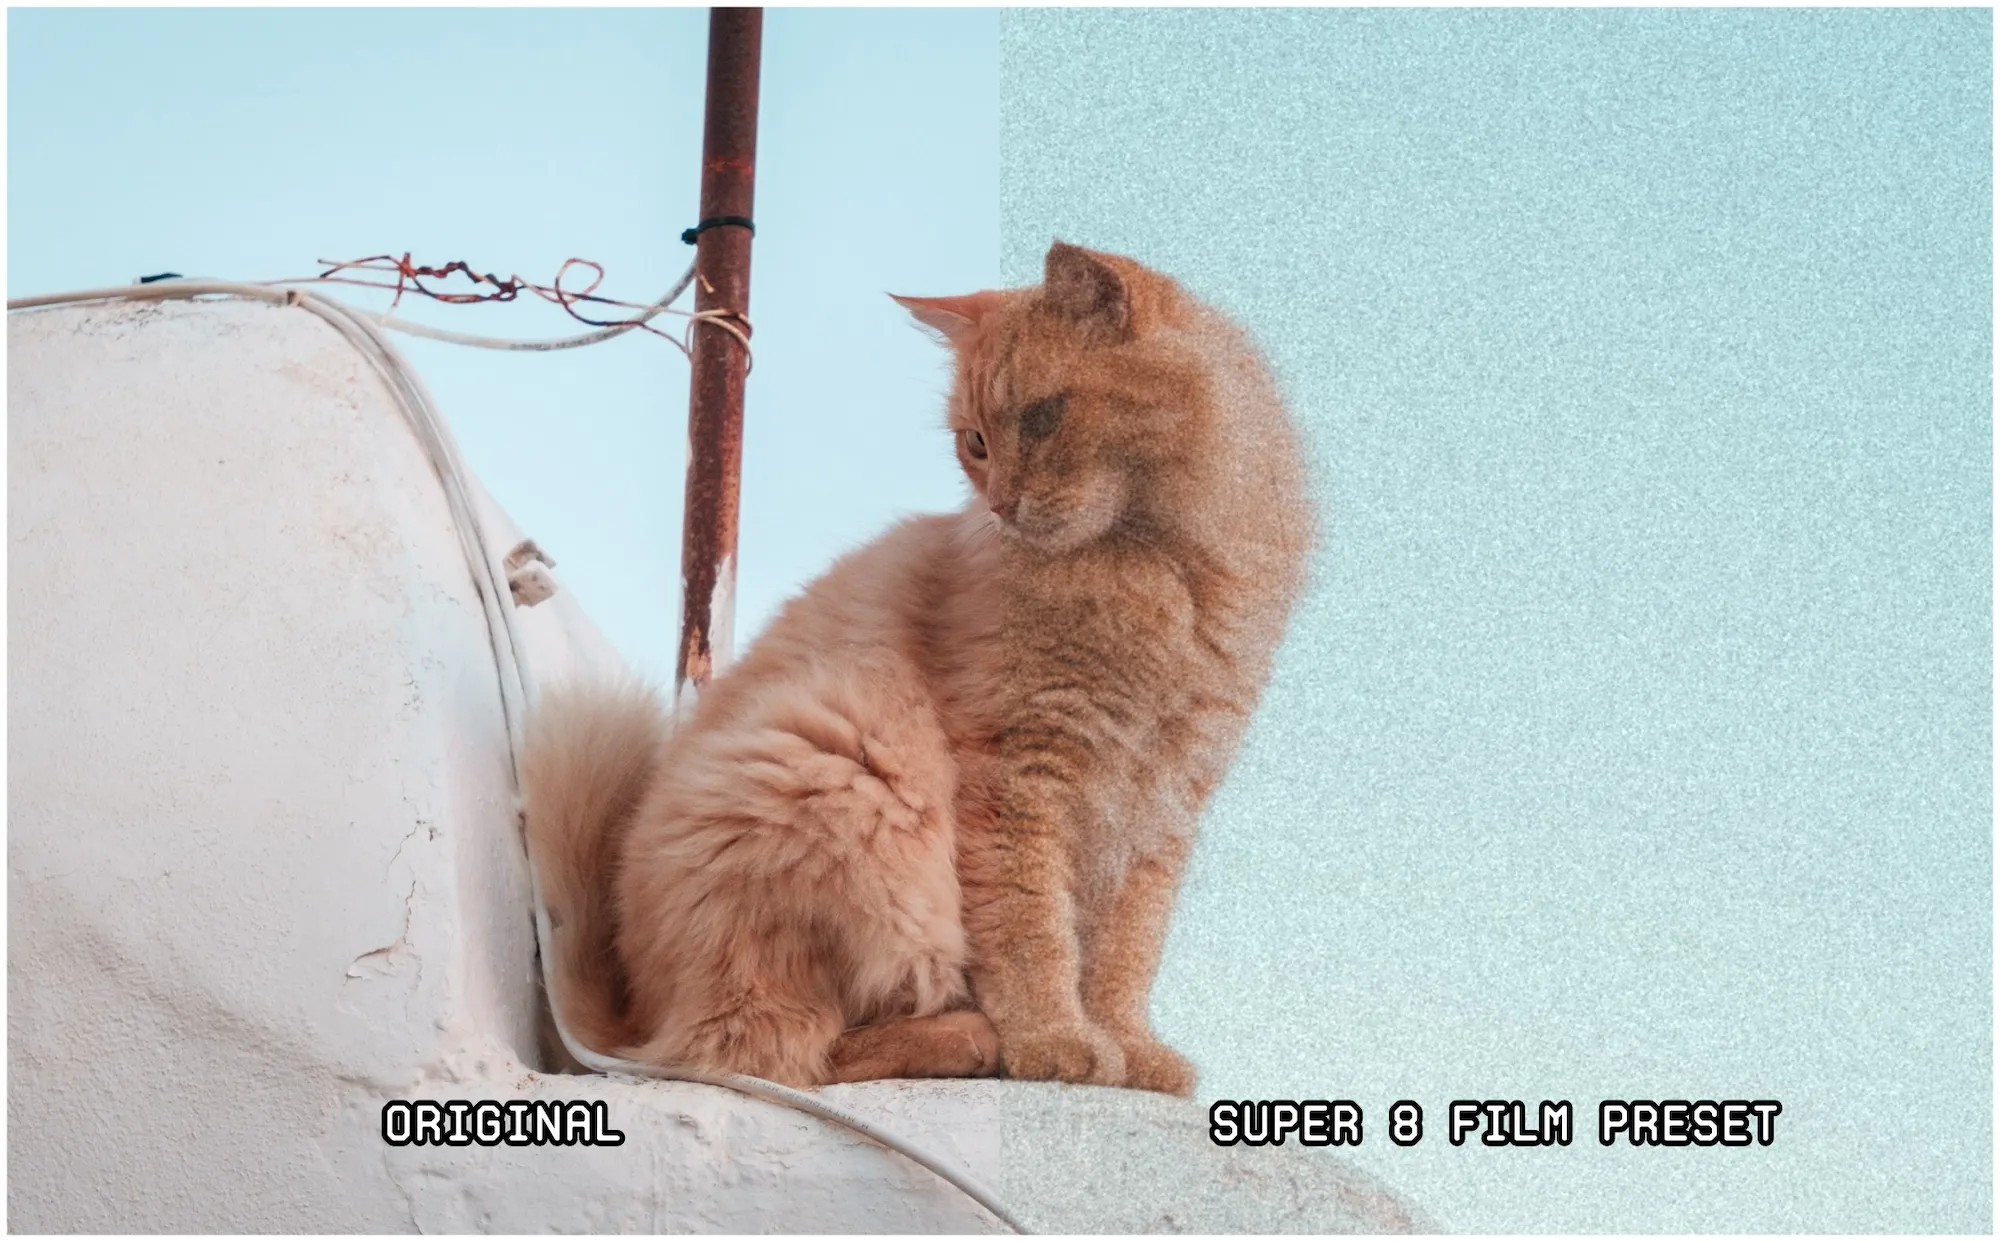
Super 8 Film:
Personally, this is one of my favourites in the preset package. However, I think for this series the grain is too pronounced for all of the images in the series.
Final choice - 35mm Compact Preset:
Ultimately, the above looks weren't quite right for this particular series (I'm sure they will be other though), however, upon testing the 35mm Compact preset, I found that this one stood out to me the most. It was ideal as its soft grain, faded appearance, and matte tones mimic the aesthetic of images captured on 35mm film using a compact point-and-shoot camera; and is synonymous with vintage vacation images.
Adapting the preset look with the Slider Tool
The Slider Tool for presets in Lightroom is hugely valuable in allowing you to control the strength (amount in %) of the preset that you apply. It’s a fantastic way of getting the exact look you want for your photos, as sometimes you may want to decrease (or increase) the effects of the preset.
I used the Slider Tool to refine the look of the 35mm Compact preset with my images, bringing it down to 55% strength, as I felt the effect was too strong when using the preset at 100% with this particular series.

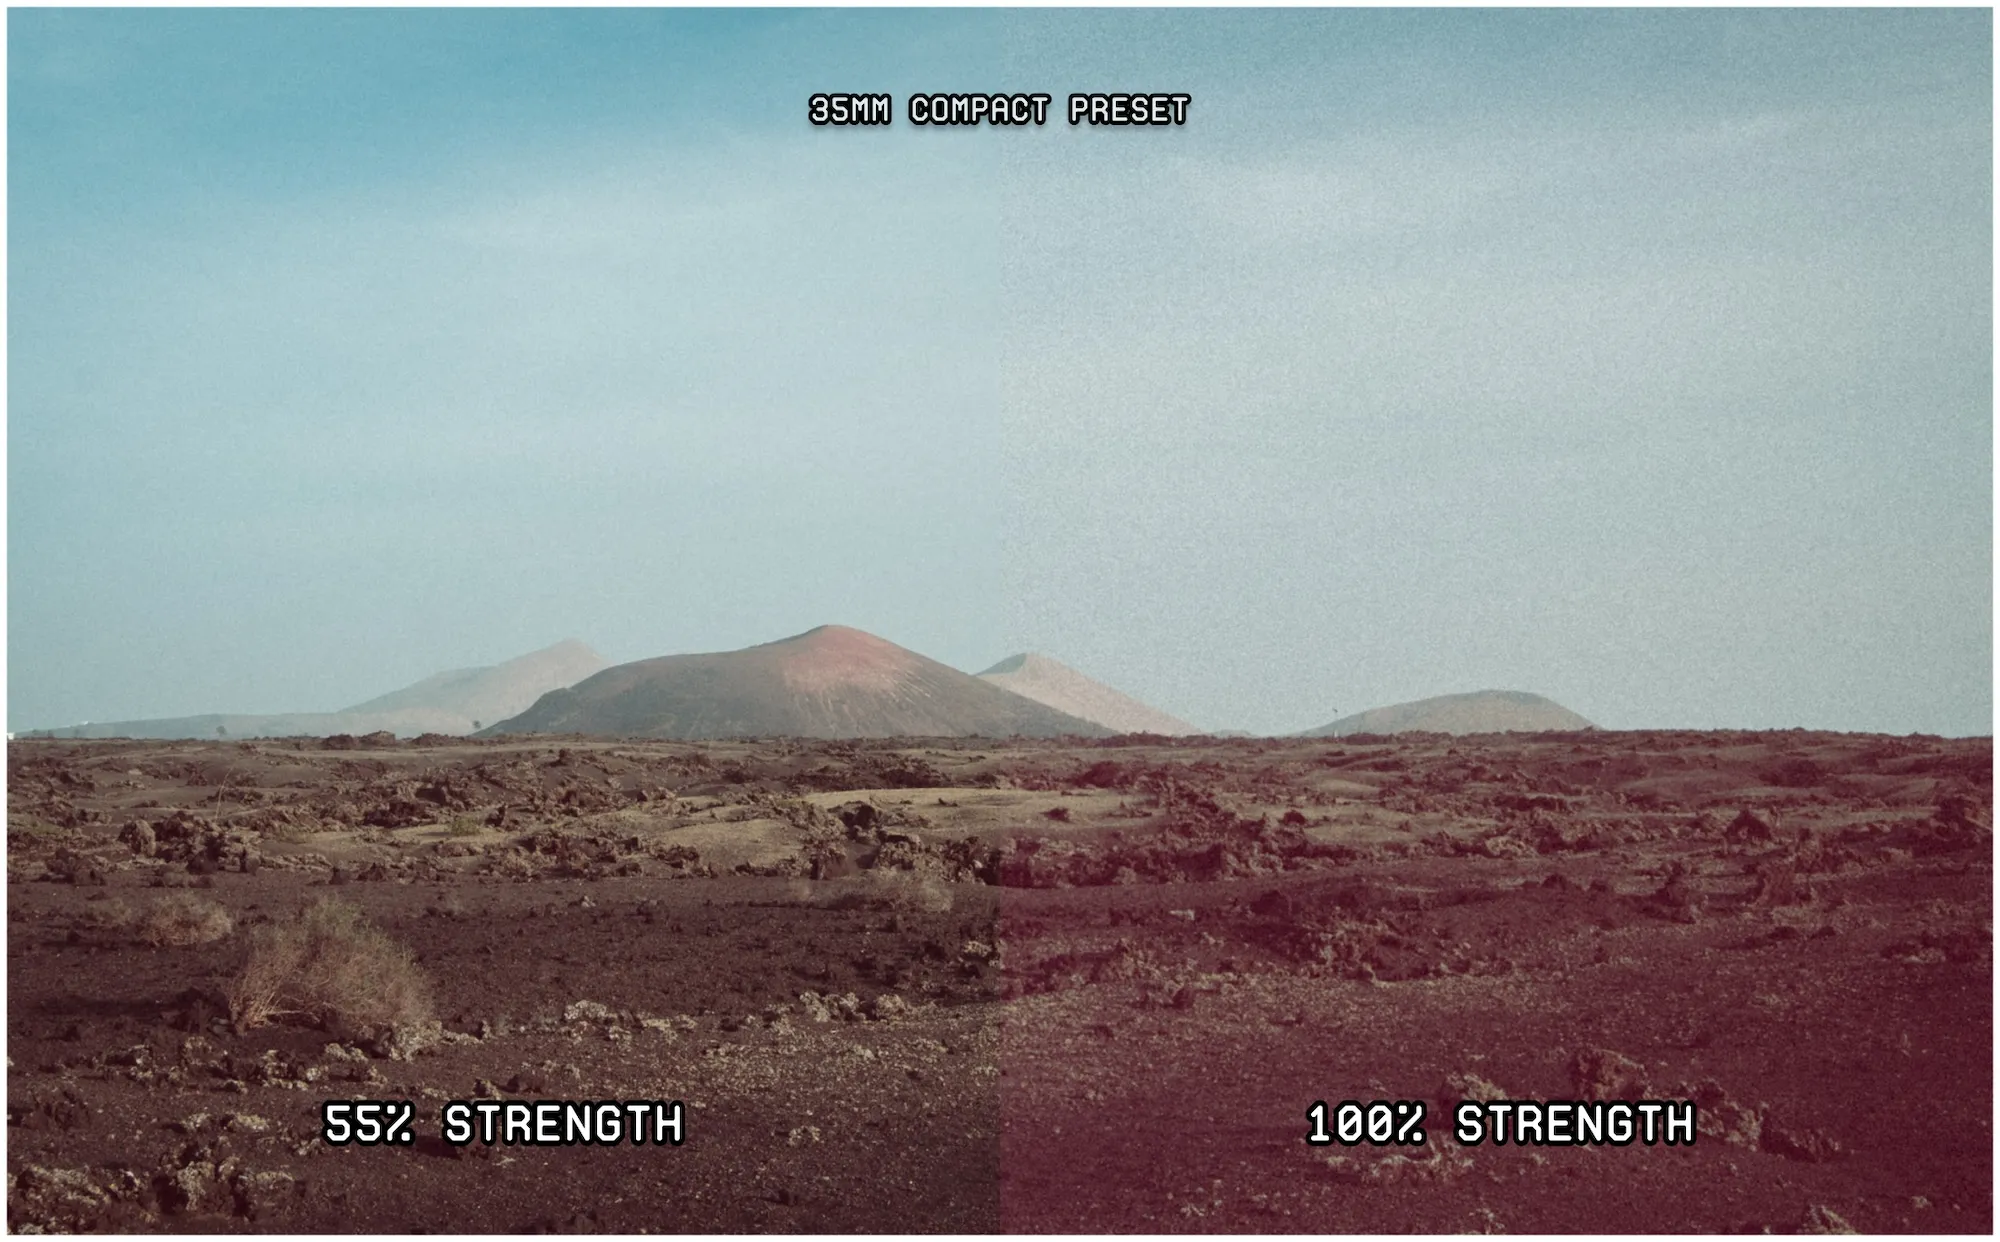
Generally, there won't be a ‘one-size-fits-all’ approach where a preset will 100% work for your images when you first apply it, so some adjustments are generally necessary. Also, you should apply the preset look equally across all your photos for consistency, and it's generally not a good idea to use different presets across the same photo series. You'll end up with a group of images that lack consistency and look too different from one another.
Completing the series with the 35mm Compact Preset
Once I decided on the 35mm Compact preset and set the strength with the Slider for my photos, I applied this preset and Slider setting to all images in the Lanzarote Final Edit Collection to make the effect consistent throughout the series.
I applied the preset to each image manually as I wanted to have full control over the final look of each shot (such as contrast and light adjustments after applying), but the preset and effect strength are the same throughout. There is also the option to Sync edits in the Develop Module of Lightroom, too, and you can refer to Adobe's Lightroom instructions for more information.
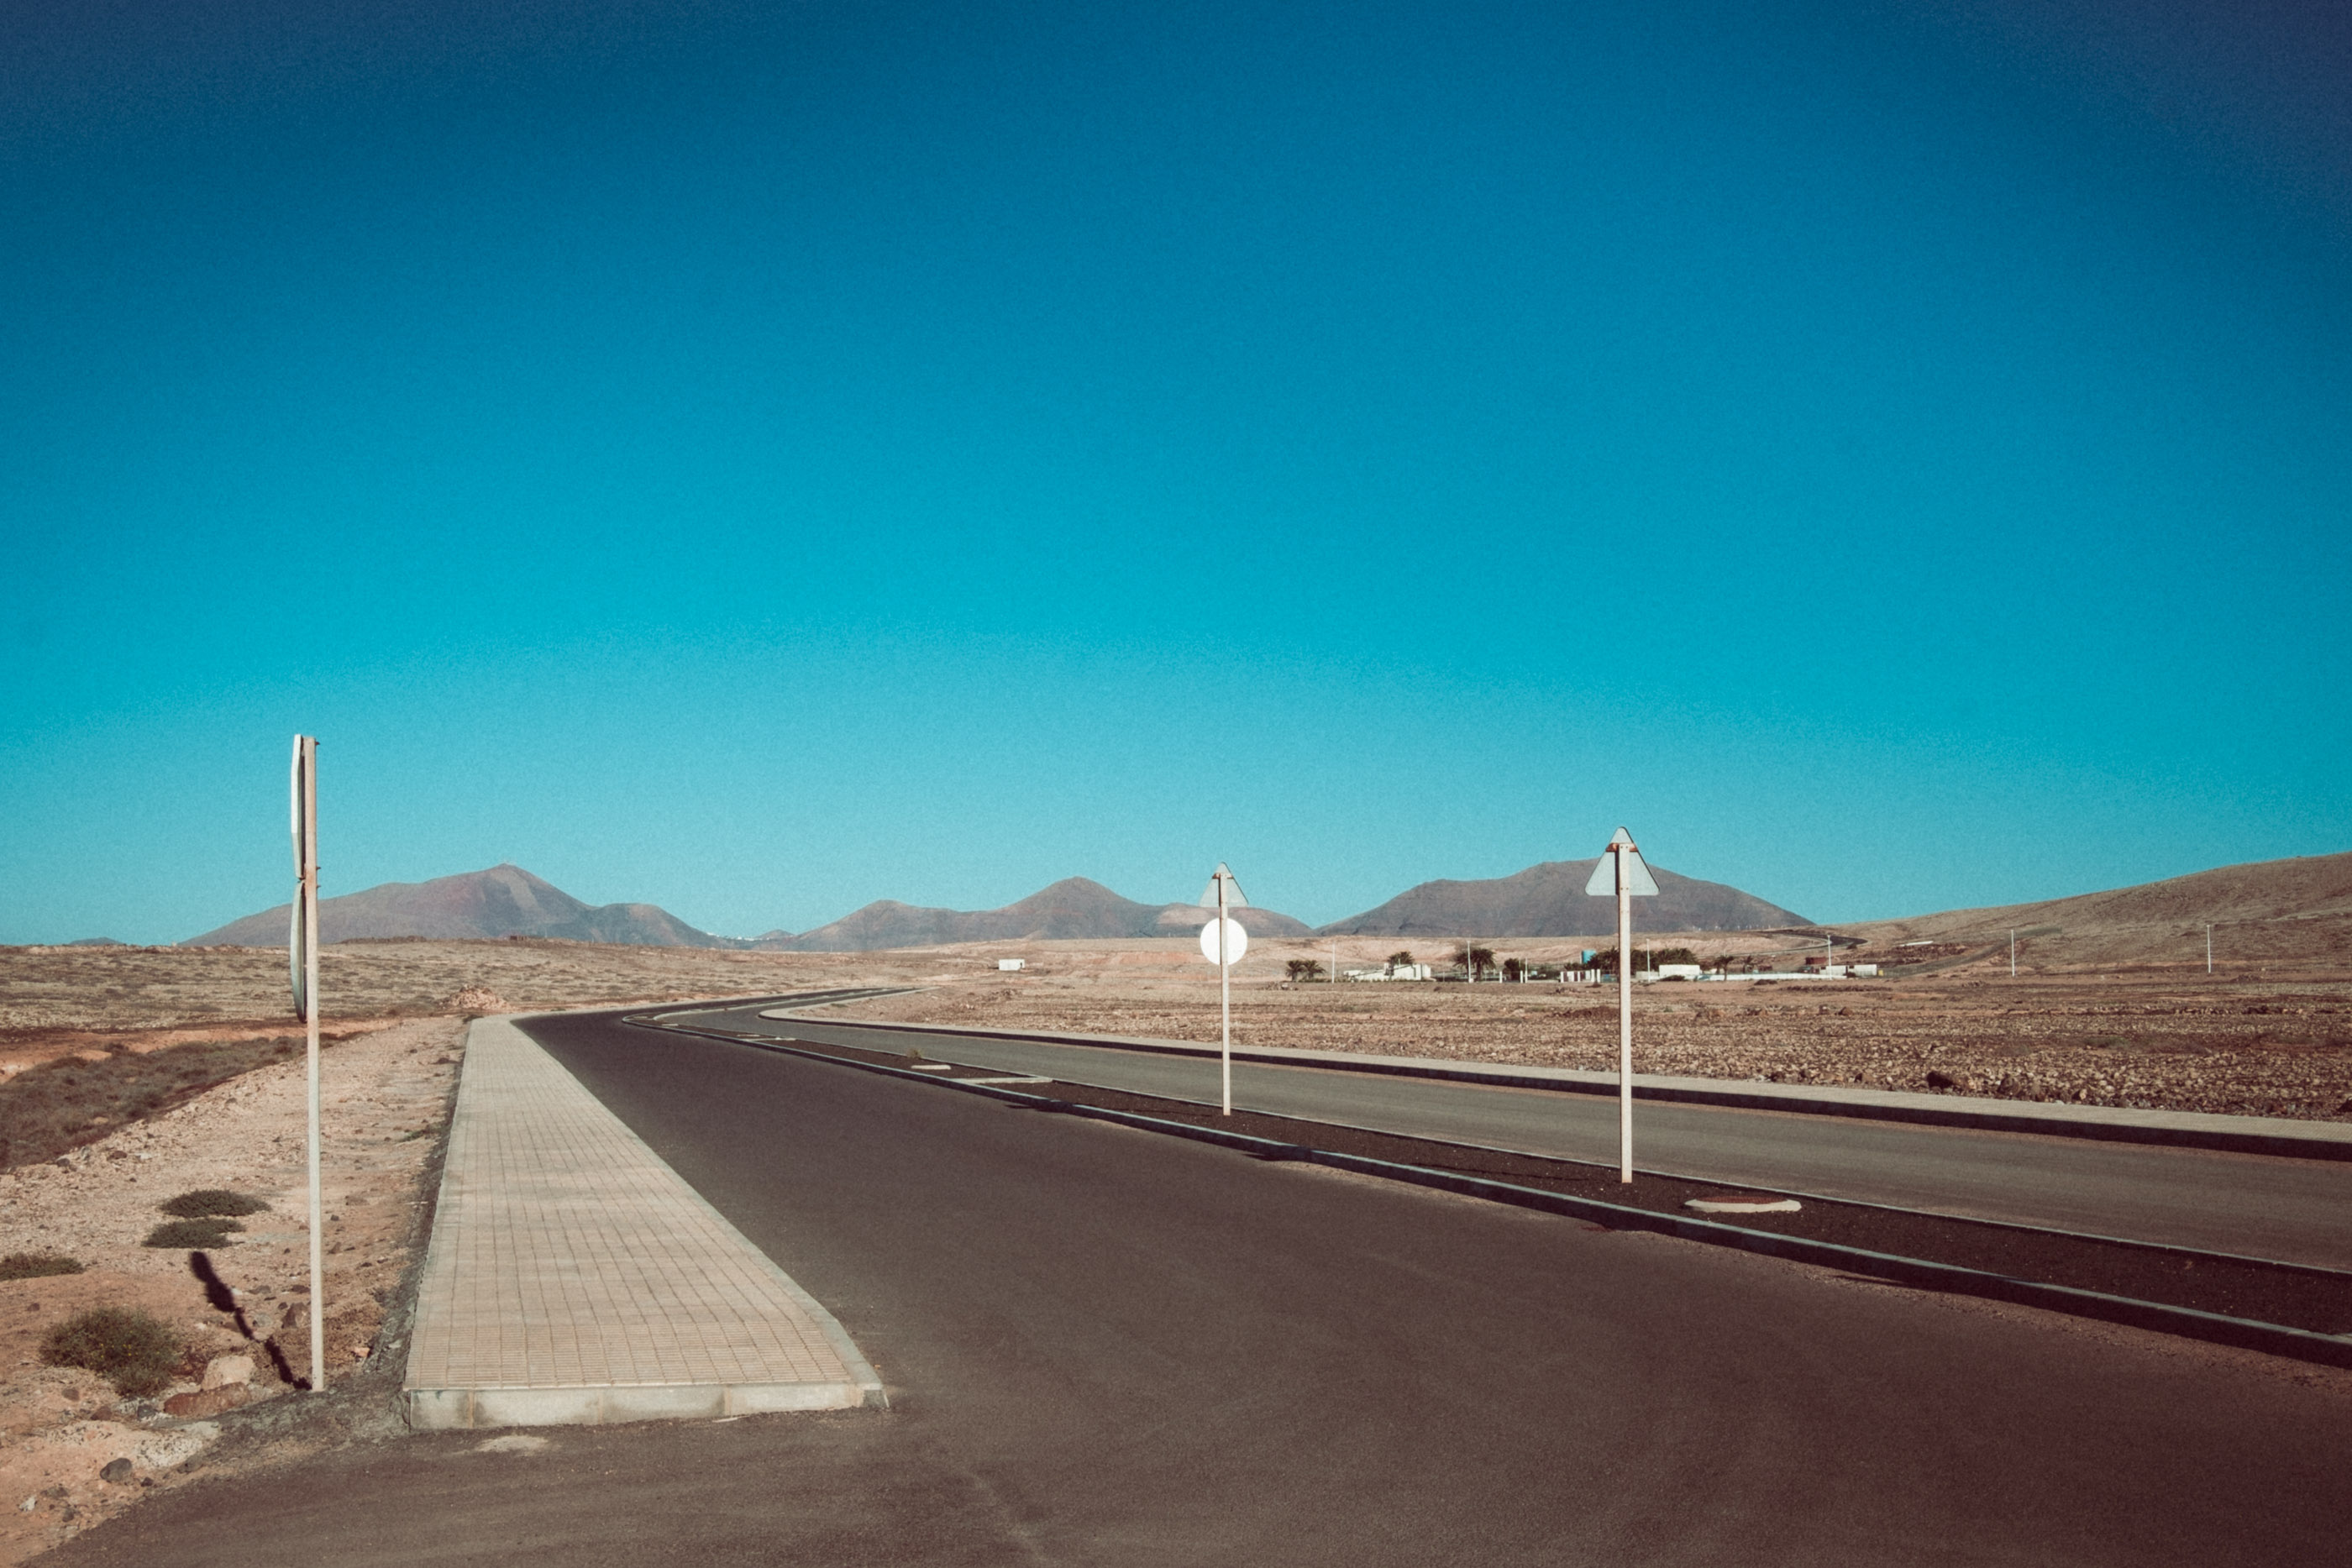
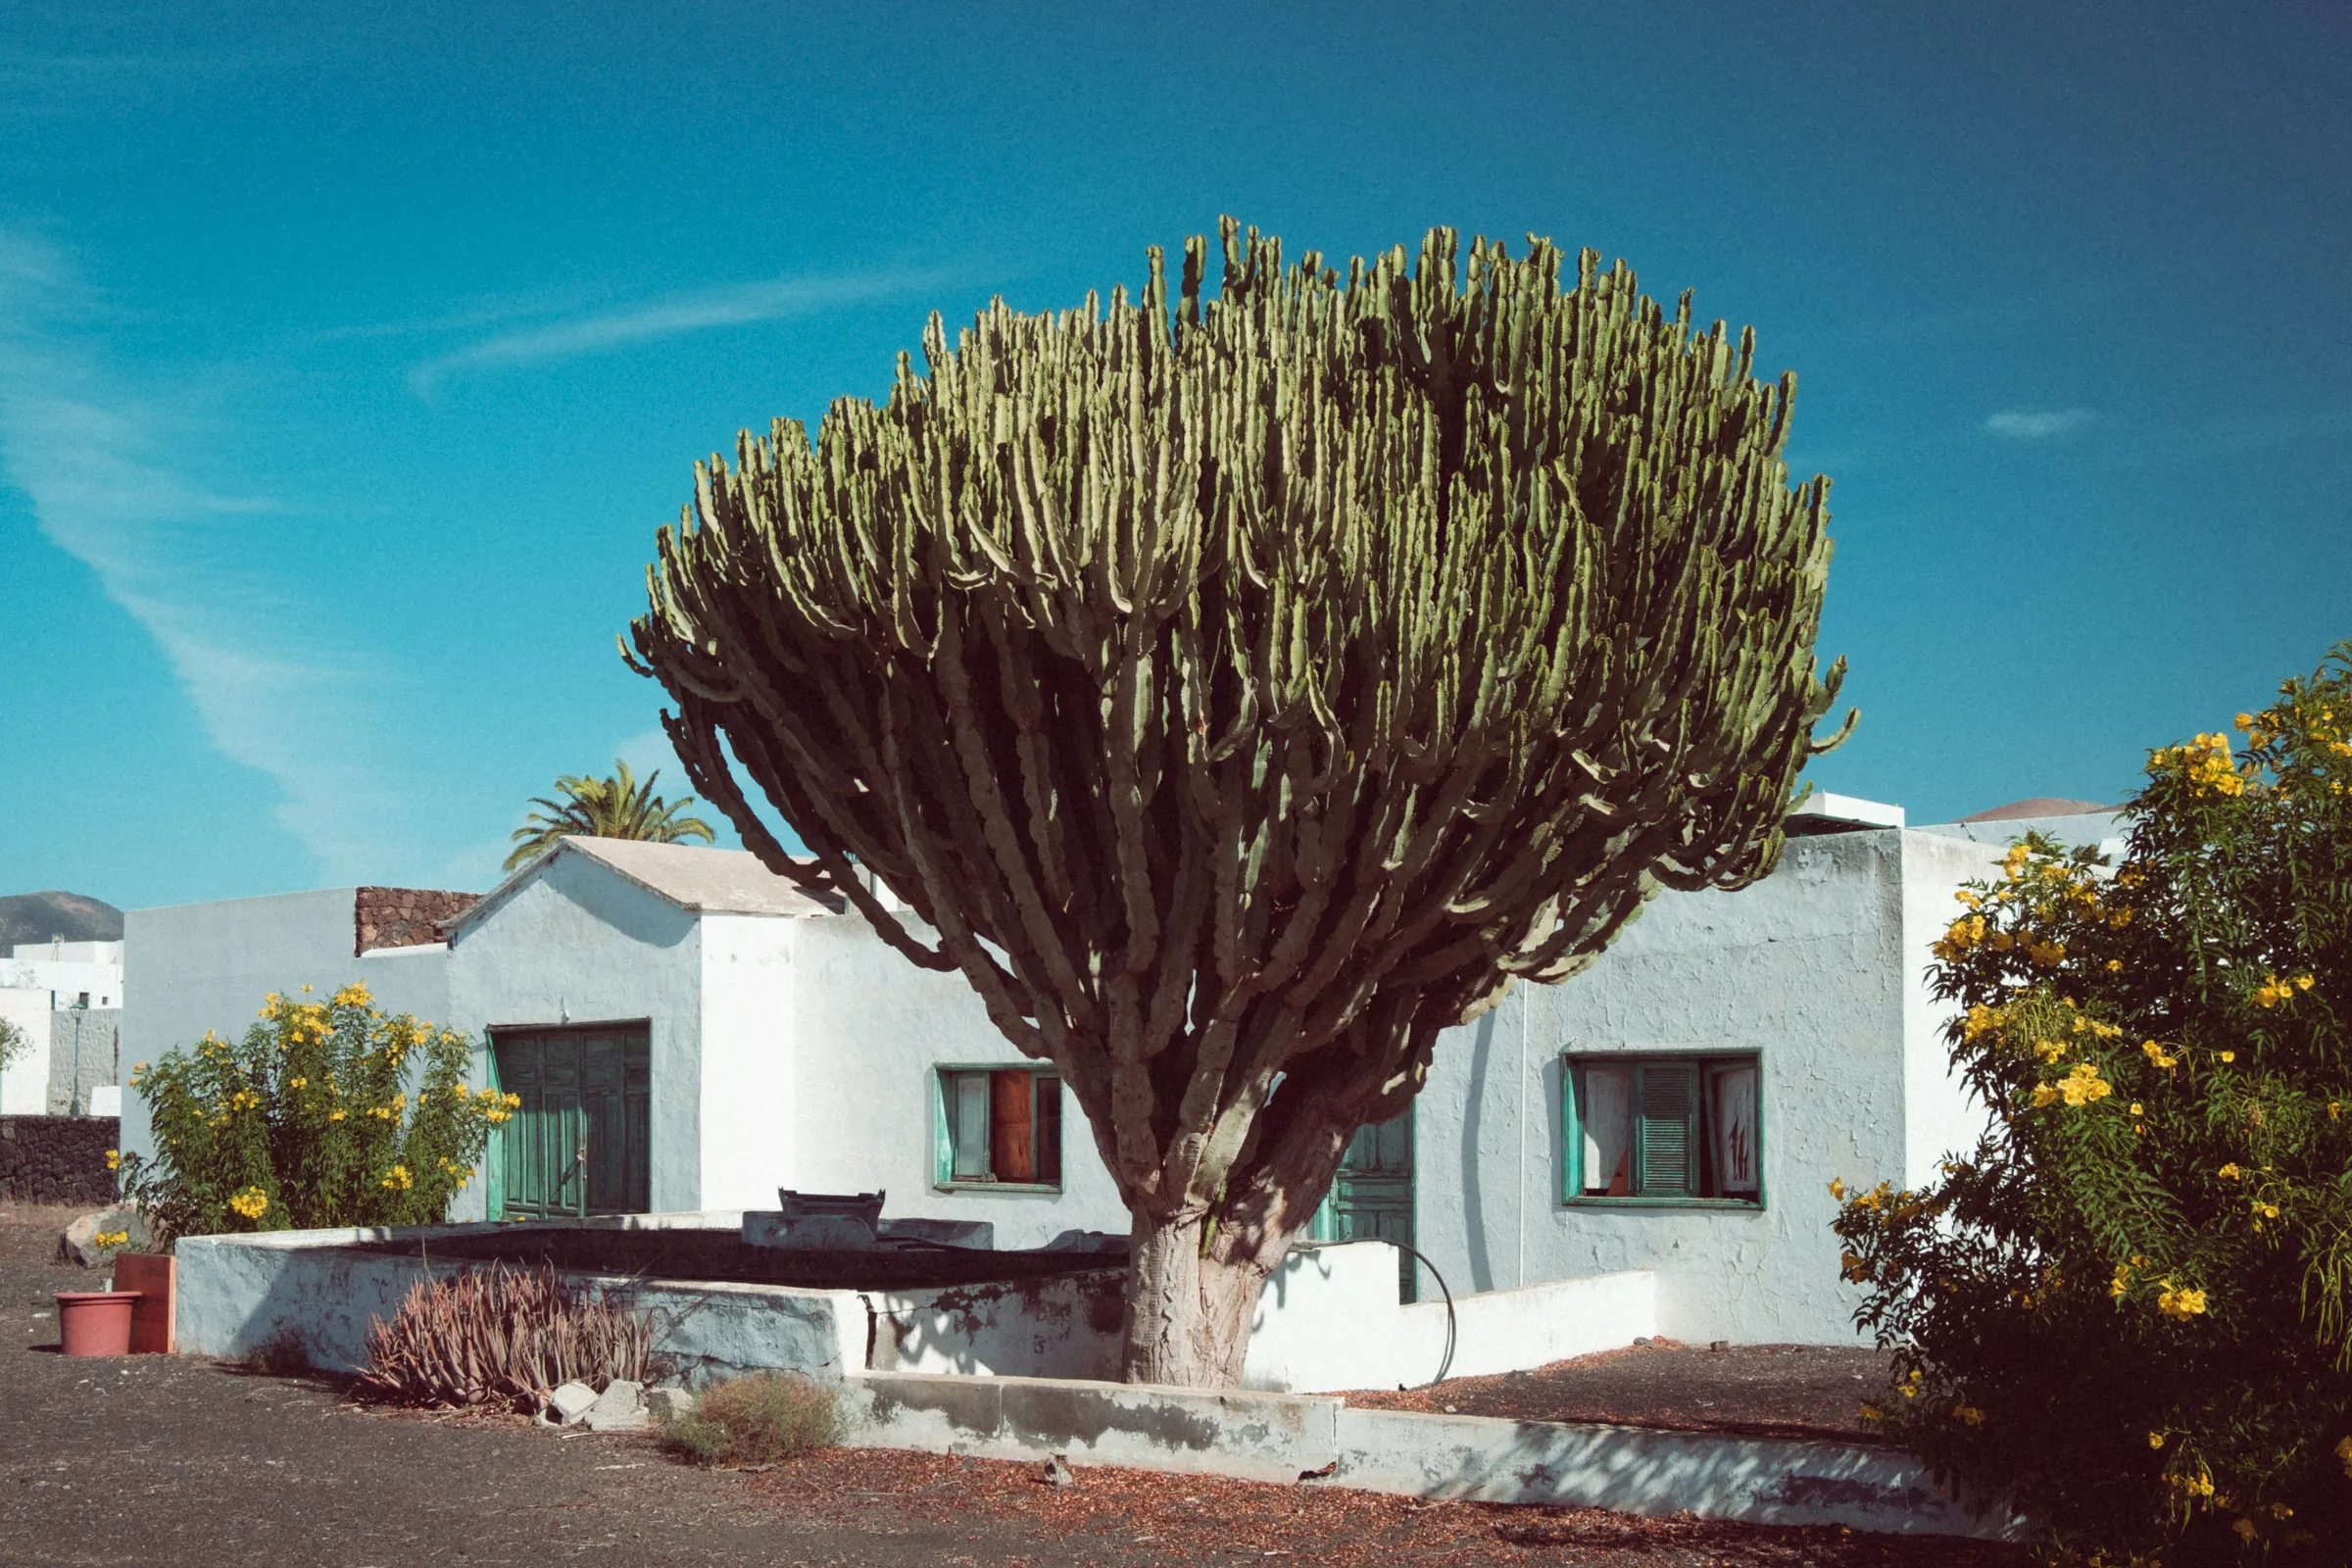
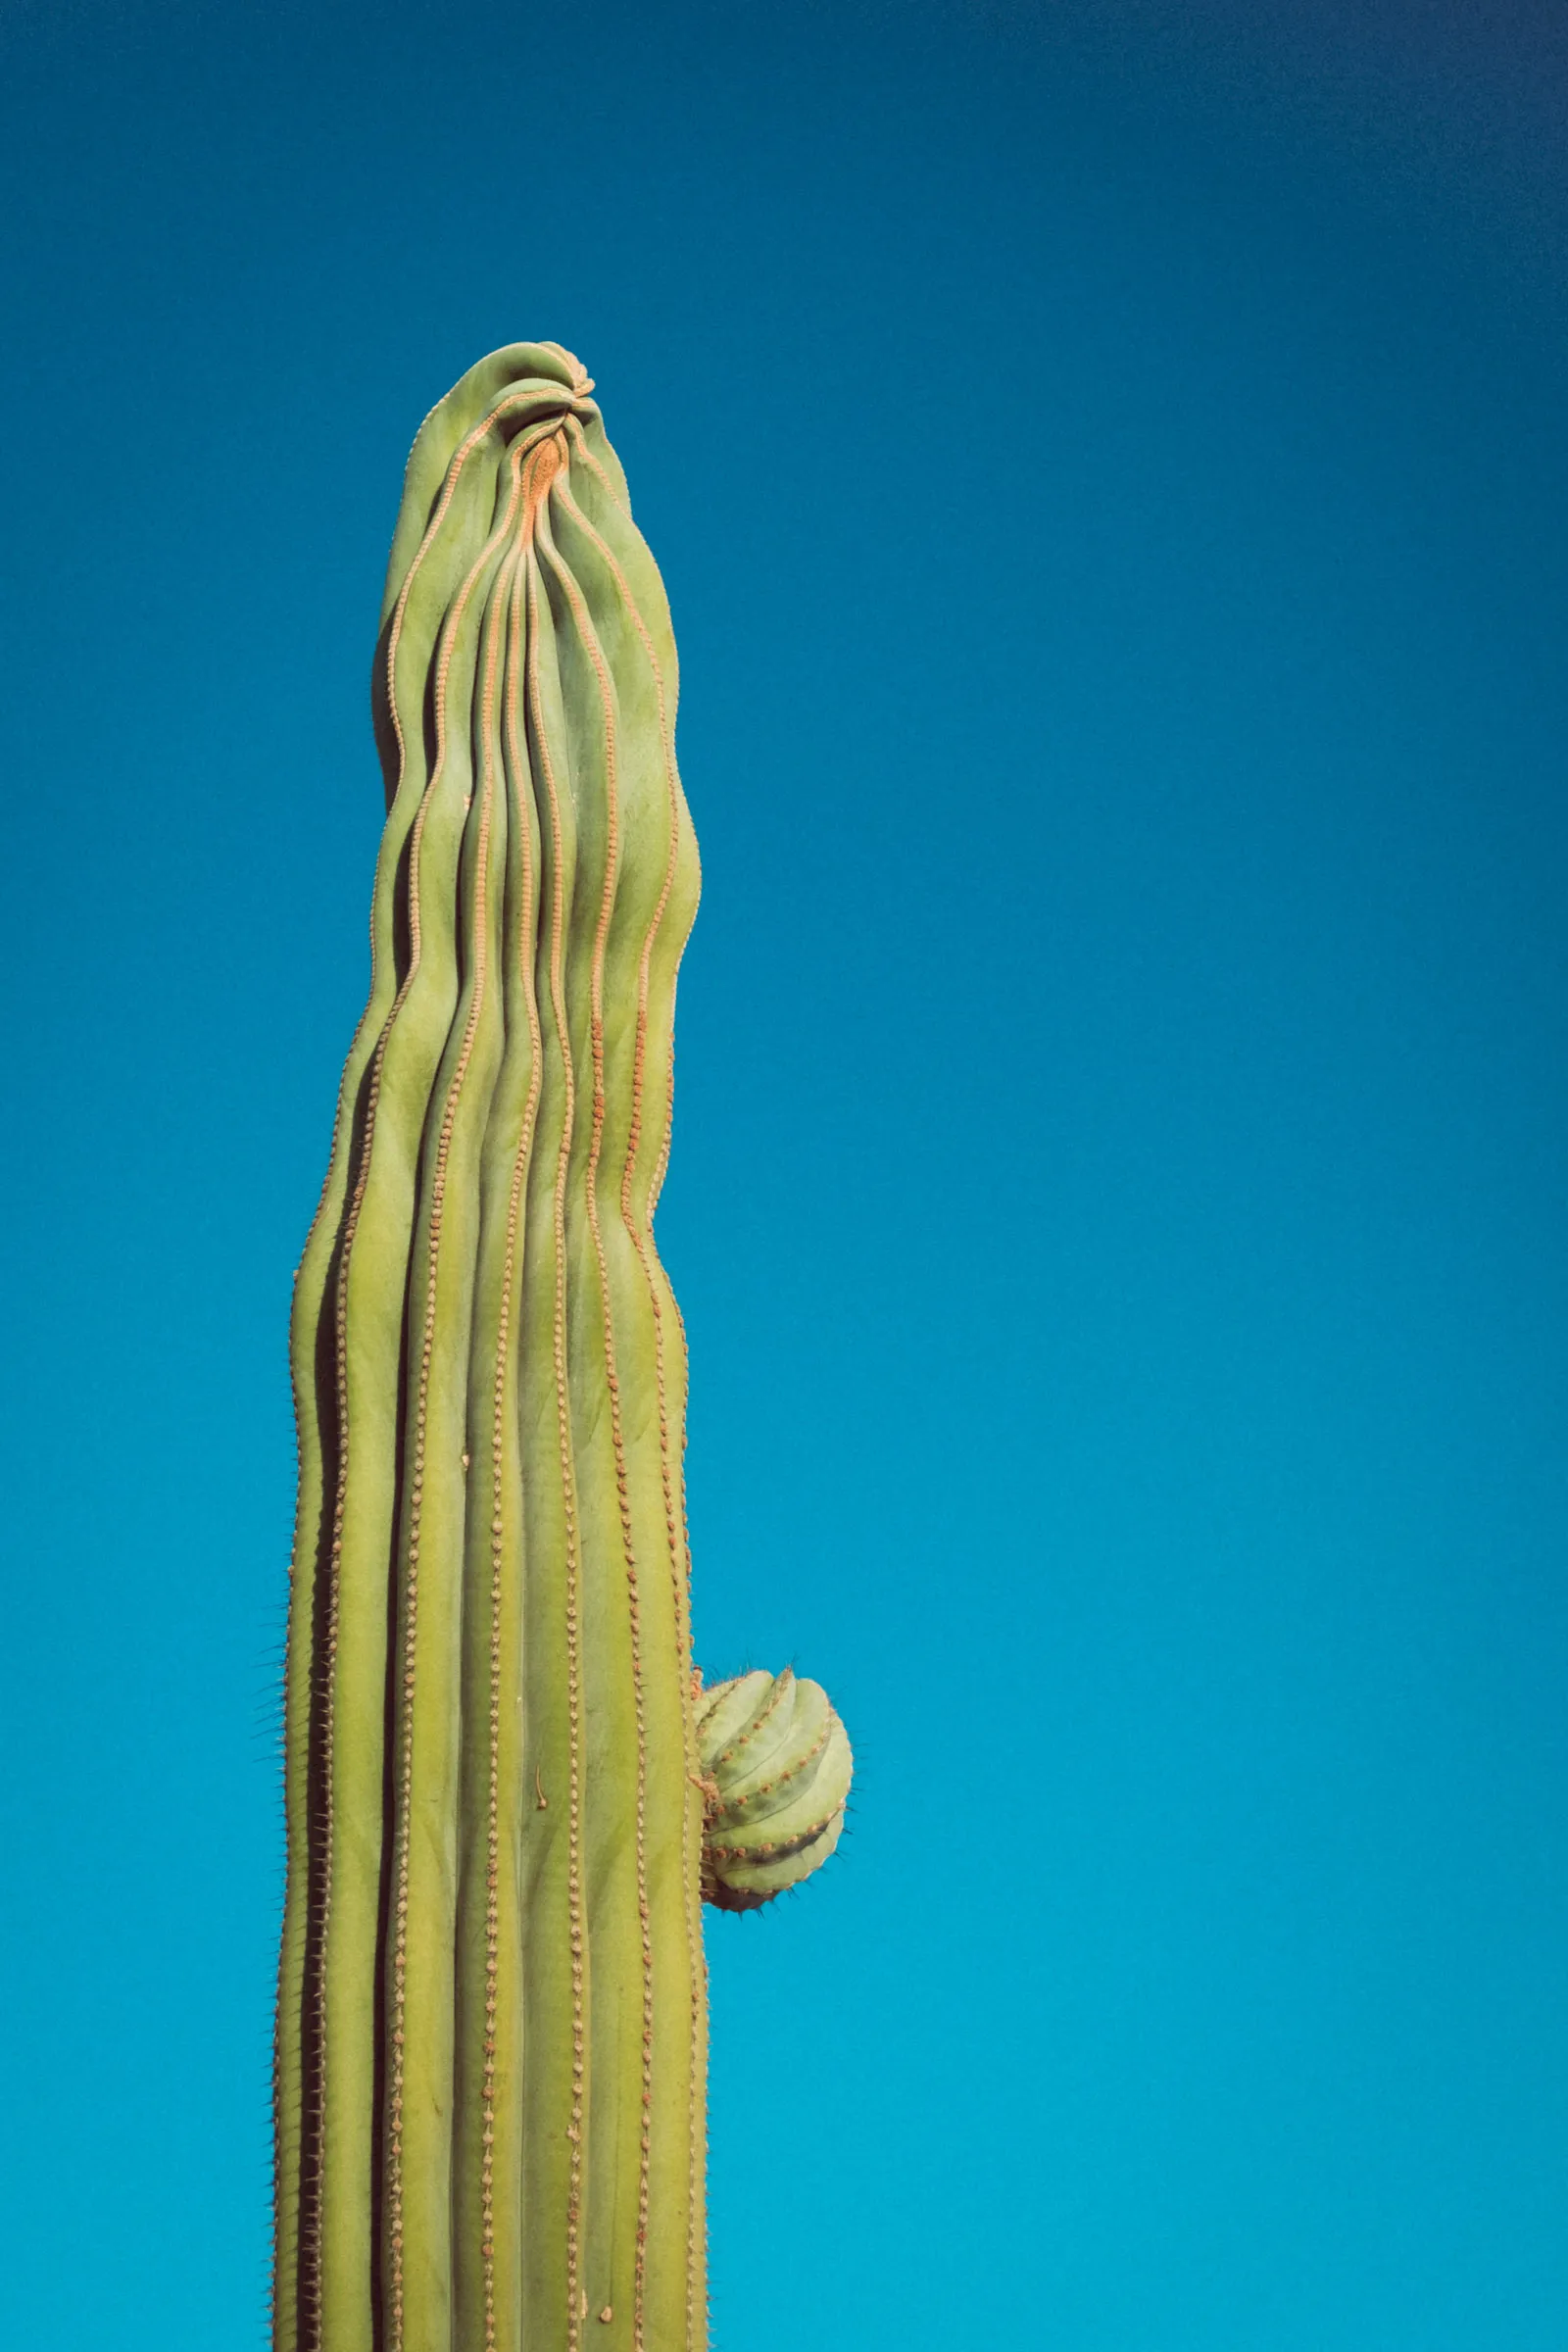
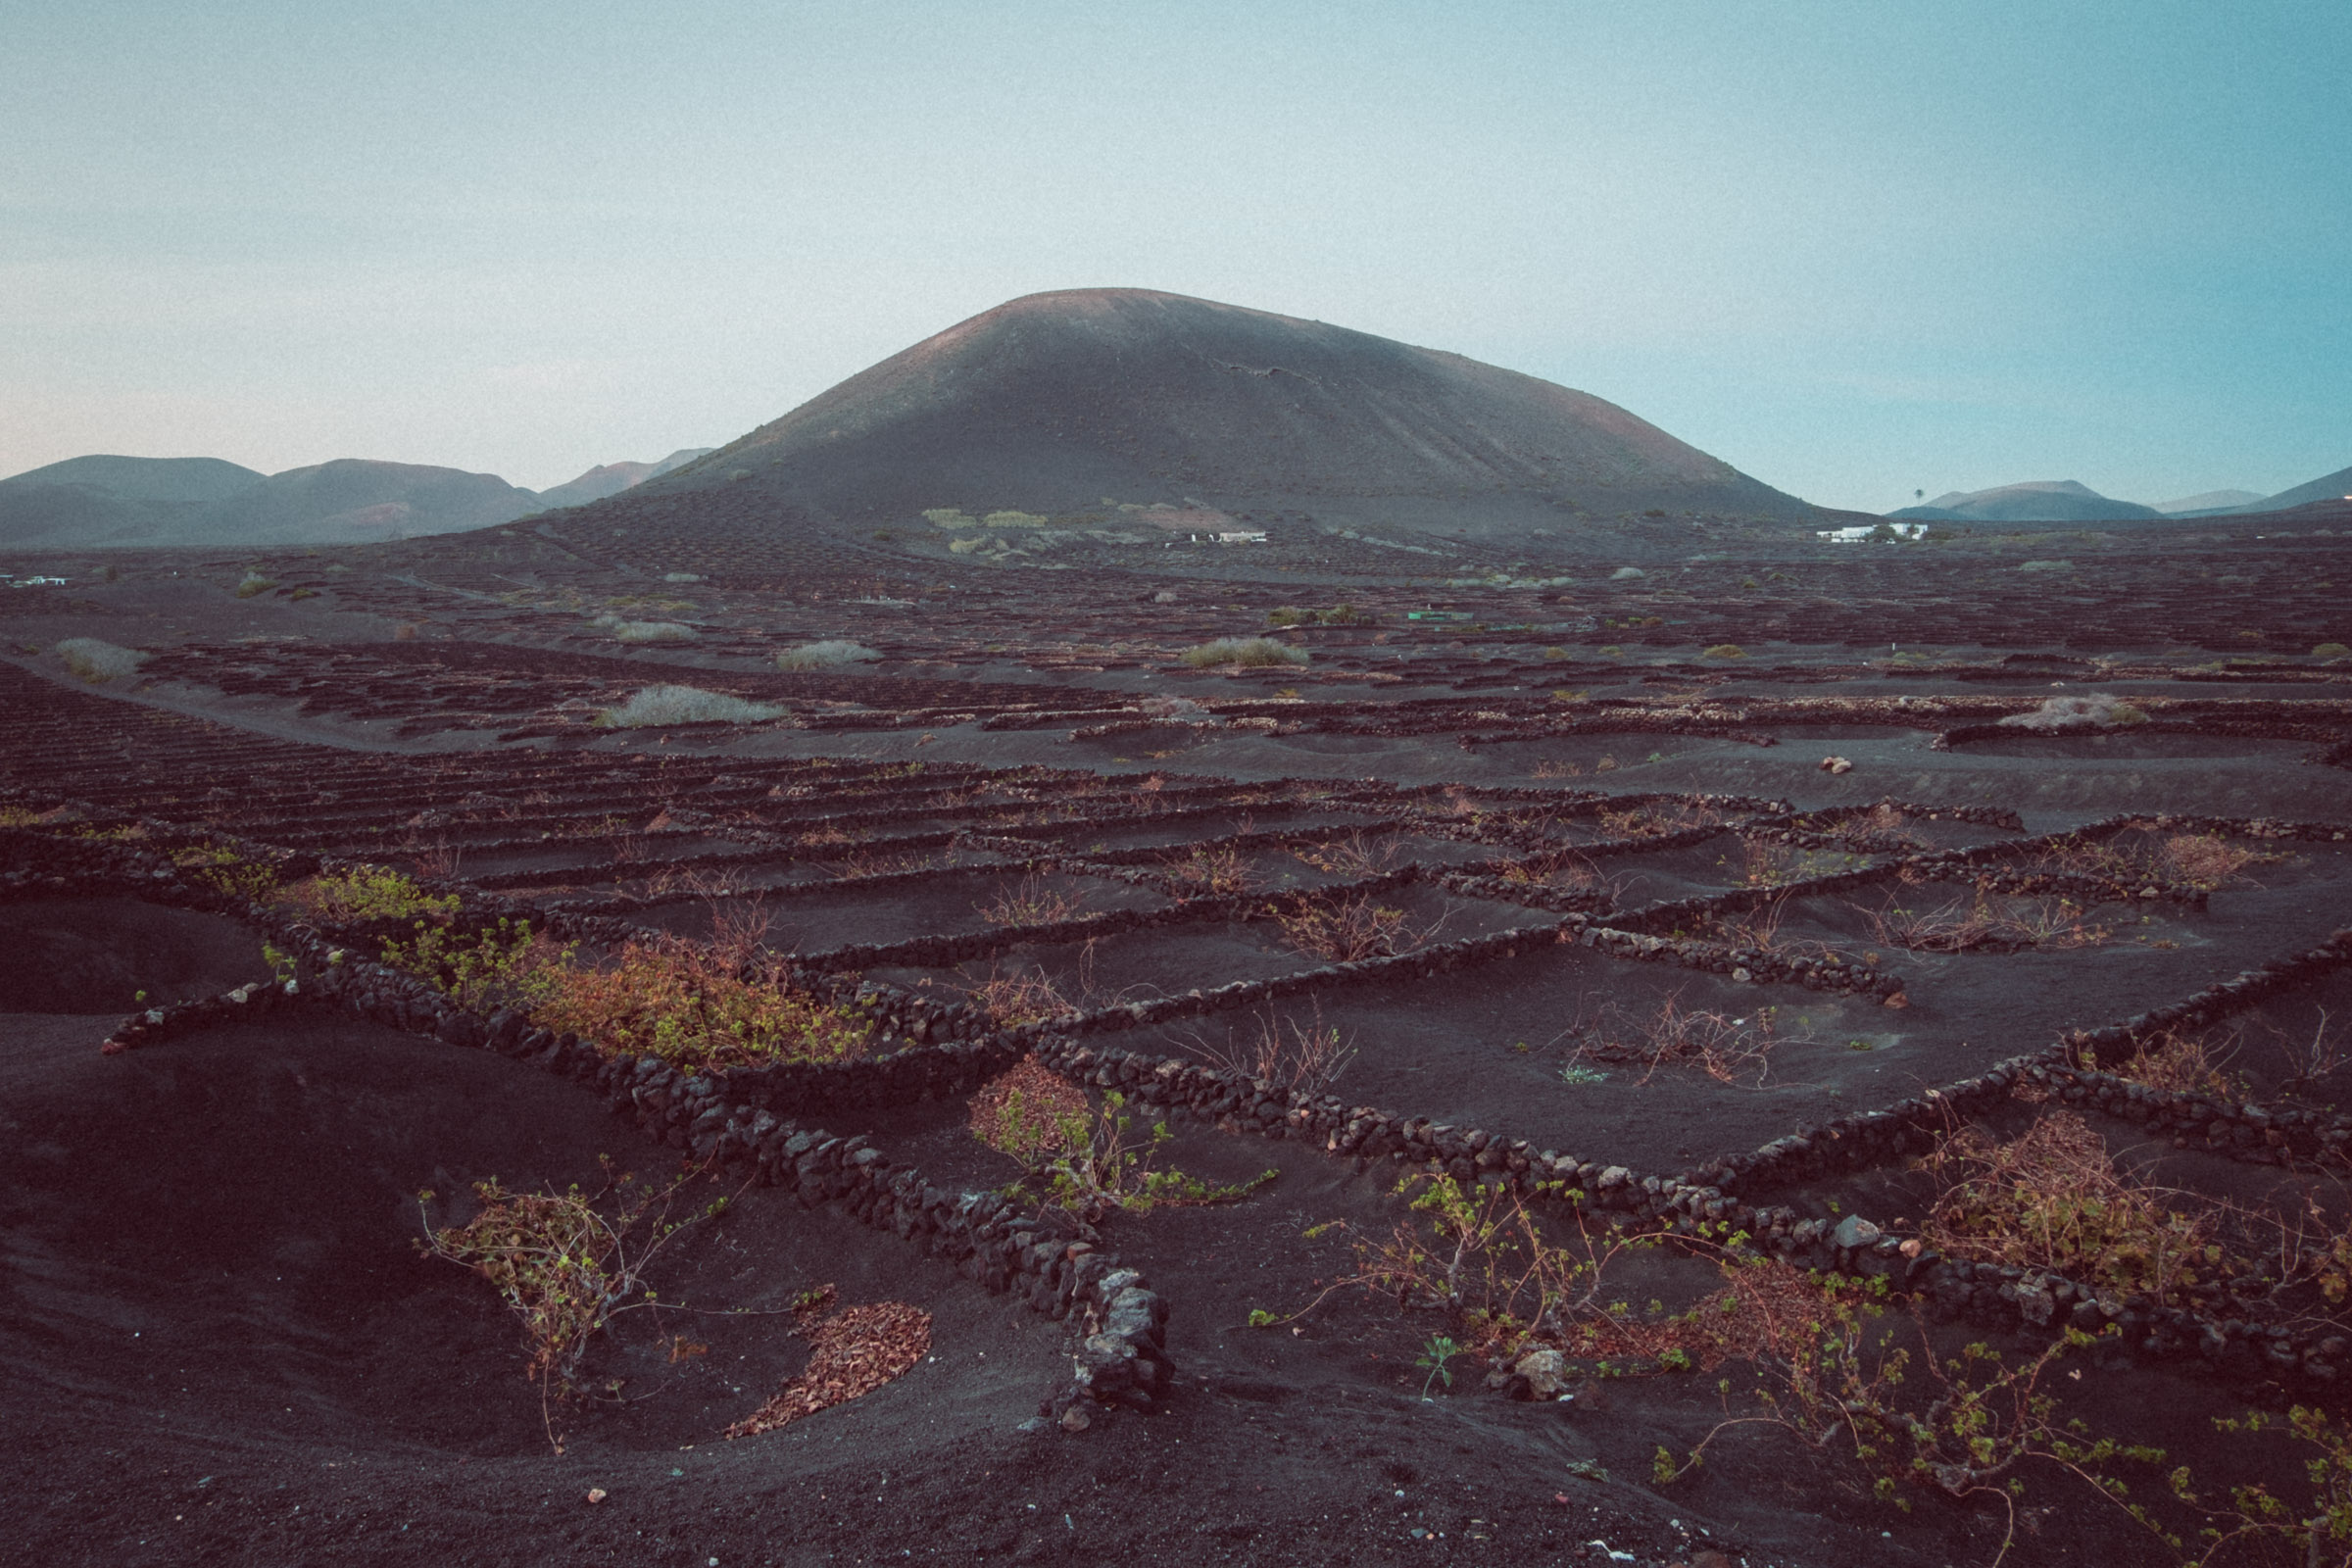
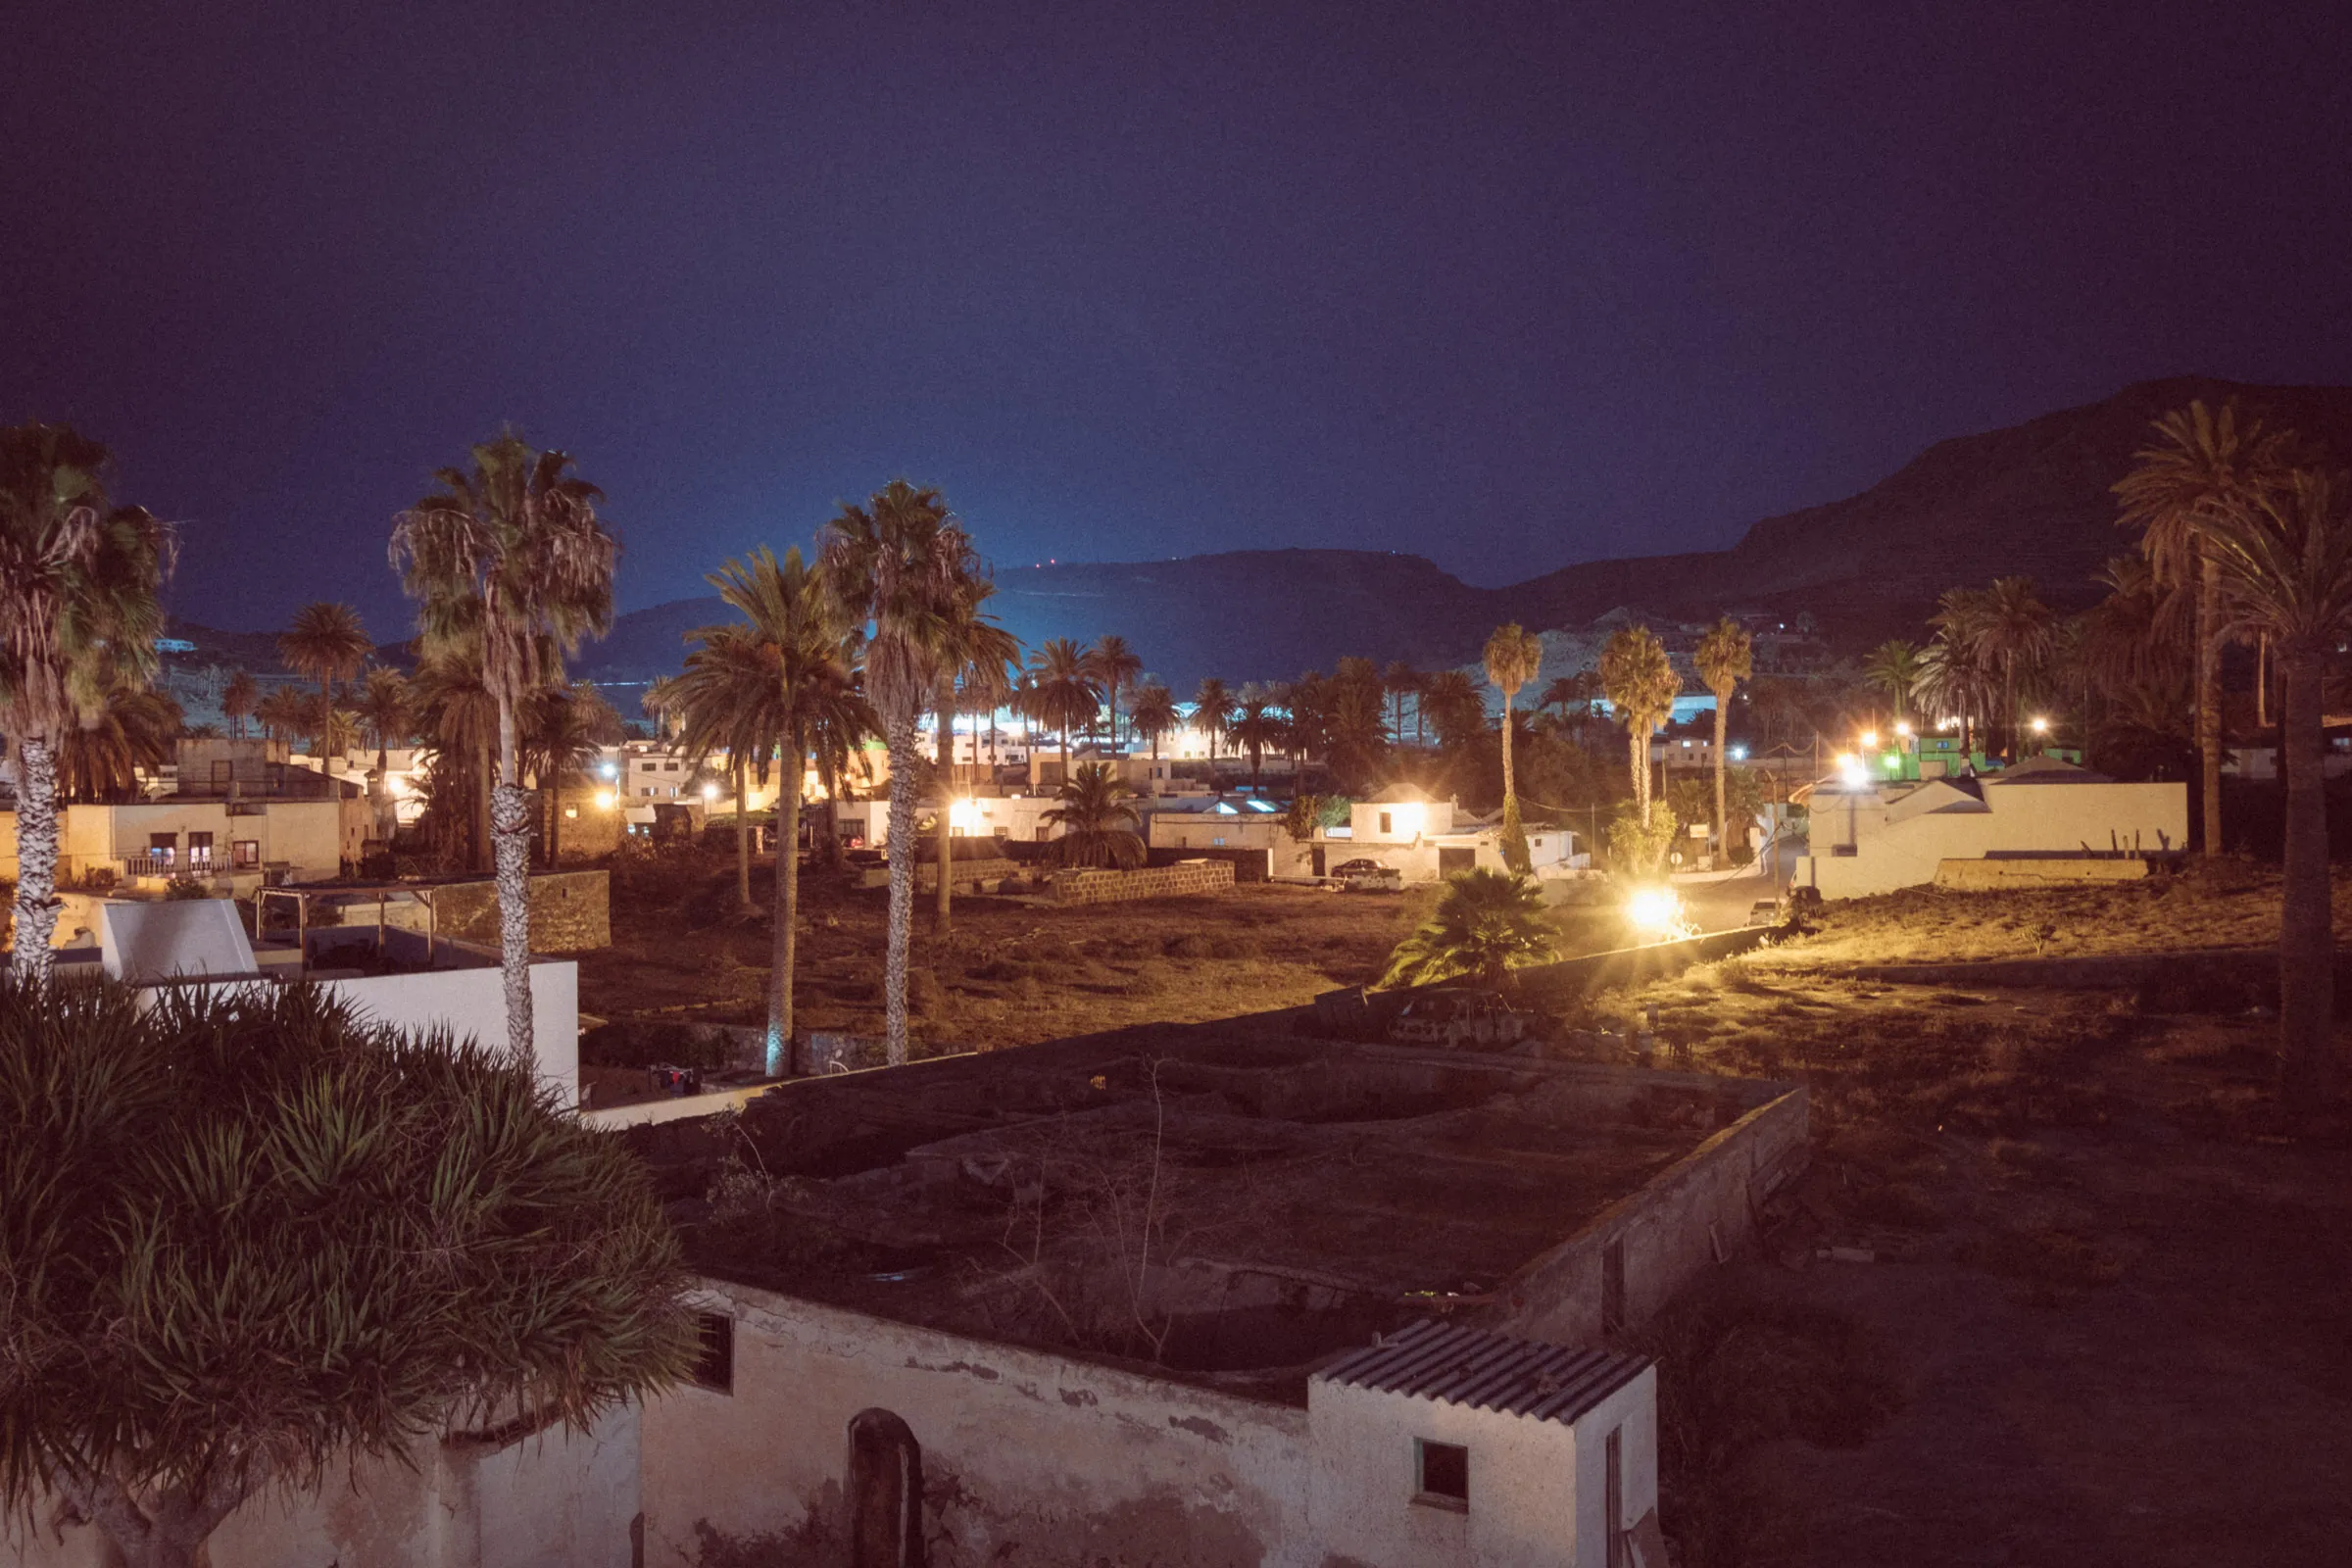
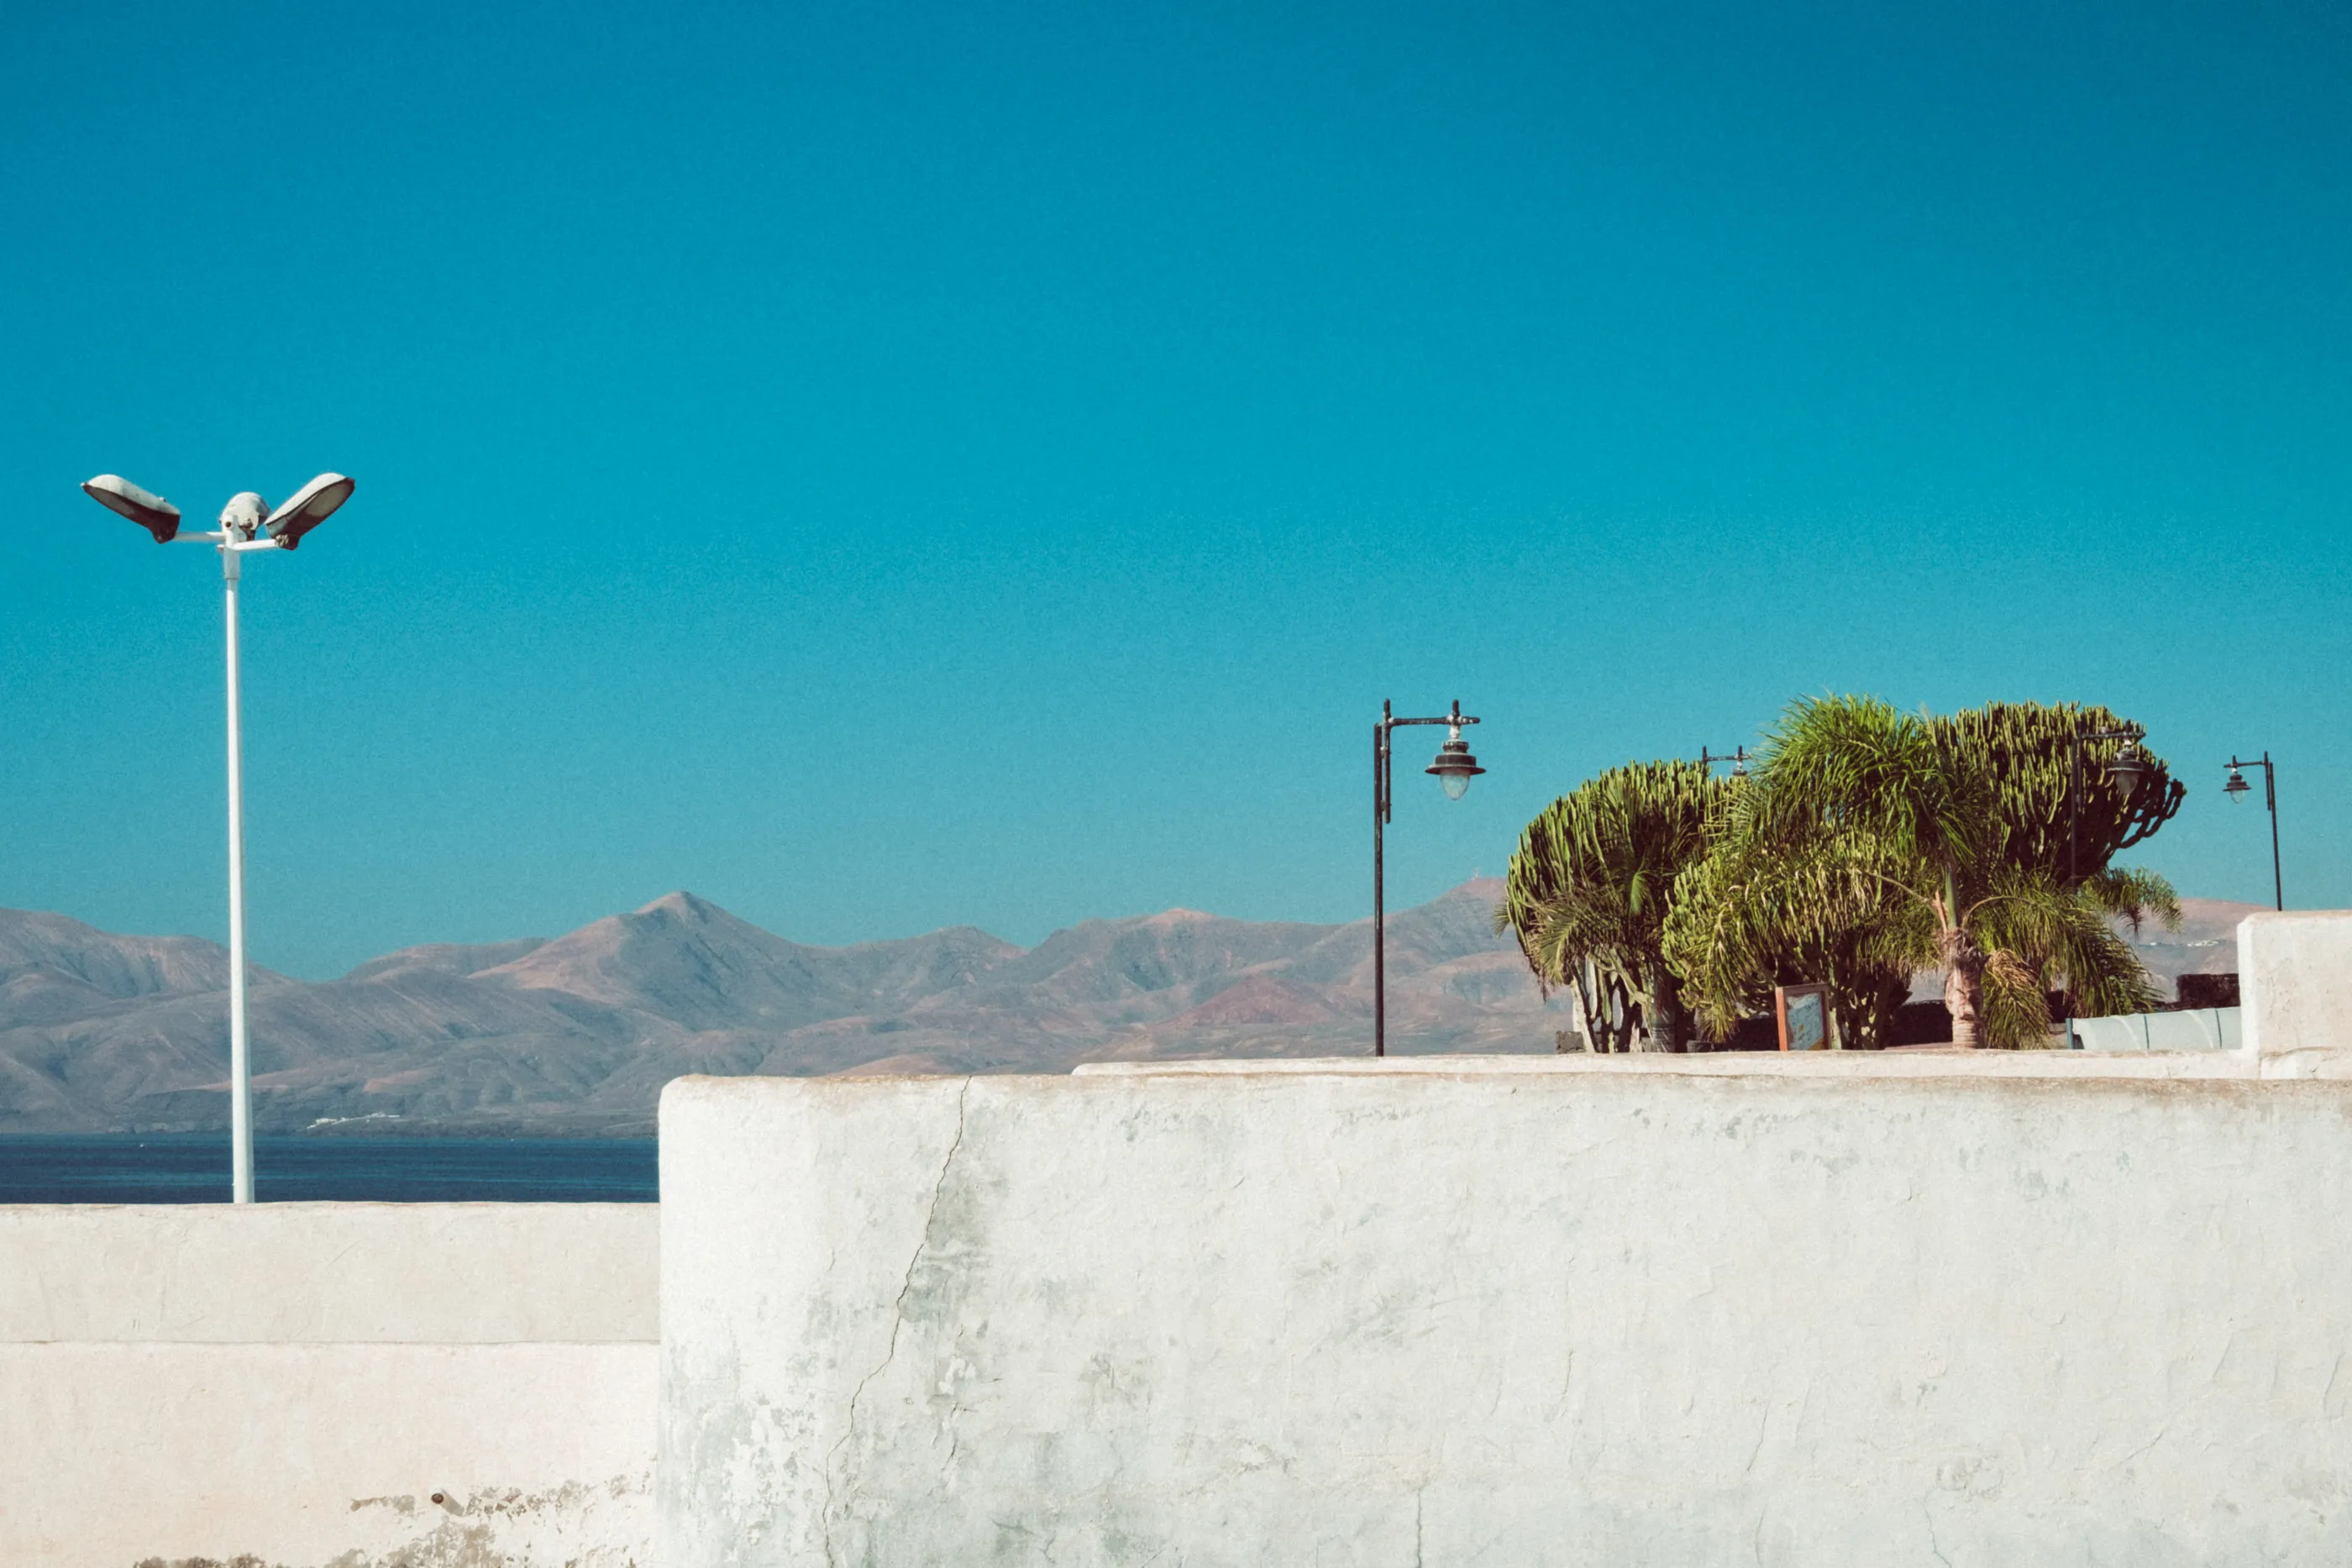
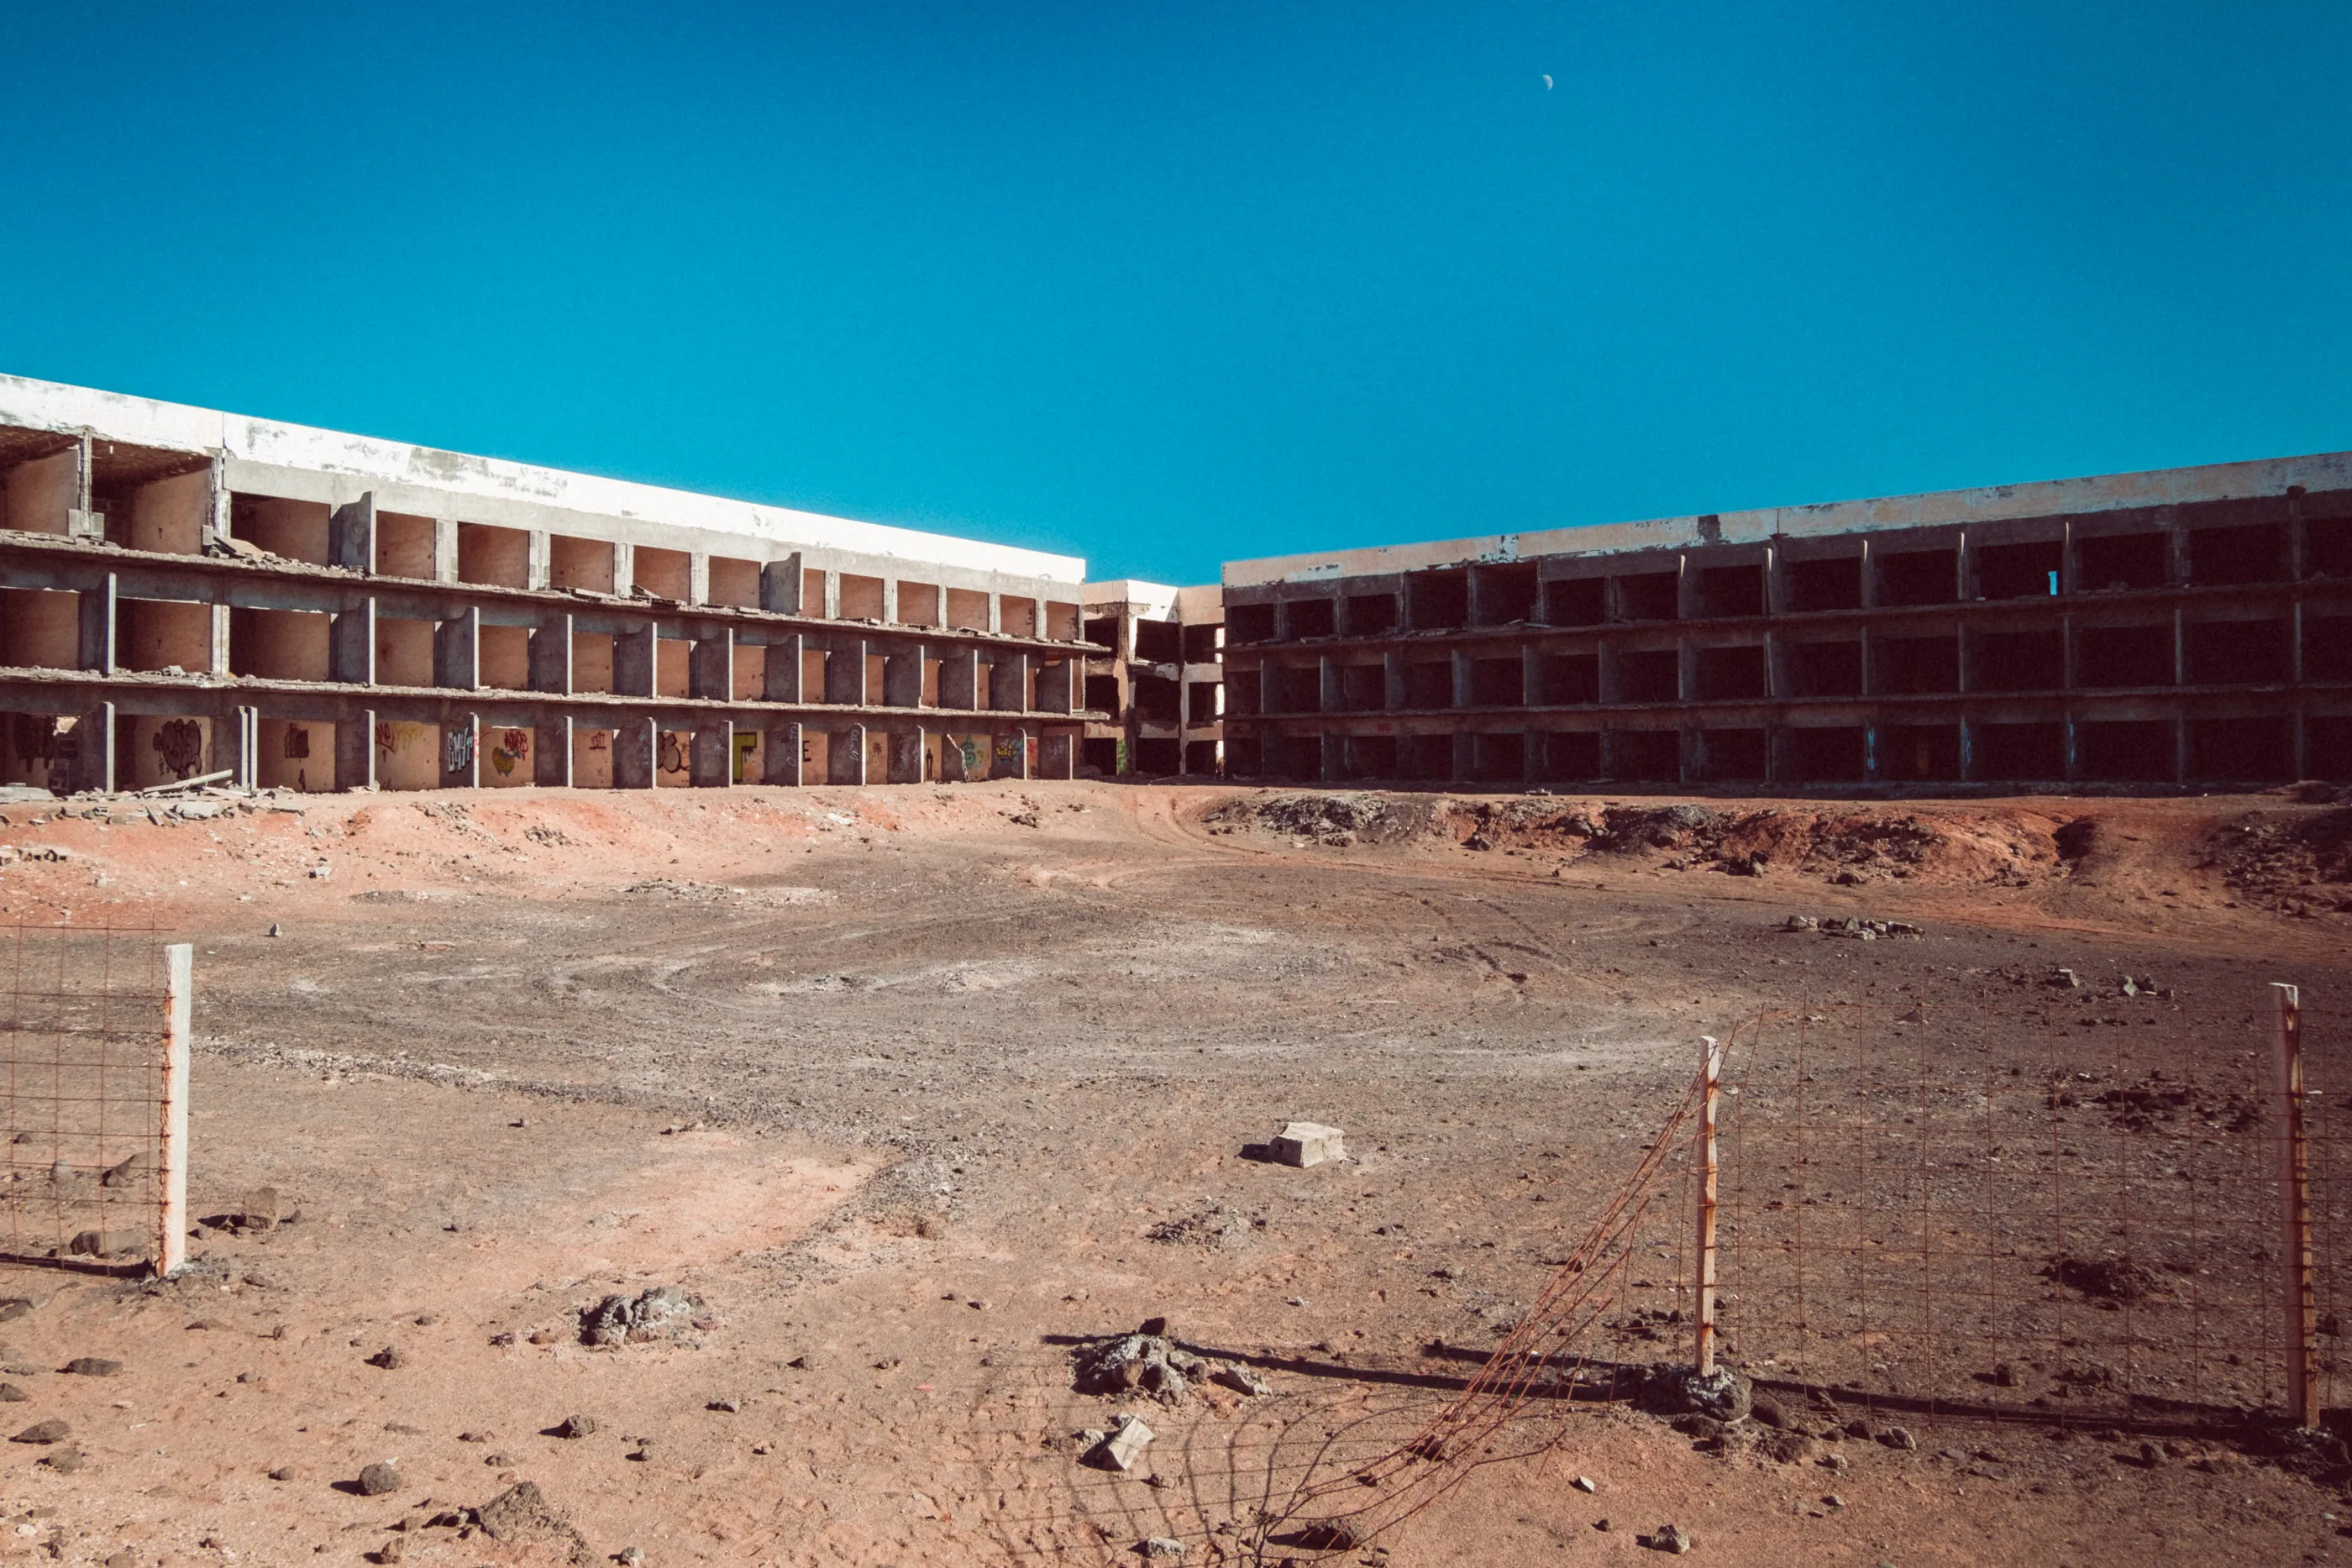
Below, you'll see a selection of images from my final edit from the Lanzarote series with the preset applied across all the images. Overall, I'm really happy with the final look using the 35mm Compact preset; it delivers the retro holiday vibes I was going for with this series, and I'd highly recommend you give presets a try too!


Final thoughts and next steps
I hope you found this case study valuable, and that it is a good read-through about how presets work. I also hope it also inspires you to experiment with presets to see how effectively you can transform your images with new looks! As you can see from this guide, you can give your images a real, meaningful transformation and beautiful, stylish aesthetic with presets, so why not try them with your own photos? Highly recommended!
It's worth remembering that experimenting with presets is about having fun, trying something new with your photography, and learning. Editing your images should be enjoyable!
Once you get the hang of using presets, go back through your image archive and look at your images again in a different light. Try applying different presets to your older images; you'll undoubtedly find it valuable in giving some of your older work a new lease of life! You never know; you may publish or sell some of your older work with their new preset treatment.
As a reminder, you can find all of Picfair’s presets on one dedicated presets page; they are free and compatible with Adobe Lightroom and Photoshop on desktop and mobile. For the purpose of this guide I used these presets in Adobe Lightroom desktop, but they work perfectly well in Lightroom for Mobile too, if you prefer editing images on your smartphone.
Remember to upload photos with the presets applied to your Picfair Store and share them across your network; you never know- they could end up on our social media channels, too!
Picfair’s Free presets:
Get 30+ new looks for your images effortlessly with Picfair's FREE Adobe presets Retro, Film Stock & Classic.
Download Picfair’s presets.


