


Nothing ruins a good photo quite like a wonky horizon - here’s how to thwart unwanted tilt

Many fantastic photos submitted to image libraries, magazines, competitions and galleries are let down by a single glaring problem: a wonky horizon.
Sometimes intentional tilt can be creative, but an off-kilter horizon almost always looks wrong. And it’s such a simple problem to fix - either at the time of shooting or afterwards with simple editing tools. Here’s how...
1 Find natural lines
There are certain natural lines in every scene that will look awry unless they’re perfectly horizontal or vertical, and identifying where these lines are is one of the key steps in becoming a straight shooter every time. If you’re shooting seascapes then it’s easy, as the flat horizon is an obvious visual aid. Similarly, with indoor scenes the floor or ceiling is a useful indicator.

2 Find the horizon
There are plenty of scenes that have no obvious horizon line or vertical line to use for reference. This is when your judgement comes into play. Often it’s a case of finding the likeliest guide, like the edge of a pavement or a row of fence posts. At other times we might need to work out a sort-of average horizon by roughly evening out distant details, like the differing levels in a mountain range or the tops of a row of trees.

3 Straight or not?
There are times when a scene may look level to the eye, but it turns out to be tilted afterwards. It all depends on the elements that make up the scene. The viewer’s eye is drawn through the scene by natural leading lines, and diagonal lines are often more aesthetically pleasing than verticals or horizontals. Of course, if there’s no obvious visual indicator to work with, it’s worth asking yourself whether it matters if the frame is perfectly straight or not.

In this portrait all the lines in the scene are at an angle, so attempting to make them horizontal would look wrong. Photo by Will Wilson - f/4 | 1/125s
4 Level your panoramas
Levelling out the horizon can be doubly tricky for panoramas as even if you get the first image in the sequence perfectly straight, the rest may not be. This often happens when shooting for panoramas with a tripod, as if the legs aren’t at exactly the same height or if the ground is uneven then the swivel head may throw the horizon off-kilter as you swing it around to capture the scene in several segments.
Before shooting, check that the first and last camera position match up with one another. A live view grid can be invaluable for this, as it helps to keep the horizon consistent throughout the entire sequence.

5 In-camera levelling
If you’re struggling with persistent wonky horizons then one of the simplest methods to correct the issue is in-camera electronic levelling. Most cameras will offer an on-screen graphic that shows if the camera is tilted or level. The graphic will overlay on top of the live view feed of the scene. So if you’re using a mirrorless camera then you’ll have the option to view the graphic either on the LCD or through the viewfinder.
DSLR users can similarly engage Live View, and many models also feature a more basic viewfinder levelling display. Each brand has its own way of turning the feature on, but it usually involves cycling through the on-screen graphic options. Once enabled, simply alter the camera angle until the graphic is perfectly level.

Most cameras have an electronic level - on the Canon 90D (above) it’s accessed by pressing the Info button to cycle through the on-screen options. There’s also a separate viewfinder level icon that can be switched on in the camera menus.
6 Turn on viewfinder grids
The levelling screen offered by many cameras overlays the graphic on top of your image, so it can sometimes hamper your view when composing a scene. If you want a less intrusive visual aid, then lots of cameras also let you overlay subtle grid lines. It’s especially useful for DSLR users, as many will let you display a subtle grid in the viewfinder.
While perhaps not as accurate as the electronic level screen, these grid lines offer a helpful visual aid for lining up details in your scene that you know should be perfectly horizontal or vertical, such as the horizon in a coastal scene. And they’re subtle enough that they can be left on all the time, which many landscape photographers will do when out on a shoot.

7 Use tripod spirit levels
A tripod can be a great help if you’re plagued by wonky horizons, as it allows you to fine-tune the camera angle at your leisure. Many tripods will also feature a handy spirit level built into the tripod head, which can be invaluable when out shooting landscapes or architectural scenes. You can also buy very inexpensive spirit levels that sit in the flash hot shoe on top of the camera.

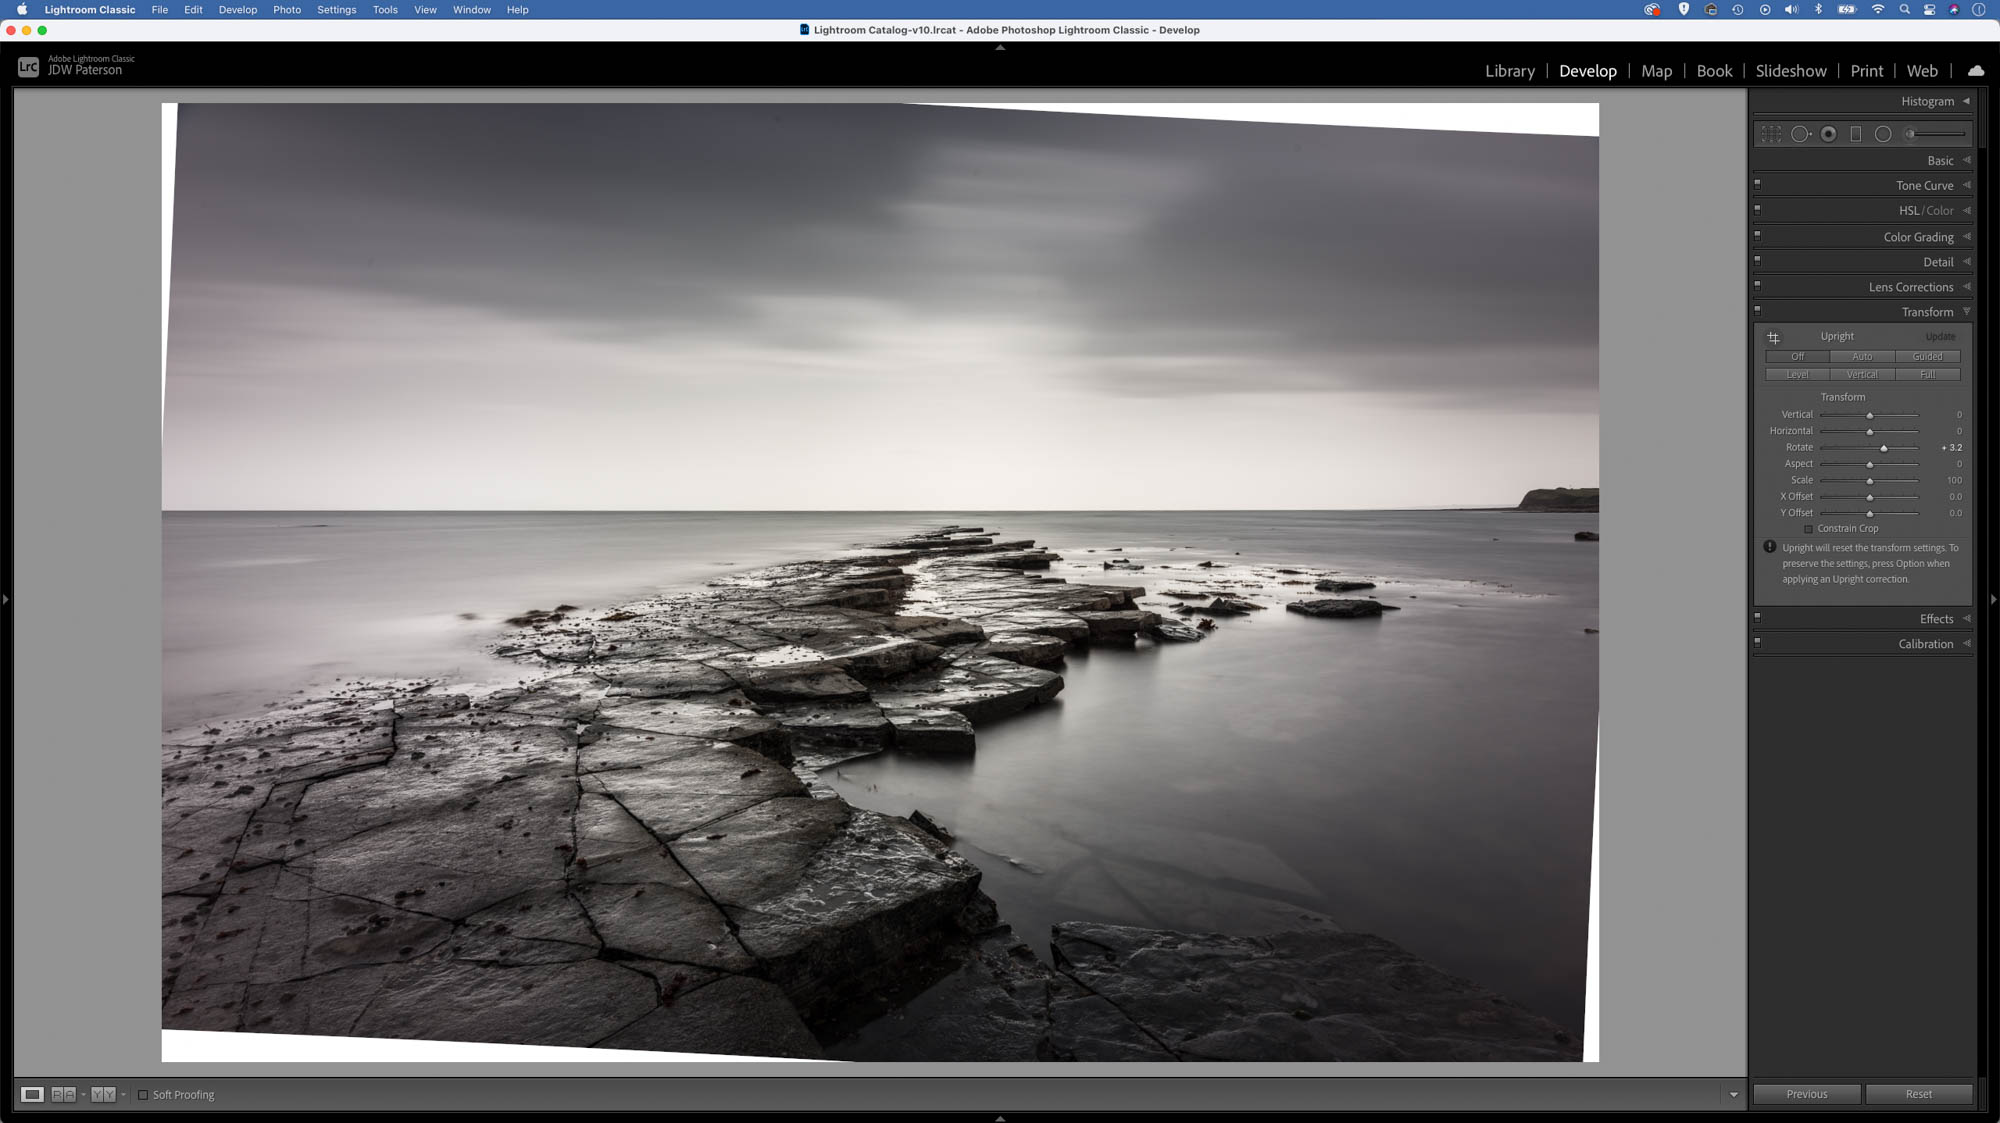
8 Lightroom’s Auto-level button
If you don’t get things perfectly straight in-camera then you can always crop later to correct for the tilt. Of course, this usually means cropping in slightly tighter so you inevitably lose a portion around the edges of the frame, which may be difficult in tight compositions.
There are several ways to straighten a wonky frame in Lightroom. The quickest is often the Auto-Level button in the Upright settings. Found in the Transform Panel, the Upright buttons automatically rotate and skew the image to correct for wonky horizons and converging verticals. The Auto-Level button works best when there’s an obvious line to work with like the sea or a building. If there isn’t, it might struggle. It can also slip up when there’s a strong line that is close to the horizon line, as it might pick this up by mistake and make a wrong correction. This is when we switch to manual correction…

9 Crop and Straighten in Lightroom
Lightroom’s Crop tool lets you rotate your frame by dragging the corners of the crop box. When you start dragging, the crop overlay will show you a handy grid that makes it easier to align with objects and lines in the frame. The tool settings on the right of the screen also offer a straighten tool. Pick this up then drag along a natural line in the scene to make it perfectly horizontal or vertical.

10 Use Rotate instead of crop
The Crop tool is the obvious choice for correcting tilt in Lightroom, but there’s another option that may be better. The Rotate slider in Lightroom Classic’s Transform Panel (called the Geometry panel in Camera Raw and Lightroom’s cloud app) also lets you correct wonky frames. The handy thing about this feature is that - unlike the Crop tool - it won’t crop in tighter as you rotate. Instead, the rotated corners are left as empty space. This can be useful if you intend to fill in the missing spaces later, perhaps by cloning nearby details or with Photoshop’s Content-Aware Fill command.
11 Correct bowing horizons and fix verticals
Barrel distortion can cause the edges of the frame to curve slightly, and this can make a horizon line look annoyingly bowed. It’s usually more apparent with wide angle lenses, especially if the horizon line is positioned near to the top or bottom of the frame. Thankfully, it’s easily fixed in Lightroom. Usually all you need to do is check ‘Enable Profile Corrections’ in the Lens Correction panel and Lightroom will automatically fix the issue.
You can also fine-tune things manually with the Distortion slider. Sometimes correcting the horizontal axis can leave the vertical axis looking wrong. If this occurs try using the Guided button in the Transform panel. This lets you plot lines through the image along horizontal and vertical shapes to correct for distortion.
.jpg)
Video tutorial
If you notice that your photos aren't quite straight after looking back at them, don't worry, it's simple to fix! Here's a video tutorial on how to straighten and clean up your photos in Lightroom.

James has been a professional photographer and award-winning journalist for the past 15 years. He is editor of Practical Photoshop magazine and contributes to leading photography publications worldwide.
View all articles

