


Discover a host of this year's popular editing styles and how to apply them to your photos…

When we first open an image on our phone, tablet or computer the endless editing options can be slightly daunting, so why not stick to these popular imaging trends and learn how to give your photos a contemporary look or a stylish retro treatment with ease...
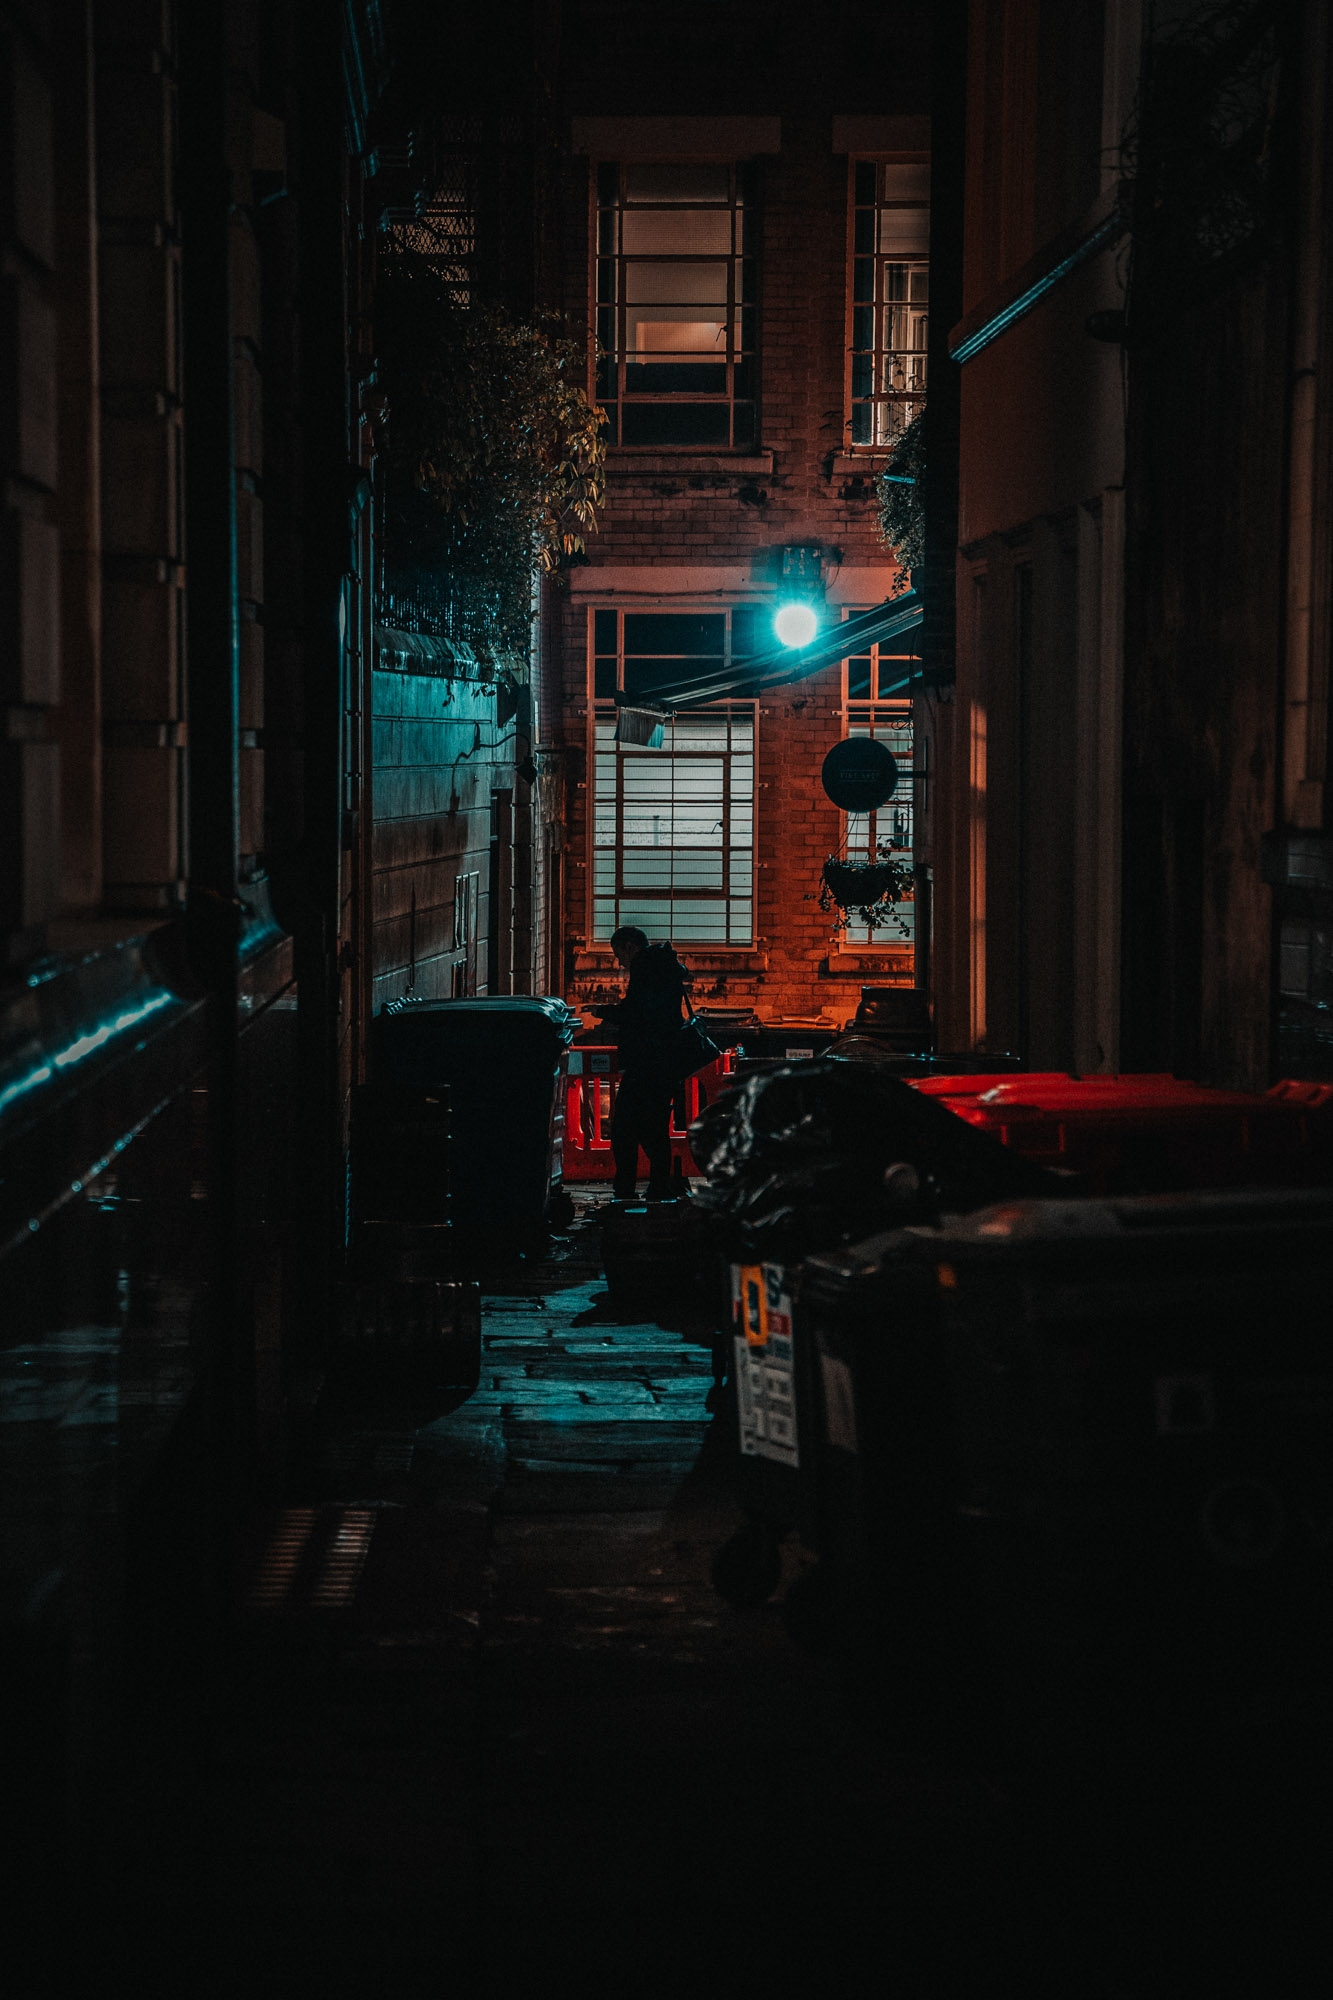
1 Go dark and moody
A dark and moody look can give your photos plenty of atmosphere. When shooting, look for dark scenes with small pockets of light in them, then expose for the highlights so that the shadows become very deep. When it comes to editing, use the Exposure and Shadows controls to deepen the shadows and try cooling the white balance temperature for a muted feel. A heavy vignette can also compliment the moody atmosphere - use the radial Filter in Lightroom to add a dark vignette to the corners of the frame.
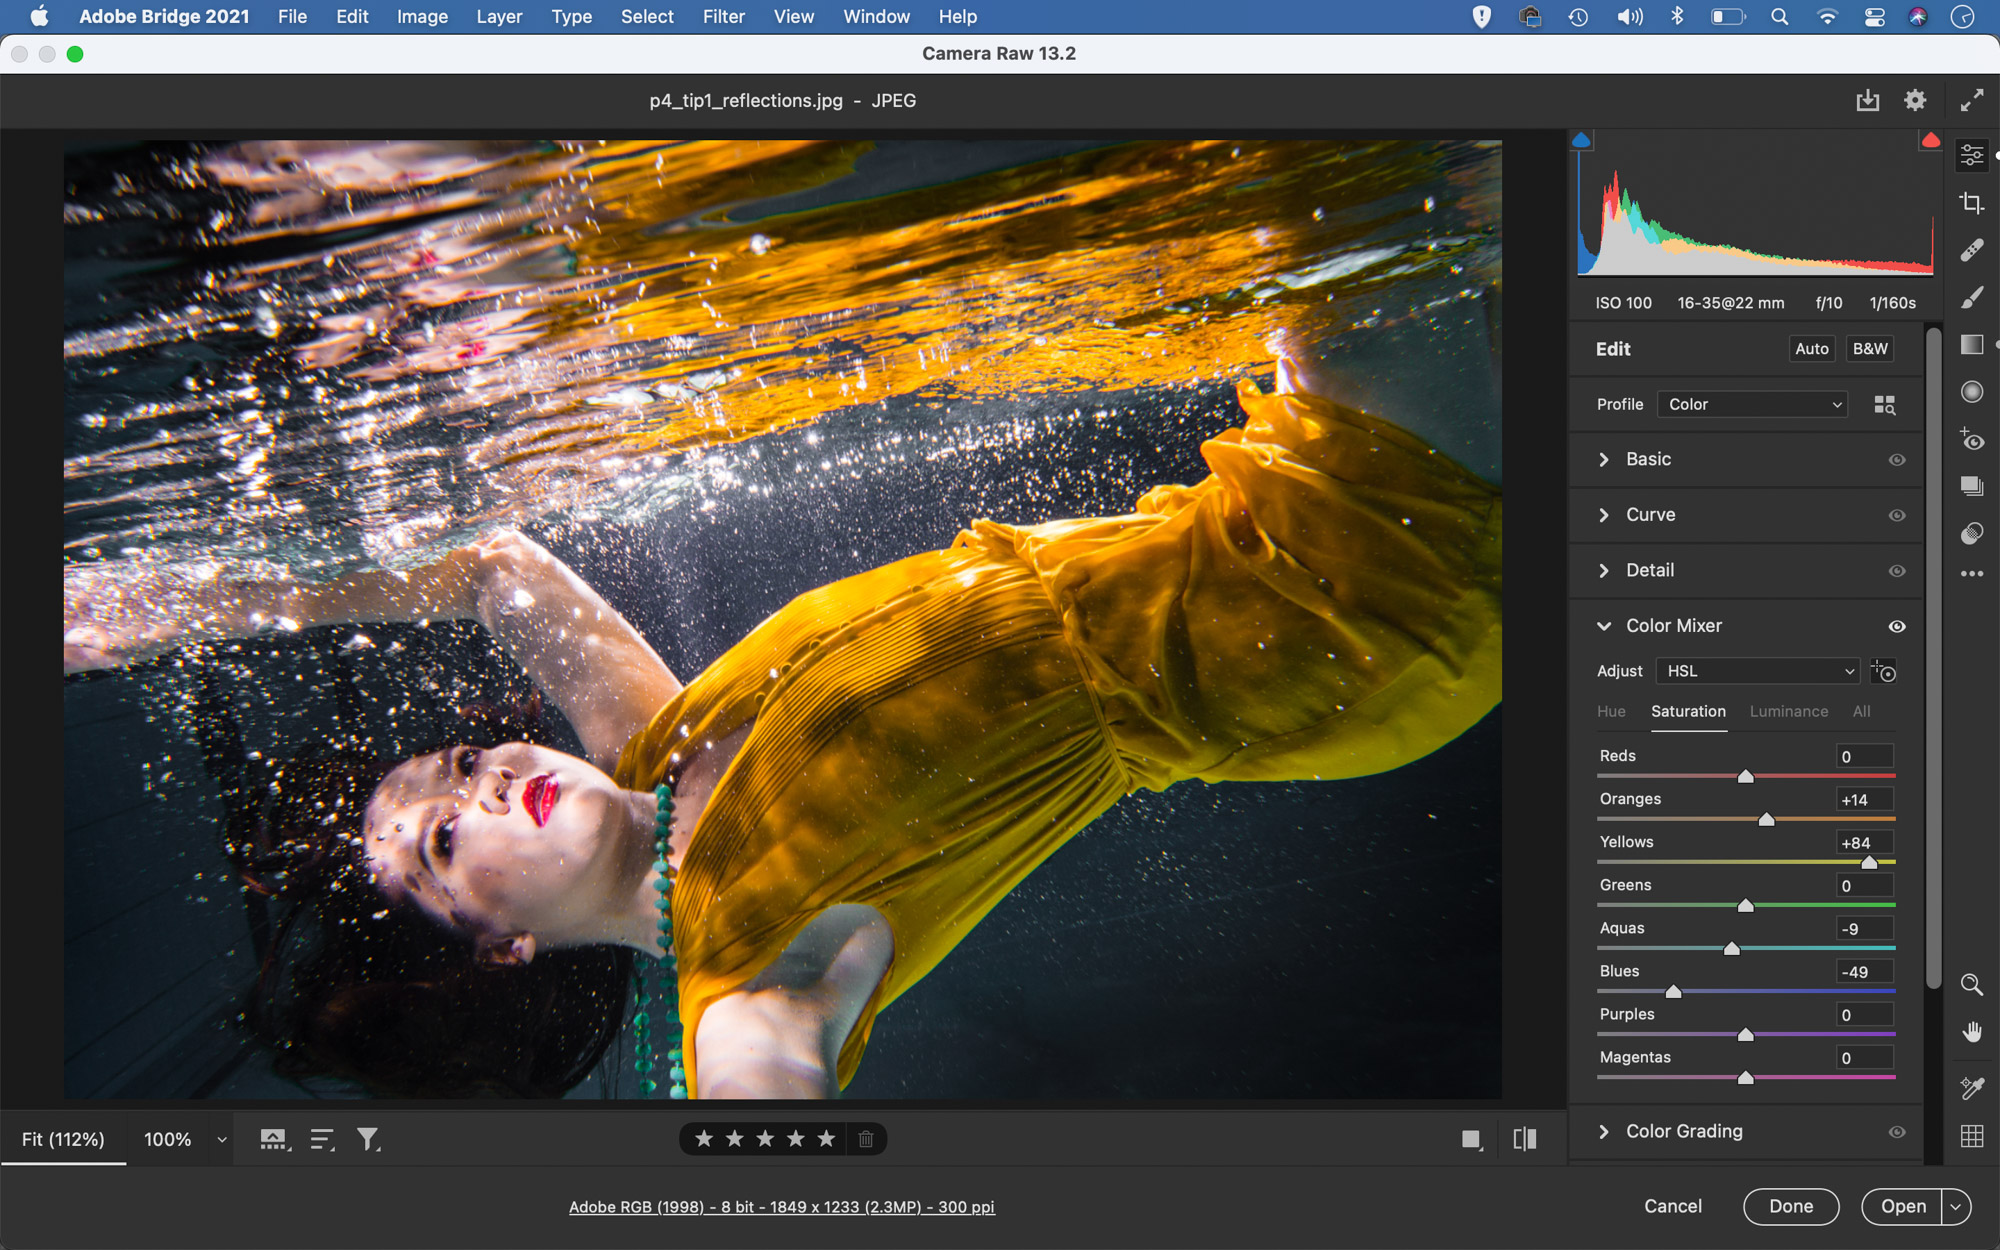
2 Vibrant colours
A bold colour palette can make your image pop out of the screen or print. Sometimes all you need to do is boost the saturation or vibrance (which targets the less-saturated colours). If you want greater control then try experimenting with the Color Mixer Panel in Camera Raw/Lightroom. Head to the Saturation tab then grab the target tool and drag left/right over colours in the image to alter the saturation of different colour ranges.
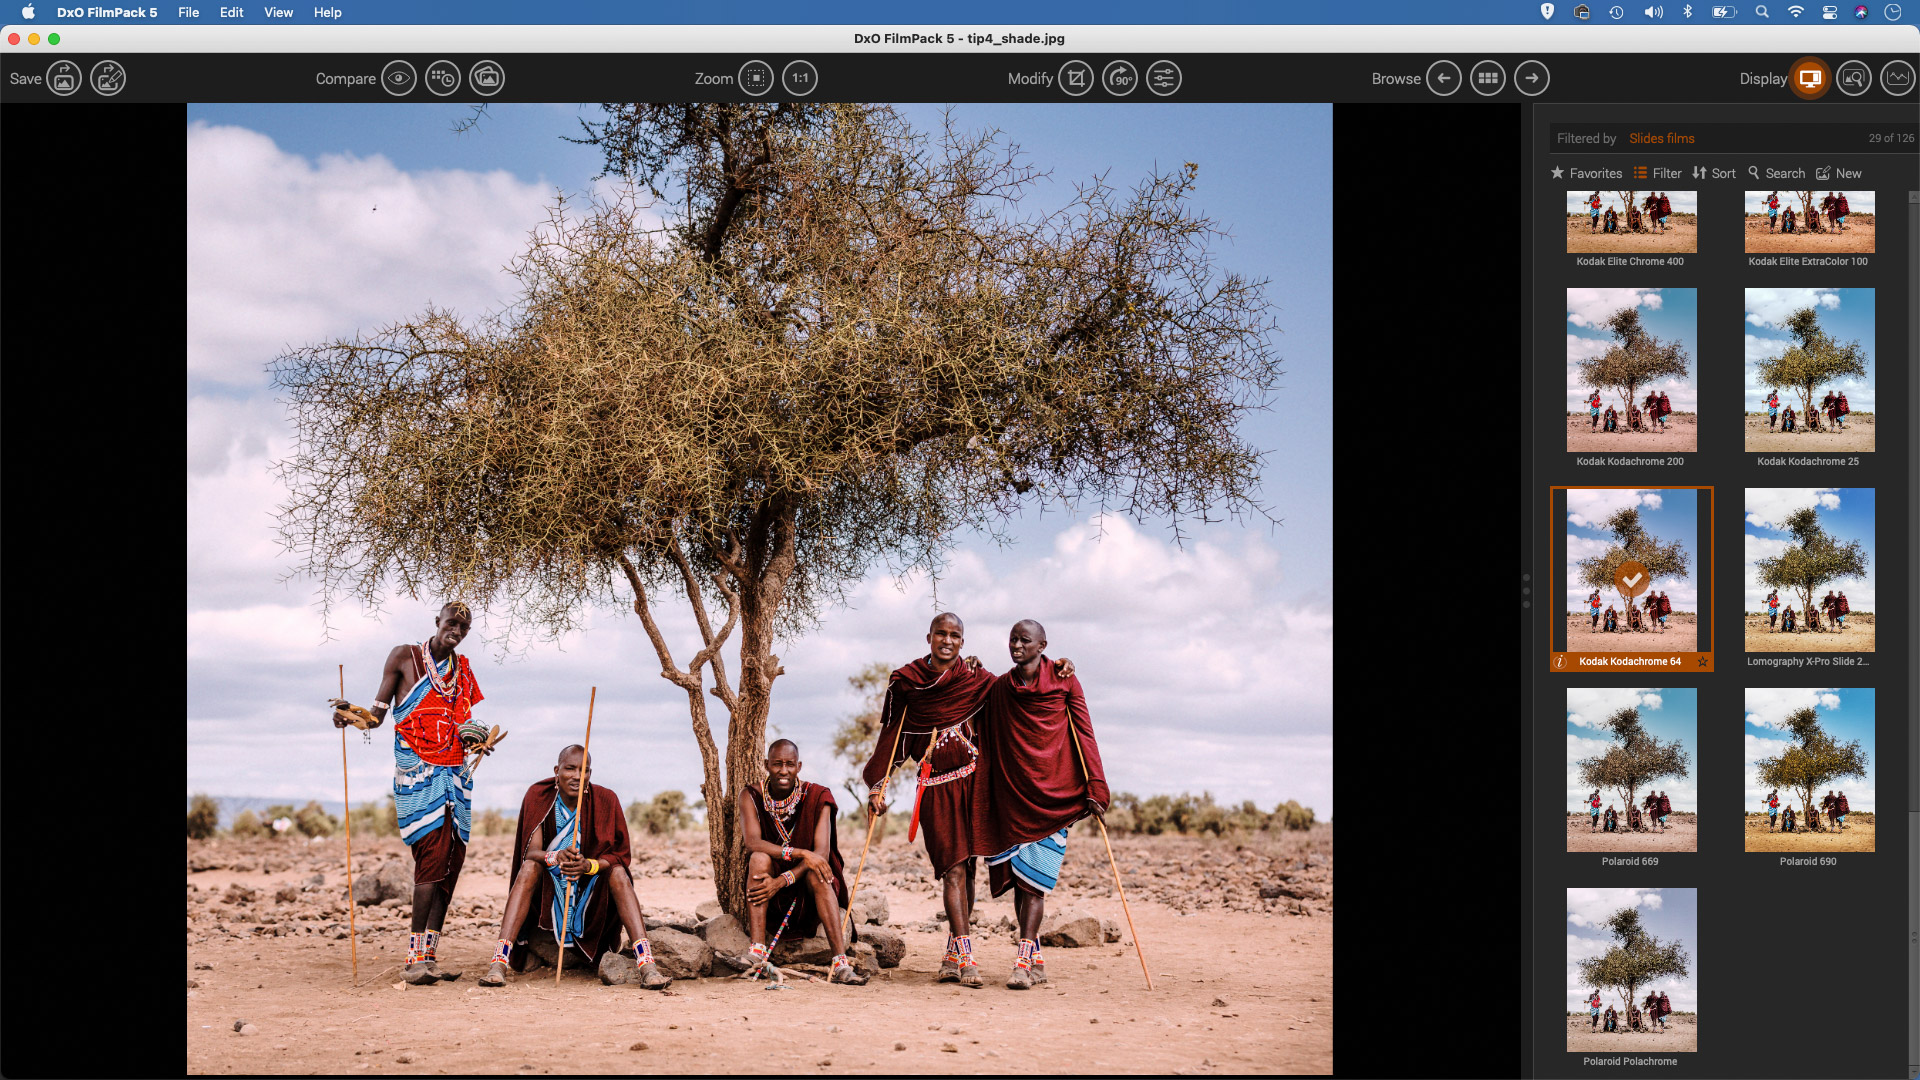
3 Replicate classic film stocks
One of the saddest things about the demise of film photography is the decline of famous film stocks. Different types became known for their individual characteristics, like vibrant greens (Kodachrome 64), or eye-popping colour rendition (Fuji Velvia) or creamy monochrome skin tones (Ilford Delta 100). Thankfully, we can replicate film stocks with plugins in Lightroom. One of the best is DxO Filmpack, which adjusts colours and adds grain to get the look of many famous film stocks. Of course, nothing beats the real thing. Many of the classic stocks are still available through specialist outlets, so if you own a film camera then why not order a few rolls?
4 Embrace low-maintenance editing
When anybody can add an effect to their photo within a few seconds - or even as they take the shot - there’s something to be said for the opposite approach. A minimalist take on image-editing can cut out visual tricks and let the viewer focus on the most important thing, the content of the image.
Of course, it means less screen time too. So why not embrace low maintenance editing and leave your images as they are? or perhaps keep editing to the absolute minimum - simply open the image on your tablet or phone in Lightroom CC and hit the Auto button (which - thanks to machine learning technology - is far more intelligent than you might think).
5 Add a retro colour treatment
One of the easiest ways to add a retro colour treatment is with the Profile Browser in Lightroom/Camera Raw. Simply go to the Vintage set and choose a treatment, then use the Amount slider to control the strength of the effect. For more control, head to the Color Grading panel. Here you can add individual colour tints to the highlights, midtone and shadows. Old prints tend to skew towards blue in the shadows and yellow in the highlights.

6 Classic black and white
Some looks ever go out of style. For a classic black and white treatment, try the set of B&W profiles in Lightroom/Camera Raw These give you a range of different black and white effects, some with increased contrast, others that darken or lighten certain colour ranges during the conversion. For greater control, head to the B&W Mixer panel and use the eight colour sliders to control the brightness of each colour range.

7 Make it matte
A matte look gives images a retro feel while at the same time seeming modern and fresh. Essentially all we have to do to get the look is reduce the contrast by flattening out the tones, so that the darkest and lightest points in the scene move closer together in the tonal range.
A simple way to do this is with the Tone Curve in Lightroom/Camera Raw. Drag the top right point on the diagonal curve line downwards to subdue the highlights, and the bottom left point upwards to lift the shadows. The flatter the curve line, the more matte the image becomes. If you like, do a similar edit to the Blue channel curve to add blue to the shadows and yellow to the highlights.

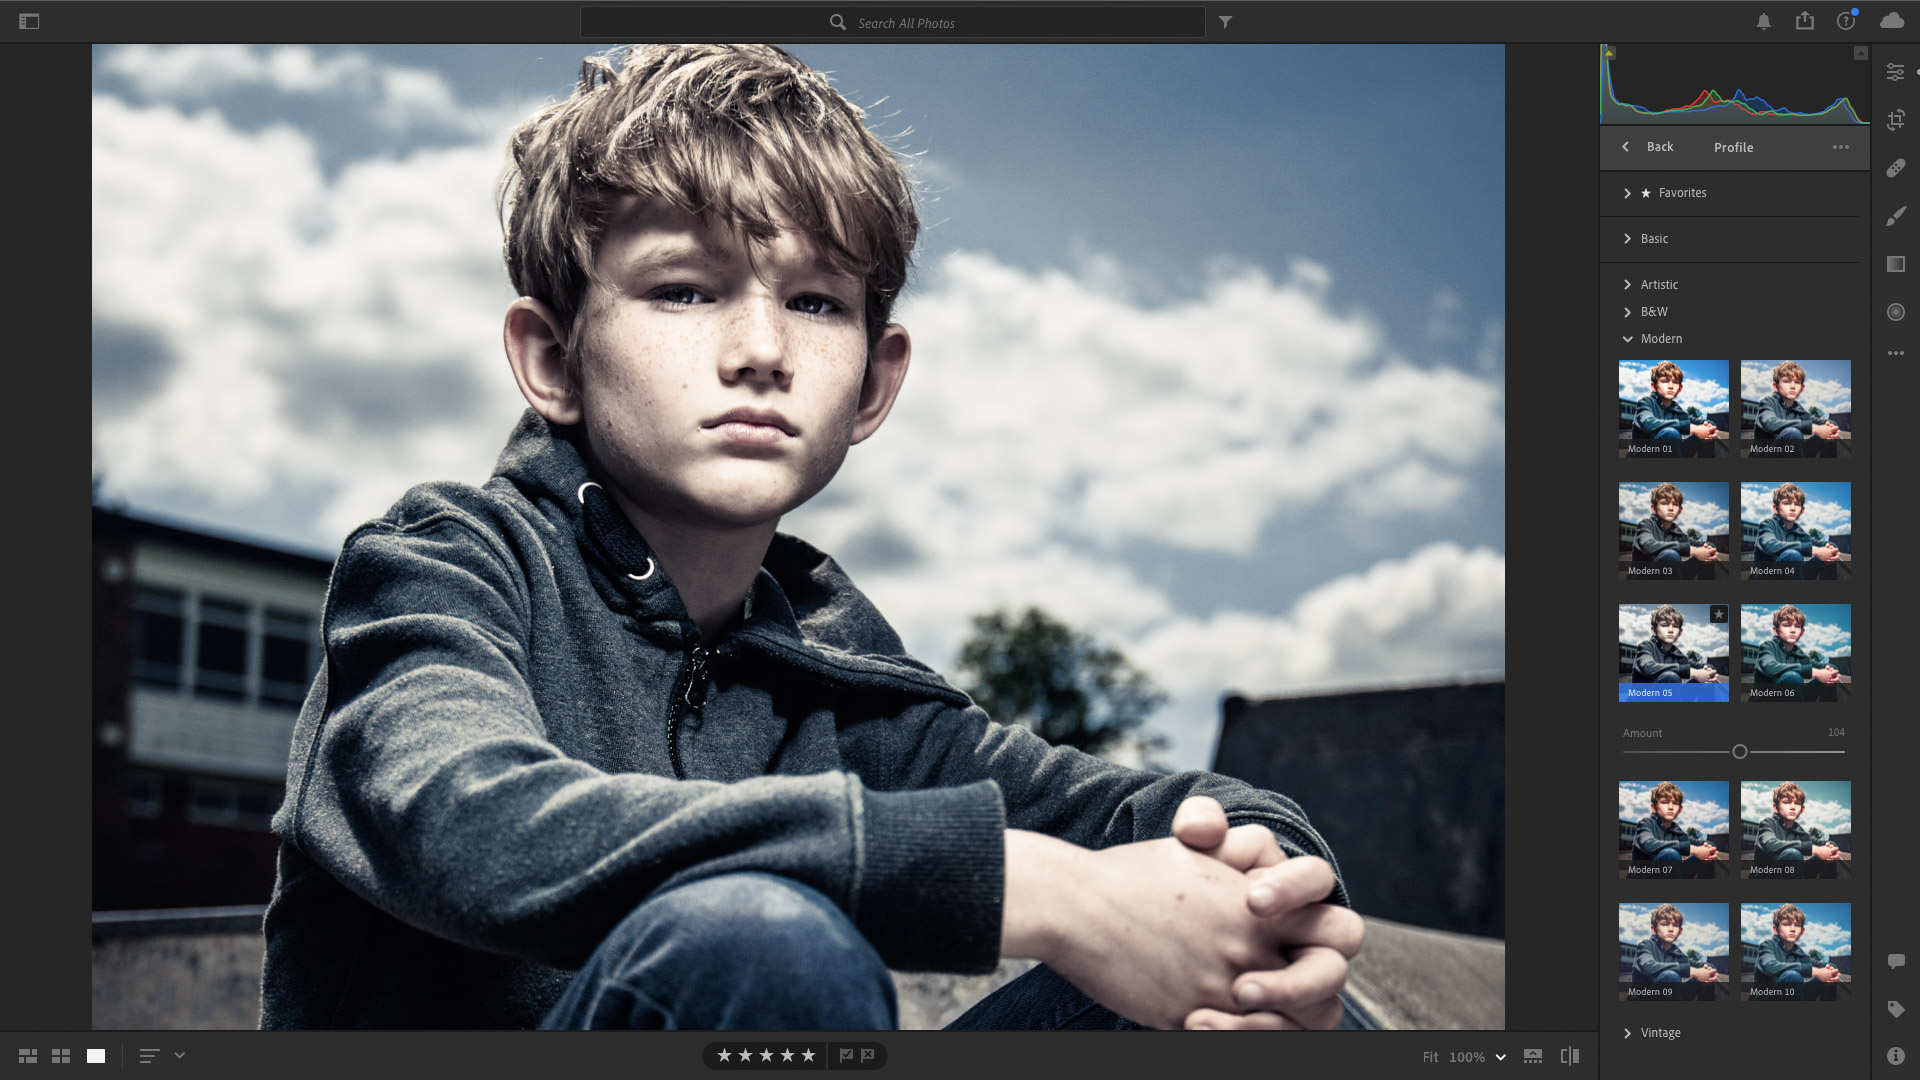
8 Use muted colours
In the early days of digital photography there was a trend for over-the-top colours, hyper-real saturation and bold contrast. These days the opposite approach feels more contemporary. Muted colours and cool tones can give photos a modern edge.
A good place to start is the Profile browser in Lightroom/ Camera Raw. Try the Modern 05 profile for a desaturated look, then go on to tweak the colours with the Color Grading controls.
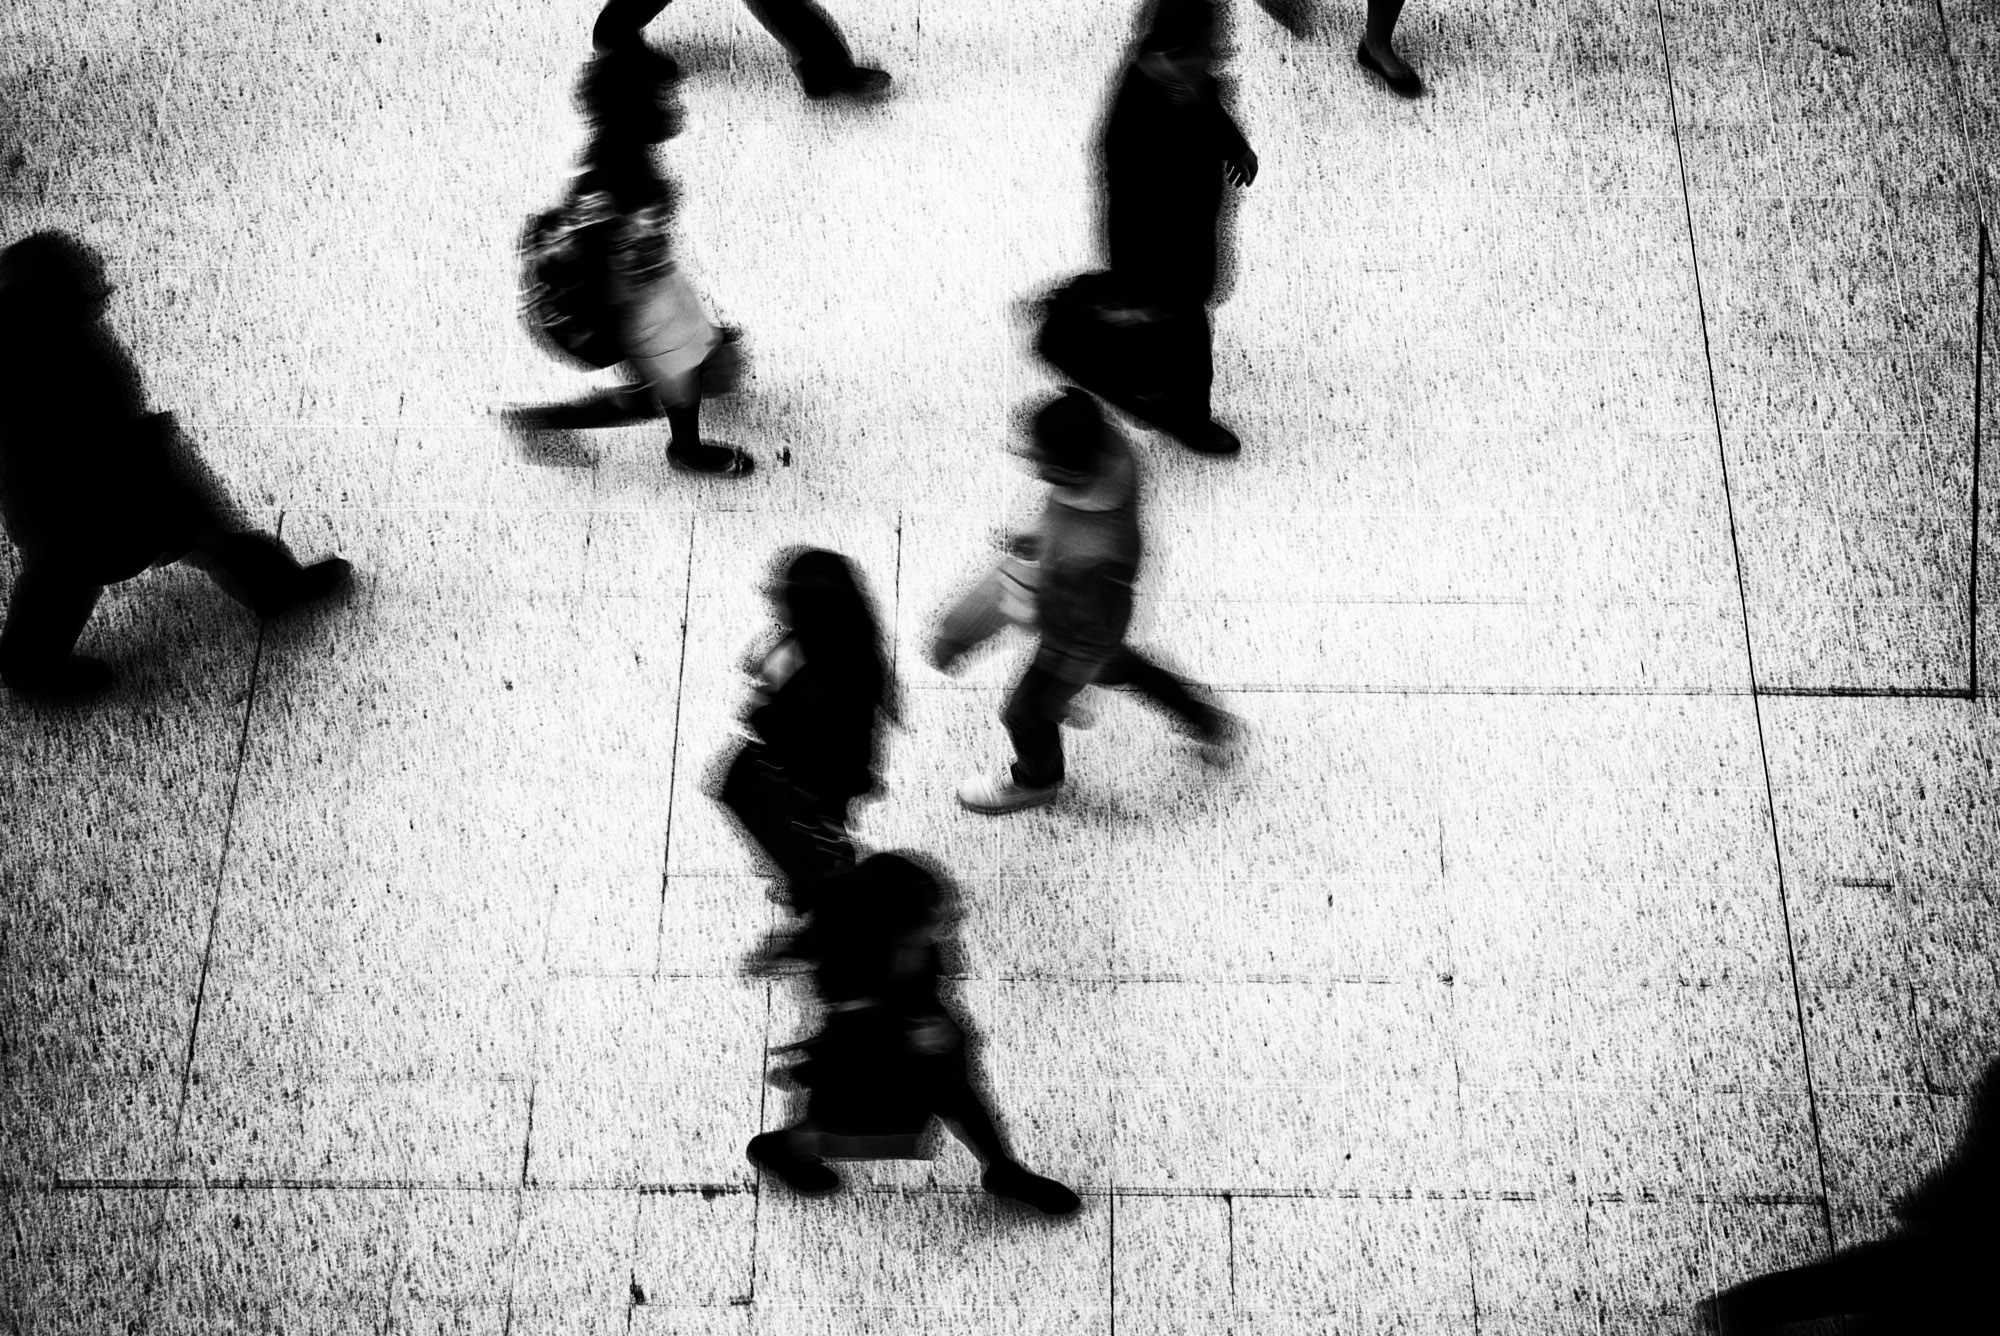
9 Get the grainy look
In the days before digital cameras, high-ISO film would give photos a wonderful grainy quality. These high speed films would often be used in documentary, street photography and photojournalism because of the low-light performance required in such situations. As such, adding grain to your digital images can lend them a visceral, vérité feel. Grain can also be used to great effect for fine art, motion blur or abstract images.
To add grain to your photos, use either the Effects Panel in Lightroom or the Add Noise Filter in Photoshop. Of course, you could also increase image noise by intentionally shooting with a very high ISO.
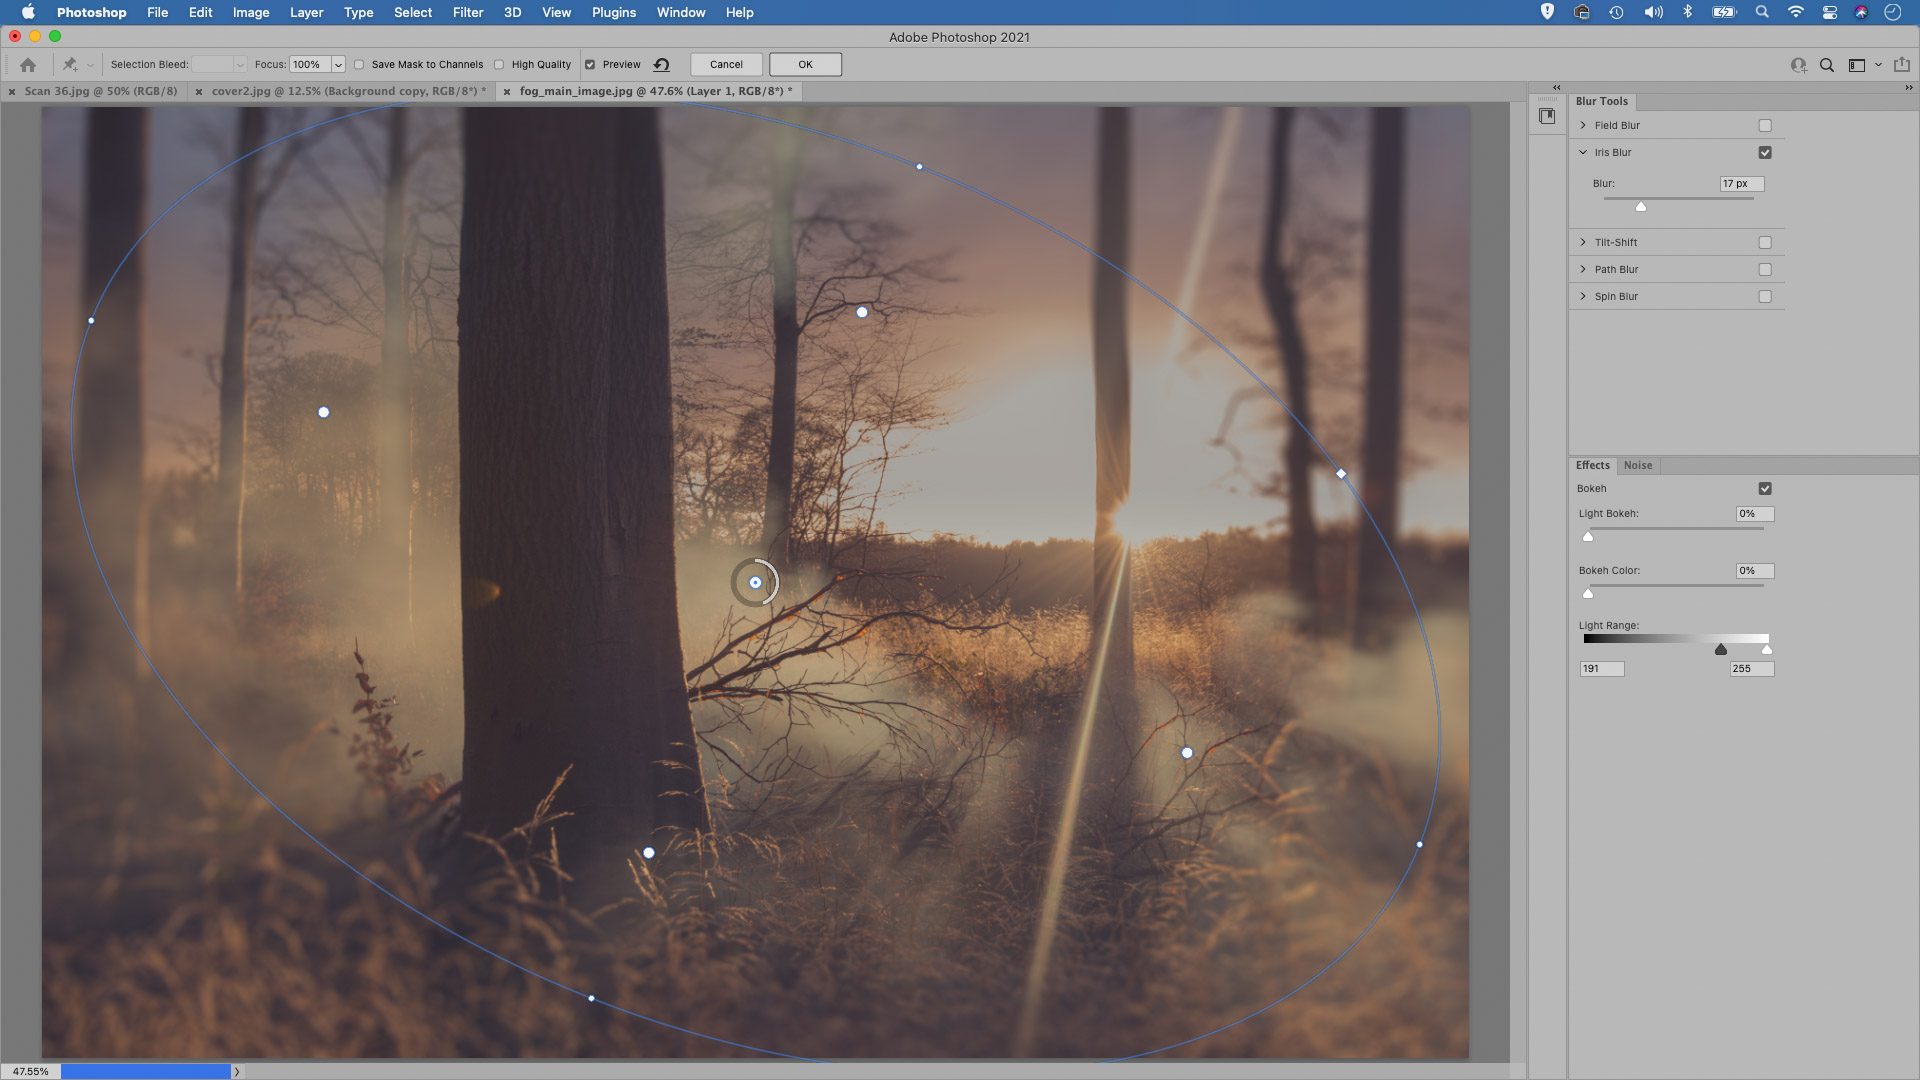
10 Blurred edges
Blurring the fringes of the image can give you a toy camera look, as these cheap devices were often only sharp in the centre of the frame. The blurred look is easy to achieve in Photoshop. Go to the Iris blur filter (Filter > Blur Gallery > Iris Blur). Use the on-image dial to control the strength of the blur, and the sliders to set the characteristics of the bokeh. Try complimenting the look with a cross process effect. You’ll find a handy cross process preset within the Photoshop Curves command.
Video tutorial
Experimenting with different editing styles can result in some really interesting photos, which can help you gain a distinctive editing style. Here's a tutorial on how you get that sought-after analogue film look for your shots using Affinity Photo:
All images by James Paterson unless otherwise stated.

James has been a professional photographer and award-winning journalist for the past 15 years. He is editor of Practical Photoshop magazine and contributes to leading photography publications worldwide.
View all articles

