Top tips for taking photos of rainbows, aurora, Sun halos and more
Always keep your eyes to the skies. The sky so often constitutes the backdrop to landscape photos, but sometimes it can become the main subject.
"The sky so often constitutes the backdrop to landscape photos, but sometimes it can become the main subject."
From rainbows to light pillars, there are a host of atmospheric phenomena that occur seemingly at random that can make for incredible one-off photographs. Usually caused by how sunlight interacts with particles in Earth’s atmosphere, solar and lunar halos, alpenglow and zodiacal light may appear to be randomly occurring, but they’re sometimes tied to seasons and weather conditions that can be predicted.
For those who love photography and travel, here’s a bucket list of rare atmospheric phenomena to check-off…
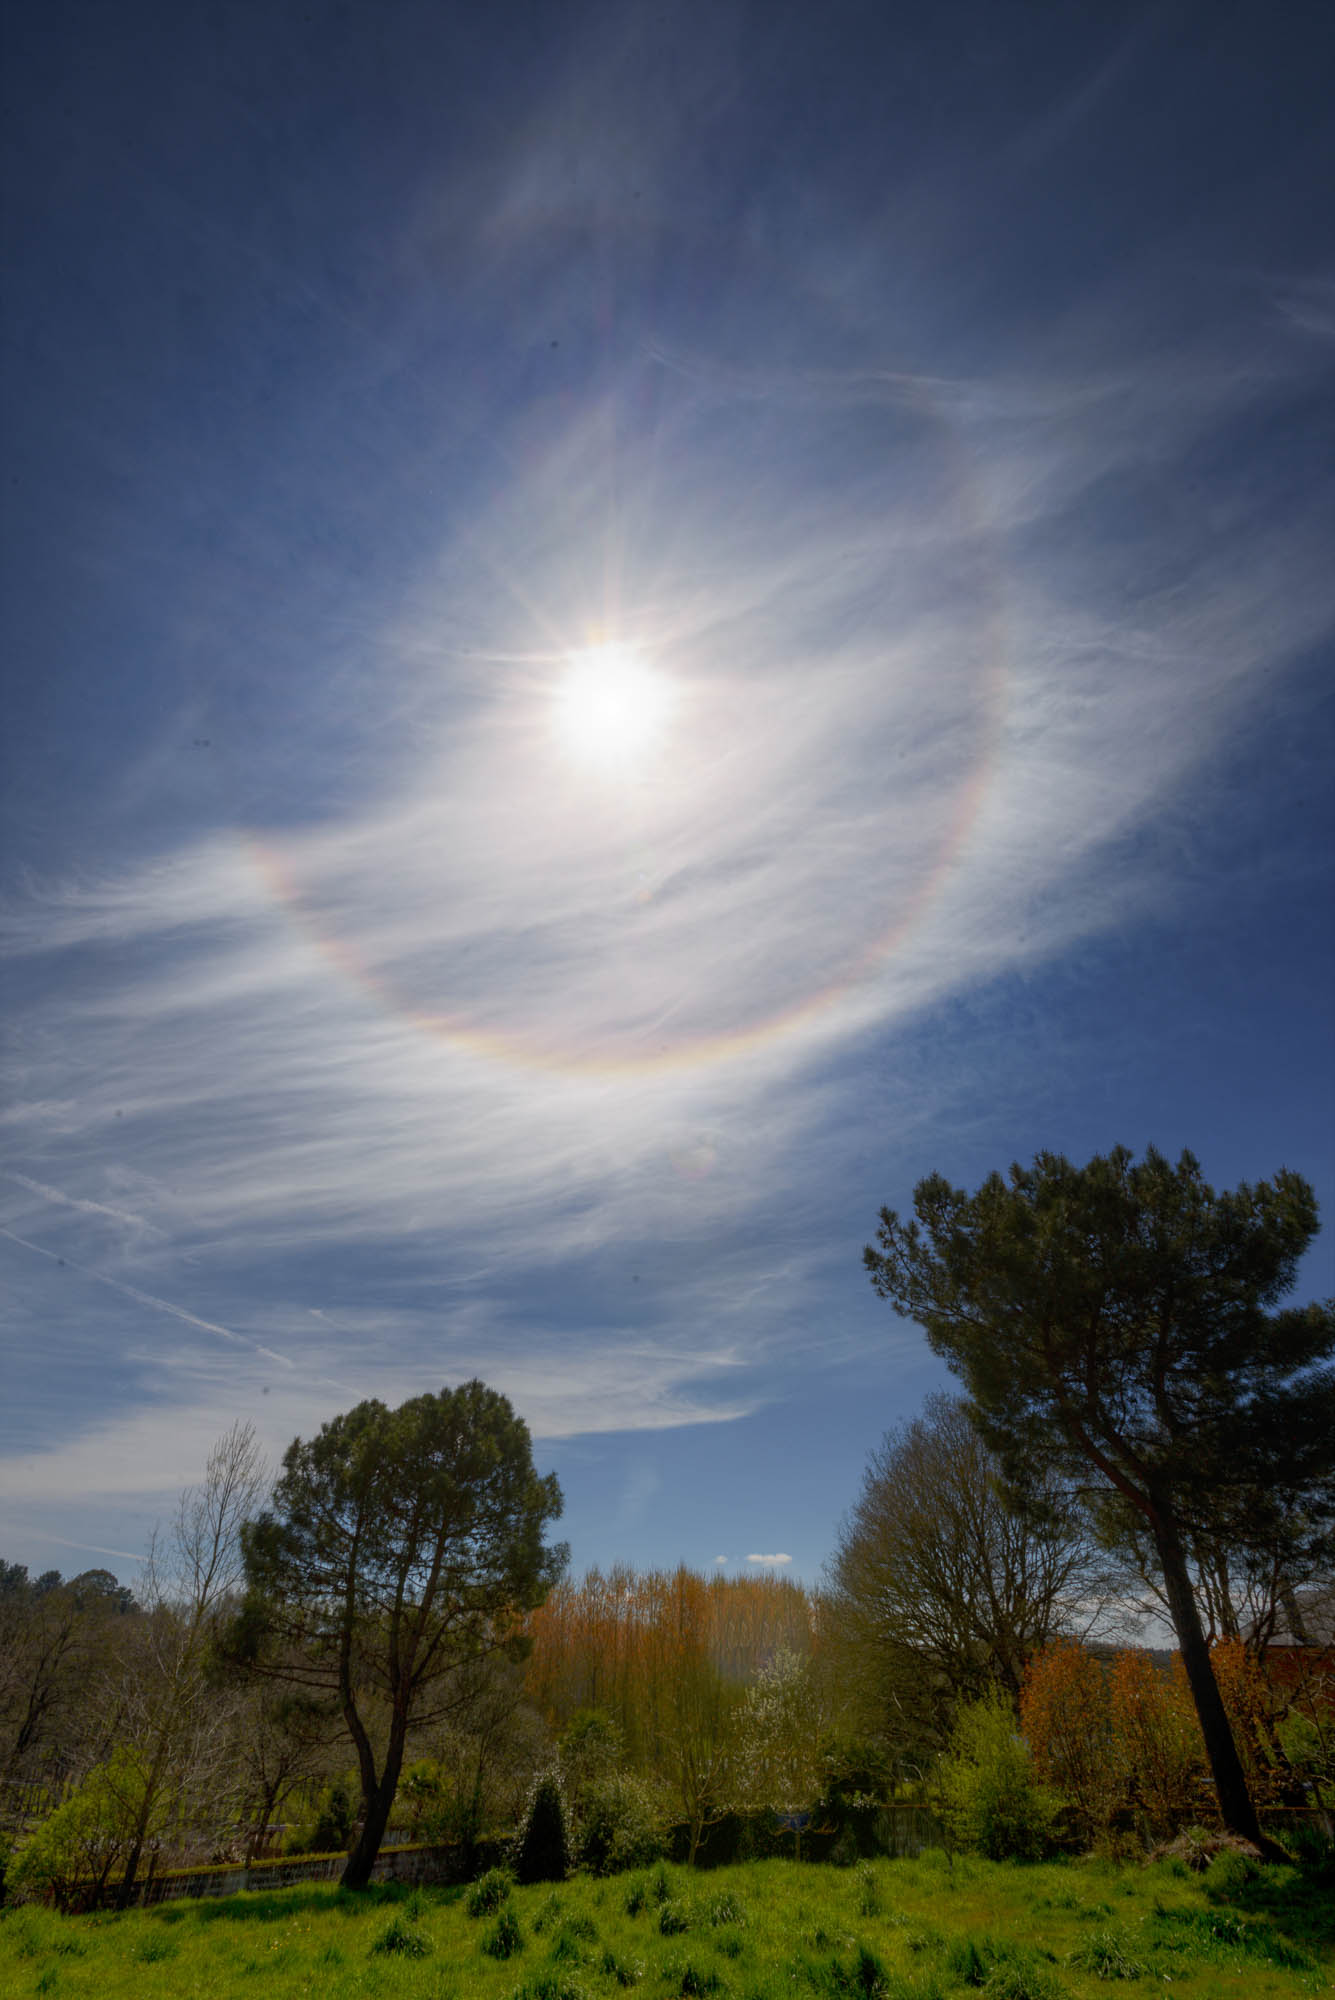
1 Sun halos
At some point you've probably seen a strange halo around the Sun during a clear day. Also called parhelion, icebow and ‘false Sun’, a wide circle of light around our star is a natural atmospheric phenomenon caused by sunlight refracting off hexagonal ice crystals in the atmosphere. That can happen close to the ground in winter on cold days or high up in the Earth’s atmosphere as sunlight travels through cirrostratus cloud formations. The latter can happen at any time and be seen from anywhere on the planet.
Sun halos occur on a 22° circle because those ice crystals refract the Sun’s rays by exactly that angle, so you’ll need a wide-angle lens to capture them in a composition. Wide-angle lenses will also cope well with focusing on the Sun, which in aperture priority mode is a good way to get the correct exposure. However, be safe: use ‘live view’ on your LCD and never look at the Sun through your camera’s optical viewfinder! If your image is too bright or too dark, switch to manual and retain all your settings save for exposure times, which you should experiment with – but keep them short.
Author tip:
The exact same thing can happen to a full Moon. Called a ‘lunar halo’, they’re mostly caused by ice crystals in cold wintry air at northern latitudes of the northern hemisphere. So if you go up north hunting for the aurora, do keep an eye out for lunar halos in darkness.
2 Alpenglow
Have you ever seen the mountains glow in delicate pinks, oranges and reds around sunrise or sunset? That’s alpenglow, a phenomenon that’s most often seen as an illumination of mountain peaks from a lower elevation or the tops of buildings from street-level. The light is coming from a Sun that has already set, or is about to rise, from the viewer’s perspective, but it’s shining directly on the subject. To create a sharp, noise-free shot keep to ISO 100 and use a fast lens on a wide aperture. A telephoto lens will help you isolate the alpenglow while a wide-angle lens will better capture an epic urban or rural scene.

Author tip:
A kind of ‘sister’ sight to alpenglow for those on the plains is the anti-twilight arch, an atmospheric phenomenon that’s more famously known as the ‘Belt of Venus’. Seen during twilight as a pink band opposite the sunset point about 10-20º up and caused by the same scattering of light as alpenglow, Earth's blue-gray shadow eventually rises into the Belt of Venus.
3 Rainbows and double rainbows
Rainbows occur when sunlight reflects off the back of spherical raindrops, bending as it exits. They always occur opposite the Sun and by definition on days when there are rain showers. Double rainbows happen when sunlight is reflected twice within a raindrop to cause separate reflections, usually as one brighter, redder rainbow and one higher, fainter and bluer rainbow.
To photograph any kind of rainbow you must be on the edge of a cloud bank. That’s really hard to predict, and in any case, rainbows tend to occur most reliably on days when rain showers sweep across the surface. So a lot of it is down to luck; if the weather is right for rainbows (showers with Sun breaking through), get into position and hope – and remember that chasing rainbows is an easy way to get wet! For the best saturation of a rainbow’s colors, as well as a deeper blue sky and more contrasty clouds, use a circular polariser, carefully rotating it until you get the most beautiful-looking rainbow.

Author tip:
Rare, elusive and only detectable in super dark locations, moonbows are caused by the same physics as rainbows. Occurring opposite a bright Moon – typically a full Moon, which only occurs for one night each month – a moonbow can be photographed using a tripod, wide-angle lens on a wide aperture (so a small f-number). Since they tend to occur on full Moon night or close to it, the night sky tends to be fairly bright, so count on ISO 100-400. Experiment with exposure times until you’re happy.
4 Fogbows and white rainbows
While rainbows appear when sunlight reflects off the back of raindrops, ‘fogbows’– also called ‘white rainbows’ – happens when the same thing happens to the much smaller water droplets that make up fog. Their tiny size precludes colour, though it’s possible you may see a faint reddish or blueish tone to an otherwise whitish fogbow. They tend to be broader than rainbows, but smaller. Like a rainbow, you have to have the Sun behind you to a fogbow in relatively thin fog in front of you.

Author tip:
The most common sighting of a fogbow is in clouds beneath when in an airplane, though technically they’re called cloudbows, not fogbows. An even rarer phenomenon in a moon fogbow, caused by strong moonlight in a foggy landscape at night.
5 Aurora
Perhaps the most famous atmospheric phenomena of all for photographers is the aurora. They’re known as the aurora borealis in the northern hemisphere (most easily seen September-April) and the aurora australis in the southern hemisphere (March-September). These mostly green – but also sometimes purple, red and blue – arcs, ribbons and curtains in the night sky are caused by charged particles in the Sun’s solar wind that hit Earth’s magnetic field and get accelerated down into the upper atmosphere along the magnetic poles to strike atoms. You’re seeing electrons collide with oxygen and nitrogen molecules, which momentarily releases energy in the form of light.
To photograph them you need a manual camera on a tripod focused on infinity (∞ on the dial), a wide-angle lens on as low an f-number as possible, and an ISO of between 800 and 3200. The latter depends on the strength and position of the display; if the aurora is very bright and very fast moving all around you, keep to ISO 800 and short exposure times. If you’re seeing still or gradually moving greens sweep across a landscape – known as the ‘forest fire’ effect – you can use much higher ISO and exposures of up to 25 seconds.
Editor's tip:
Read our full guide to capturing the aurora here

Author tip:
Chasing aurora in the Arctic Circle in places like Iceland, northern Scandinavia, northern Canada and Alaska is as much about cloud-dodging as anything else. As well as some good weather apps you're going to need to keep warm. You may feel fine when you get out of your car, but two hours later – when you've not moved apart from the occasional re-positioning of your tripod – things can be very different. So dress incredibly warmly, and take some food with you, which can get your internal engine going when things get really nippy at 2 a.m.
6 Zodiacal light
How about capturing the ethereal glow of the biggest object in the Solar System? No, not the Sun, but zodiacal light, a cone of faint white light that can be seen shimmering in the post-sunset (and pre-dawn) night sky. It’s actually sunlight reflecting off ancient interplanetary dust and ice particles orbiting the Sun in the same plane as all of the planets. You can capture it in the same way as any night sky image:
- Use a wide-angle lens with a wide aperture
- Put your camera on a tripod
- Us as low as F-stop as possible (f2.8-f4.5)
- Manually focus on infinity
- ISO 800 (or more if your camera has a full-frame sensor)
- Exposure: 15-25 seconds
If you can’t see the cone of light when reviewing images on your LCD, ramp-up the ISO for a test shot and if it’s there it will become visible. Just remember to reduce your ISO again to avoid a noisy shot (unless your camera has a full-frame sensor). Shoot in raw and you’ll be able to reveal a lot of brightness in post-processing, which is critical for revealing the zodiacal light.

Author tip:
A precious and fleeting sight, photographing the zodiacal light is all about timing and location. To capture it in spring (late February to late March is best) in the northern hemisphere – when it’s known as the ‘false dusk’ – you need to be in a very dark location (such as Starlight Reserve or a Dark Sky Park) free from light pollution, in the week before New Moon, in the hour or two after sunset. Look west. In autumn, the ‘false dawn’ in autumn will be visible, again in moonless skies, in the east in the hour or two before sunrise.

Jamie Carter is a journalist and author focusing on stargazing and astronomy, astrophotography, and travel for Forbes Science, BBC Sky At Night magazine, Sky & Telescope, Travel+Leisure, and The Telegraph.
View all articles